The Strawberry Quilt – Pattern is a delightful and vibrant design that captures the charm of one of nature’s sweetest fruits.
Whether you’re an experienced quilter or a beginner ready to take on a cheerful new project, this pattern offers both creativity and simplicity.
The design typically features blocks or appliqués shaped like strawberries, often paired with greens and soft pinks that mimic a fresh berry patch.
Quilting with a Strawberry Quilt – Pattern brings a refreshing touch to home décor. From picnic blankets to baby quilts or even kitchen wall hangings, this playful theme fits well in both traditional and modern settings. It can be as whimsical or elegant as you wish, depending on your fabric selection and the structure of your pattern.
In this article, we’ll guide you through the essential aspects of the Strawberry Quilt – Pattern, including materials, construction steps, layout ideas, and helpful tips to personalize your creation. By the end, you’ll be equipped with all the knowledge needed to start stitching your very own strawberry-themed quilt.
1. Why Choose a Strawberry Quilt – Pattern?
The Strawberry Quilt – Pattern offers more than just aesthetic value—it provides a sense of joy, warmth, and even nostalgia. For many crafters, strawberries symbolize childhood, summer, and happy outdoor memories, making this quilt design deeply personal and evocative.
One of the biggest advantages of using a Strawberry Quilt – Pattern is its flexibility. You can go bold and bright with red strawberries on crisp white fabric or choose a softer palette with pastels and subtle floral prints. Either way, the design brings life and movement to any quilt.
Another reason quilters love this pattern is its seasonal charm. It’s especially popular in spring and summer, but can also be adapted for year-round display by adjusting color schemes. Think burgundy strawberries for fall, or even white strawberries with metallic accents for winter.
Additionally, this quilt pattern is a great project for both beginners and experienced quilters. It typically includes basic piecing or appliqué techniques that are easy to learn but still offer room for artistic flair and personalization.
Because the Strawberry Quilt – Pattern is so visually appealing, it makes a great gift idea. Quilts with strawberry themes are perfect for baby showers, birthdays, anniversaries, or housewarming gifts. Add a personalized label to make your quilt even more special.
Lastly, it’s a fantastic way to use up scrap fabric. The small shapes of strawberries and leaves can be made from leftover pieces of red, pink, green, or white fabric, making this pattern both cost-effective and eco-friendly.
2. Materials and Tools You’ll Need
To get started with your Strawberry Quilt – Pattern, you’ll need a selection of quality fabrics, basic quilting tools, and a little creativity. Good preparation ensures a smoother process and a more polished final quilt.
Start by selecting your main fabrics: red or pink for strawberries, green for leaves, and a neutral background fabric such as white, cream, or light gray. You can also add a print for the strawberry tops or use textured fabric to mimic seeds.
You’ll also need batting—a soft middle layer that gives your quilt warmth and structure. Cotton batting is great for this type of quilt since it’s breathable and easy to work with, especially for beginners.
Basic tools include a rotary cutter, cutting mat, and quilting ruler to help you cut pieces accurately. You’ll also need pins or clips, thread, and a sewing machine. Hand-sewing is also an option for smaller details or appliqué work.
If your pattern uses appliqué techniques, you may need fusible web or interfacing to help attach the strawberry shapes to the background before sewing. This stabilizes the pieces and reduces fraying.
For the quilt backing, choose a fun, coordinating print or keep it simple with a solid color. Make sure it’s slightly larger than your quilt top to allow for adjustments during quilting and binding.
Finally, don’t forget binding strips to finish the edges of your quilt. These can match the background or contrast with a vibrant color for a bold border. Binding not only protects the edges but also frames the entire design beautifully.
3. Building the Strawberry Quilt Block
Once your materials are ready, it’s time to start crafting your Strawberry Quilt – Pattern blocks. These blocks may be pieced or appliquéd depending on your pattern’s instructions. Either way, they’re a lot of fun to create!
Step 1: Cutting Your Fabric. Use your rotary cutter and ruler to cut the necessary shapes: strawberry bodies (usually triangles or rounded hearts), leaf tops (half-moons or scallops), and background squares or rectangles. Be precise with your measurements for consistency.
Step 2: Appliqué or Piece the Strawberries. If using appliqué, position the strawberry and leaf shapes onto your background fabric using fusible web. Iron them down according to the product instructions, then secure with a zigzag or blanket stitch.
Step 3: Add Details. You can add embroidered seeds, use small black buttons, or create seeds with fabric paint or small pieces of fabric. These tiny touches bring realism and charm to each block.
Step 4: Join the Blocks. Once your blocks are complete, lay them out on a flat surface to determine the final layout. Alternate rows, mix in plain blocks, or add sashing between each strawberry to give the eye a place to rest.
Step 5: Layer the Quilt. Sandwich the quilt top with batting and your chosen backing fabric. Pin or baste securely to prepare for quilting. This is also a great time to do any hand-stitching or decorative quilting patterns.
Step 6: Quilting and Binding. Quilt as desired—either with straight lines that echo the shapes or free-motion patterns like vines or swirls. Finally, trim the edges and attach your binding to complete your beautiful strawberry quilt.
4. Creative Variations and Display Ideas
One of the joys of using the Strawberry Quilt – Pattern is how customizable it is. Here are several ways to make your quilt truly one-of-a-kind and suitable for any space or recipient.
Create a mini quilt or wall hanging for kitchens, nurseries, or craft rooms. Small strawberry blocks arranged on a canvas or embroidery hoop can bring joy to a tiny space and serve as a cheerful decoration.
Make a baby quilt using soft pinks and greens with flannel backing for extra coziness. Add the child’s name or birthdate with embroidered text to create a keepsake that will be treasured for years.
Design a picnic quilt using bold prints and durable cotton fabric. Strawberries are perfect for summer, and this kind of project is ideal for outdoor use or gifting to friends who enjoy garden gatherings.
Incorporate patchwork techniques to use up fabric scraps. Mix gingham, floral, polka dots, and solids to create an eclectic, vintage-inspired look. This also allows for more creative freedom in your design.
Turn your strawberry blocks into tote bags, pillow covers, or table runners. Even if you don’t want to make a full quilt, these smaller projects still capture the charm of the pattern in practical ways.
Add a themed border using vines, blossoms, or pieced berries. These extras create a more complex and finished look, especially if you’re entering the quilt in a fair or giving it as a showpiece gift.
FAQ – Frequently Asked Questions
Q1: Is the Strawberry Quilt – Pattern beginner-friendly?
Yes! Many versions are suitable for beginners, especially those that use simple piecing techniques. Appliqué may require practice, but it’s easy to learn with basic tools.
Q2: How long does it take to make a strawberry quilt?
Depending on size and complexity, it can take anywhere from a weekend to a few weeks. Baby quilts and mini wall hangings go faster than full-sized bed quilts.
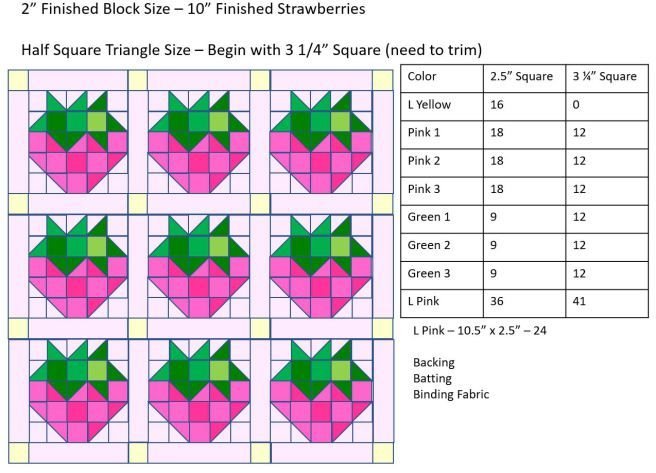
Q3: What size are the strawberry blocks usually?
Common block sizes range from 6” to 12”. You can adjust the size depending on the overall quilt dimensions you’re aiming for.
Q4: Can I use non-traditional colors for the strawberries?
Absolutely! Try pink, peach, or even blue for a modern twist. It’s your quilt, so feel free to get creative with your color choices.
Q5: What quilting pattern should I use?
Simple straight-line quilting works well, or try echoing the strawberry shapes. Free-motion quilting with vines or leaves can also enhance the garden theme.
Q6: Can I machine wash the finished quilt?
Yes, if you’ve used washable fabric and batting. Always pre-wash your fabric to reduce shrinkage, and wash the quilt on a gentle cycle in cold water.
Conclusion
The Strawberry Quilt – Pattern brings warmth, color, and charm into any quilting project. Whether you choose to make a small wall hanging or a full-size quilt, this design celebrates nature’s sweetness through every stitch. With options for beginners and plenty of room for creativity, it’s a project that’s as satisfying to make as it is to gift or display.
We hope this guide gave you all the inspiration and information needed to start your own Strawberry Quilt – Pattern today. If you found it helpful or
have tips and photos of your own quilt, please leave a sincere opinion or suggestions in the comments. Your ideas may inspire someone else’s next great project. Happy quilting! 🍓🧵
