The Swirl-Round Quilt Block – pattern is a captivating and unique design that brings a dynamic and vibrant touch to any quilting project.
This pattern is perfect for quilters who want to challenge themselves while creating something visually striking.
With its intricate curves and mesmerizing spiral effect, the Swirl-Round Quilt Block – pattern can be incorporated into a wide variety of quilt designs, from modern to traditional styles.
Whether you’re a beginner or an experienced quilter, understanding how to work with this pattern can greatly enhance your quilting skills.
In this guide, we will break down the key steps involved in creating the Swirl-Round Quilt Block – pattern, explain the materials and tools you need, and offer some tips for achieving the perfect block. With a focus on clarity and simplicity, this article is designed to help you understand the techniques required to master this intricate quilt block.
Before diving into the steps, it’s important to understand the significance of the Swirl-Round Quilt Block – pattern in quilting. This design is a beautiful representation of motion and fluidity, and it brings an air of sophistication to your quilting projects. As we go through the process of creating this block, you’ll learn how to approach it step by step, making it an enjoyable experience from start to finish.
1. Understanding the Swirl-Round Quilt Block – Pattern
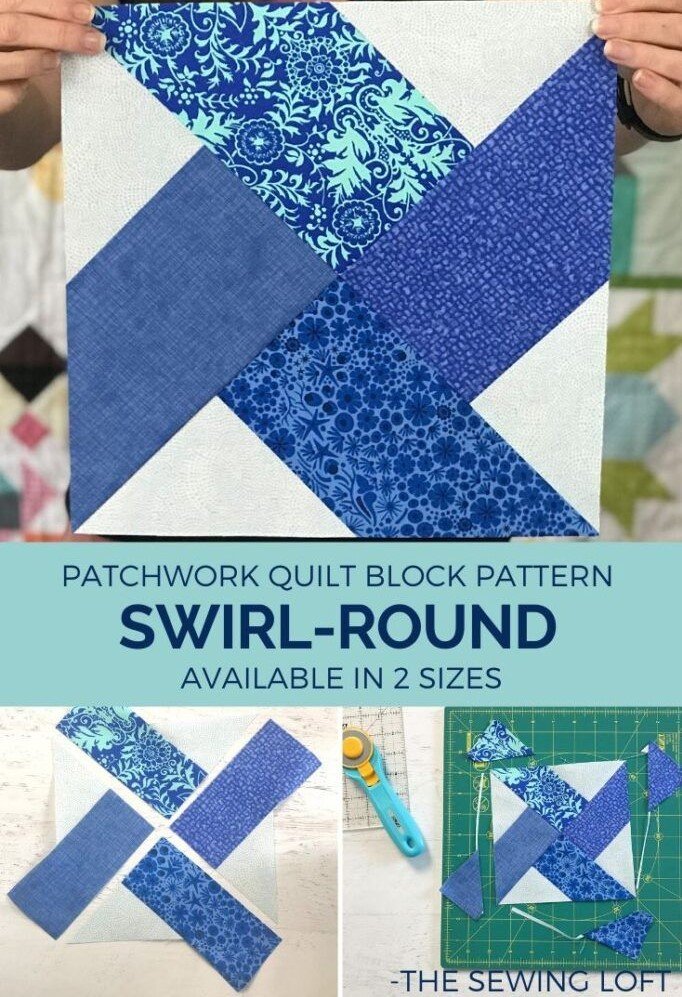
The Swirl-Round Quilt Block – pattern is a modern twist on traditional circular quilt designs. It features a spiral or swirling motion that gives the block its distinctive appearance. The pattern typically includes curved seams that require careful stitching, making it an excellent project for those looking to expand their quilting techniques. By creating a circular flow with contrasting fabrics, quilters can achieve a dynamic effect that draws the eye.
When working with the Swirl-Round Quilt Block – pattern, it’s essential to select fabrics that complement each other in both color and texture. Many quilters use a variety of fabrics that contrast in color to highlight the swirling effect. The use of contrasting fabrics ensures that the pattern stands out, giving the quilt a more vibrant and lively appearance.
Another important consideration when creating the Swirl-Round Quilt Block – pattern is the size of the block. The block’s dimensions can vary depending on the final quilt size you aim to achieve. Commonly, the Swirl-Round block is made in sizes such as 12 inches or 18 inches, but it can be adjusted to suit your personal quilting project.
This pattern also allows for a variety of design possibilities. While the traditional swirl design follows a set sequence, quilters can experiment with different shapes, such as combining the swirl with other quilt blocks or adding borders to enhance the overall design. The versatility of this block makes it a favorite among quilters who enjoy mixing traditional techniques with more contemporary styles.
2. Materials and Tools You Need for the Swirl-Round Quilt Block – Pattern
Before you begin your quilting project, it’s important to gather the right materials and tools. For the Swirl-Round Quilt Block – pattern, the following supplies will help you achieve the best results:
- Fabrics: Choose a combination of fabrics that create contrast and emphasize the swirling motion of the design. It’s often recommended to use 100% cotton quilting fabric for durability and ease of stitching.
- Rotary Cutter and Mat: These tools are essential for cutting fabric pieces with precision. A rotary cutter helps you create clean, accurate cuts for the curved shapes needed in this block pattern.
- Quilting Ruler: A quilting ruler with marked measurements will help you align your fabric pieces correctly and ensure consistent seam allowances.
- Thread: Select a high-quality cotton or polyester thread that matches your fabric. It’s important to choose thread that complements the colors of your quilt, but also one that has the strength to hold up through the stitching process.
- Sewing Machine: While you can hand-stitch the Swirl-Round block, using a sewing machine will speed up the process and create more consistent stitching, especially when working with curved seams.
- Pins or Fabric Clips: These are necessary for holding the fabric pieces in place as you sew, particularly when working with curves.
Having the right tools in place ensures a smooth quilting experience. Taking time to gather everything you need before you begin can help you avoid interruptions and keep your project on track.
3. Step-by-Step Guide to Creating the Swirl-Round Quilt Block – Pattern
Now that you have the materials ready, it’s time to start assembling your Swirl-Round Quilt Block – pattern. Follow these step-by-step instructions to guide you through the process:
1. Cutting the Fabric Pieces
Begin by cutting your fabric into strips that will form the swirls. The size of each strip will depend on the size of the block you’re making. Typically, each strip should be around 2 to 3 inches wide, but this may vary based on the design you’re creating.
2. Preparing the Curves
Once your fabric is cut, you will need to prepare the fabric for the curved seams. One popular method is to use a technique called “template piecing”, where you trace and cut out a curved template. Carefully pin the fabric strips along the curved template and begin sewing them together.
3. Sewing the Curved Seams
Sewing curves can be challenging, but it’s crucial to go slowly. Start by placing the fabric strips along the curve, and use your machine’s walking foot or a standard foot to stitch the seams. Make sure to press the seams flat after stitching to create smooth curves.
4. Assembling the Block
After all of the curved sections are sewn together, it’s time to assemble the entire block. Use the quilting ruler and mat to trim any excess fabric and ensure that all the pieces fit together accurately. Take your time to make sure everything lines up properly before moving to the next step.
5. Pressing and Final Adjustments
Press each seam carefully to avoid puckering, and make final adjustments as needed. A well-pressed block will help your Swirl-Round Quilt Block – pattern look professional and neat. Use a hot iron and steam to press the fabric without distorting the curves.
6. Finishing Touches
Once the block is assembled and pressed, add any additional borders or embellishments as desired. You can incorporate decorative stitches, applique designs, or even embroidery to personalize your Swirl-Round Quilt Block.
4. Tips for Perfecting the Swirl-Round Quilt Block – Pattern
Creating a Swirl-Round Quilt Block – pattern can be challenging, but with these helpful tips, you can improve your technique and ensure a flawless finish:
- Use Quality Fabrics: High-quality fabrics will make your quilt block easier to work with and result in a more polished look. Choose fabrics that are easy to sew and that complement each other well.
- Take Your Time with Curves: Sewing curves requires patience. Don’t rush the process, as taking your time will lead to better results. Use a gentle hand and sew slowly to maintain control.
- Press Frequently: Pressing your seams often will help prevent puckering and ensure that your block lays flat. Proper pressing is key to achieving clean, crisp seams.
- Practice on Scraps: If you’re new to curved piecing, practice on scrap fabric before starting on your main pieces. This will give you a feel for the technique and help you get comfortable with the process.
- Use a Walking Foot: A walking foot helps evenly feed the fabric through the sewing machine, especially when working with multiple layers or curved seams.
- Consider the Quilt’s Final Layout: Think about how the Swirl-Round Quilt Block – pattern will fit into your overall quilt design. Plan ahead to ensure that your blocks align properly with other blocks in the quilt.
FAQ
1. What is a Swirl-Round Quilt Block?
A Swirl-Round Quilt Block is a quilt block that incorporates a swirling, circular pattern. It typically features curved seams that give the block its dynamic, flowing appearance.
2. How do I sew curved seams in a quilt block?
To sew curved seams, use a gentle, slow sewing technique. Pin the fabric along the curve, and sew with a walking foot or regular sewing foot. Press the seams after each step to maintain smooth curves.
3. Can I use the Swirl-Round Quilt Block in other quilt patterns?
Yes! The Swirl-Round Quilt Block – pattern can be incorporated into larger quilt designs. You can combine it with other quilt blocks to create a more complex and interesting design.
4. What fabrics work best for the Swirl-Round Quilt Block?
100% cotton fabrics are highly recommended for quilt blocks. Choose fabrics with contrasting colors to highlight the swirling motion of the block and give it a dynamic look.
5. How do I avoid puckering when sewing curved seams?
To avoid puckering, make sure to press your seams regularly and sew slowly. It’s also helpful to use a walking foot for even fabric feeding and to avoid stretching the fabric.
Conclusion
The Swirl-Round Quilt Block – pattern is a stunning and versatile quilting design that allows you to create beautiful quilts with a unique, swirling effect. By understanding the materials, techniques, and tips involved in creating this block, you can confidently add it to your quilting repertoire. Whether you’re a beginner or an experienced quilter, the Swirl-Round Quilt Block – pattern is an enjoyable and rewarding project to tackle.
We hope this guide has provided you with valuable insight into creating the Swirl-Round Quilt Block. We would love to hear your thoughts and suggestions in the comments section. Happy quilting!