The Time to Bloom Quilt – pattern is a celebration of color, nature, and the joy of creative expression through quilting.
Inspired by spring’s gentle arrival and the blooming of flowers, this quilt design is perfect for anyone looking to bring a bit of brightness and beauty into their sewing projects.
Whether you’re an experienced quilter or just getting started, this pattern is approachable, engaging, and rewarding.
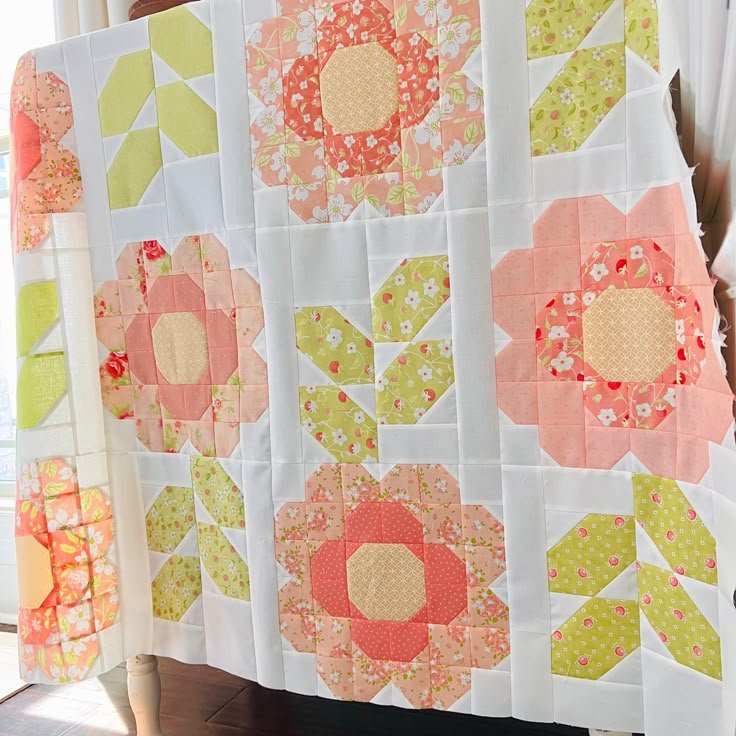
Designed to capture the essence of floral growth and seasonal transformation, the Time to Bloom Quilt – pattern typically features appliqué or pieced floral blocks arranged in a harmonious layout. The result is a quilt that feels both fresh and timeless—perfect for decorating your home or gifting to a loved one. Many crafters find that working on this project offers not just a creative outlet, but also a moment of peace and mindfulness.
In this article, we’ll explore what makes the Time to Bloom Quilt – pattern so beloved, what materials you need to get started, how to assemble it block by block, and the many ways you can personalize the final quilt. Whether you follow a published pattern or create your own version, this guide will give you the confidence and inspiration to bring your blooming masterpiece to life.
1. Why the Time to Bloom Quilt Is So Loved
The Time to Bloom Quilt – pattern is popular among quilters for its charming floral theme and the emotional warmth it conveys. This pattern often tells a story—of growth, renewal, and creativity—making it more than just a functional textile.
At its core, this quilt symbolizes hope and fresh beginnings. Many quilters choose this pattern during seasonal transitions, especially from winter to spring, as a way to reconnect with nature and rejuvenate their space.
The design usually incorporates floral blocks, vines, and leaves, either through appliqué or traditional piecing. These motifs not only look beautiful but also offer a chance to play with vibrant, cheerful fabrics in a structured yet artistic format.
Unlike some overly complex designs, the Time to Bloom Quilt – pattern strikes a balance between challenge and accessibility. Intermediate quilters can comfortably work on it, and beginners willing to take on a bit more detail find it a manageable introduction to floral quilting.
Another reason this quilt stands out is its versatility. While floral quilts are often associated with feminine or vintage aesthetics, this pattern adapts beautifully to a range of color palettes—from bold and modern to soft and pastel.
Perhaps most importantly, it’s a quilt that brings people joy. Whether draped over a couch, hung on a wall, or gifted to someone special, the Time to Bloom Quilt carries a message of love and artistry stitched into every inch.
2. Materials and Tools to Start Your Blooming Journey
Before you begin stitching your Time to Bloom Quilt – pattern, it’s important to gather the right tools and materials. Preparation sets the stage for an enjoyable quilting experience and helps ensure a professional-looking finish.
Start with your fabric selection. Since this quilt is floral-themed, many choose bright, nature-inspired fabrics—think pinks, yellows, greens, blues, and purples. Look for a mix of prints and solids to add depth and contrast to your blooms and background.
You’ll also need a good-quality quilting cotton for the background fabric. Neutral tones like white, cream, or light grey tend to work well, allowing the floral motifs to stand out clearly against the backdrop.
Basic quilting tools are a must: a rotary cutter, cutting mat, and acrylic rulers will help you cut precise pieces. If the pattern includes appliqué, you’ll also want fabric scissors, fusible web, and an iron for pressing your designs into place.
A reliable sewing machine with a straight stitch is essential. If you plan to add decorative stitches around your appliqué, make sure your machine includes those functions. Some quilters also enjoy hand-stitching elements for a softer, heirloom look.
Batting and backing fabric are required to complete your quilt sandwich. Choose a batting that matches your desired thickness and warmth. For backing, a coordinating or contrasting fabric can add an extra touch of detail to your quilt’s underside.
Lastly, gather your pattern instructions. Whether you’re using a digital file or a printed version, make sure the Time to Bloom Quilt – pattern is easy to read and includes diagrams, templates, and clear measurements.
3. Step-by-Step: Assembling the Time to Bloom Quilt
Creating your Time to Bloom Quilt – pattern is a joyful process that unfolds block by block. Each stage brings you closer to a finished piece that is as meaningful as it is beautiful. Here’s a general guide to get you started.
Begin by cutting out your fabric pieces according to the pattern. If you’re doing a pieced version of the quilt, cut all necessary squares, triangles, and rectangles. For appliqué styles, prepare your fabric shapes and attach fusible web as needed.
Assemble the individual blocks. If you’re working with appliqué, place your floral motifs on the base square and press them in place. Use a decorative stitch like a zigzag or blanket stitch to secure the edges. For pieced flowers, stitch together smaller components—such as petals and centers—before joining them into full blocks.
Once your blocks are ready, arrange them in rows or a layout that suits your quilt size. Many Time to Bloom Quilt – patterns feature repeating blocks with sashing or border strips in between, creating a garden-like grid.
Sew your blocks together, row by row, pressing the seams as you go. Pay attention to alignment—flowers and vines should appear balanced and evenly spaced for the best visual impact.
Add any borders or accent strips called for in the pattern. This is a great time to use a bold or patterned fabric that frames your floral blocks and ties all your colors together.
Finally, layer your quilt top with batting and backing fabric, then quilt as desired. You can stitch-in-the-ditch for a subtle effect or add custom free-motion quilting for extra flair. Bind the edges, and your blooming quilt is complete!
4. Creative Ways to Use and Display Your Time to Bloom Quilt
Once your Time to Bloom Quilt – pattern is finished, there are endless ways to use and display your creation. A well-made quilt can enhance any space while showcasing your craftsmanship and personal style.
One of the most popular uses is as a seasonal throw or bed topper. Drape your Time to Bloom Quilt over a couch, bed, or chair to add a cheerful burst of color and texture to any room—especially during spring or summer.
If your quilt is on the smaller side, consider turning it into a wall hanging. Use a sleeve on the back to hang it on a rod, or attach it with quilt clips for an elegant home decor piece that changes with the seasons.
You can also give your quilt as a heartfelt gift. Floral quilts are perfect for birthdays, housewarmings, baby showers, or even as a “thinking of you” gesture. Handmade items carry deep meaning and are always appreciated.
For a more functional approach, transform your quilt into a picnic blanket or table cover. The floral motifs feel right at home in an outdoor setting, and the durable quilting ensures it can withstand plenty of use.
If you’re a seller or designer, use the Time to Bloom Quilt – pattern to create items for craft fairs or online shops. Many people are drawn to floral designs for their timeless appeal and decorative versatility.
Lastly, don’t forget to photograph your quilt! Share your creation on social media or quilting forums to inspire others, get feedback, and connect with fellow quilters from around the world.
FAQ – Time to Bloom Quilt – Pattern
Q1: Is the Time to Bloom Quilt suitable for beginners?
Yes, depending on the version. Some patterns are beginner-friendly, especially those using simple piecing. Appliqué styles may be better for intermediate quilters.
Q2: What size is the finished quilt?
The size varies depending on the pattern, but common dimensions range from 60″ x 60″ for a lap quilt to 80″ x 80″ or larger for a bed-sized version.
Q3: Can I use scraps for this quilt?
Definitely! The floral blocks are perfect for using up colorful fabric scraps. Just make sure your background fabrics are consistent for a unified look.
Q4: How long does it take to make the Time to Bloom Quilt?
Time varies by skill level and available hours. On average, quilters can finish it in a few weeks to a couple of months, depending on complexity and size.
Q5: Can I modify the flower designs?
Absolutely! You can substitute different floral blocks, change the number of petals, or adjust colors to make the quilt your own.
Q6: Where can I find the Time to Bloom Quilt – pattern?
Look for it on quilting blogs, Etsy, pattern books, or directly from designers’ websites. Many also include digital versions for immediate download.
Conclusion
The Time to Bloom Quilt – pattern offers quilters a chance to create something deeply beautiful, symbolic, and personal. From fabric selection to final stitches, every step of the journey invites creativity and mindfulness. Whether you follow a detailed pattern or take artistic liberties, the finished quilt is sure to become a cherished piece in your collection or a treasured gift for someone special.
We hope this article has inspired and guided you through the essentials of the Time to Bloom Quilt.