If you’re passionate about sewing, crafting, or mending on the go, then the Travel Sewing Case – Pattern is an essential project for your handmade toolkit. With this compact and stylish case, you can carry your needles, threads, scissors, buttons, and other notions wherever you travel.
It’s both practical and creative—something every crafter will love having by their side.The beauty of the Travel Sewing Case – Pattern is how customizable it is.
Whether you prefer soft fabric pouches, roll-up designs, or structured zippered organizers, there’s a version out there (or one you can design yourself) that suits your style and skill level. From weekend getaways to emergency fixes at events, a travel sewing case keeps your materials neatly in place and ready for action.
This article will walk you through why this project is worth making, the ideal materials you’ll need, how to follow a pattern step by step, and creative ways to personalize and use your travel sewing case. Stick around to explore the Travel Sewing Case – Pattern in detail—and don’t miss the FAQ at the end for the most common questions about this clever crafting solution.
1. Why Choose a Travel Sewing Case – Pattern?
Choosing to make a Travel Sewing Case – Pattern isn’t just about crafting a functional item—it’s about preparing yourself to sew or mend anytime, anywhere. Having a portable kit means you’ll never be caught off guard when a button pops or a hem loosens during your travels.
This pattern is perfect for both beginners and experienced sewists. It’s a manageable, rewarding project that doesn’t require expensive tools or materials. In fact, many people use leftover fabric scraps or upcycle old clothing to create a unique and sustainable sewing case.
If you love giving handmade gifts, this is a winner. A travel sewing case is thoughtful and practical—a great present for a sewing enthusiast, a fashion student, a traveler, or even someone heading off to college. Personalize it with embroidery or printed fabric for a truly special touch.
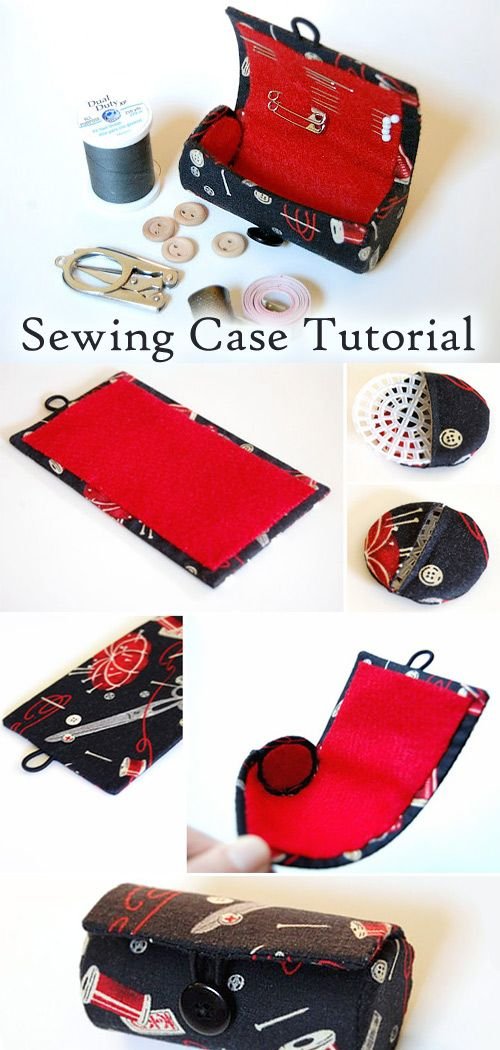
Another major perk of this pattern is organization. The compartments, pockets, and sections are designed specifically for sewing tools. No more tangled threads or misplaced needles. Everything stays put, visible, and easy to access—especially useful on the road.
Crafting your own travel sewing case also saves money. Ready-made sewing kits can be pricey, and they often don’t include the storage you really need. With a homemade case, you can design the exact size and layout you prefer.
Lastly, sewing this case is just plain fun. It’s a low-pressure, low-cost project that lets your creativity shine. From choosing fabrics to deciding on snaps or zippers, you’ll enjoy every step of making your very own Travel Sewing Case – Pattern.
2. Materials You Need to Make a Travel Sewing Case
Starting your Travel Sewing Case – Pattern begins with selecting the right materials. Fortunately, you don’t need much—just a few fabric pieces, basic notions, and your creativity to bring this handy item to life.
Start with your fabric. Cotton, canvas, or denim are great choices for durability and flexibility. Choose a sturdy fabric for the outside and a lighter one for the lining. You can mix prints, go with solid colors, or even repurpose old clothing or fabric swatches.
You’ll need interfacing to give the case structure and keep it from sagging or folding. Fusible interfacing works well and is easy to apply with an iron. It helps keep your sewing tools protected and gives your case a professional, polished finish.
A zipper or button closure is essential to secure your sewing kit while traveling. Choose a zipper that complements your fabric or adds contrast for a pop of color. If you prefer a rustic look, fabric ties or elastic loops with buttons also work beautifully.
Inside, you’ll want pockets or elastic bands to hold your supplies. Use smaller fabric pieces to sew flat or pleated pockets, or insert elastic strips to hold spools of thread, seam rippers, or marking pens in place. Clear vinyl can be used for a see-through section, too.
Don’t forget your tools! While they’re not part of the pattern itself, you’ll want to stock your finished case with essentials: needles, scissors, thread, safety pins, a measuring tape, and maybe a tiny thimble. You can customize your pocket sizes to fit whatever you plan to carry.
Last but not least, grab your Travel Sewing Case – Pattern. You can find plenty of printable versions online (free and paid), or sketch your own based on the tools you use. With your materials ready, it’s time to sew something functional, compact, and totally you.
3. How to Follow a Travel Sewing Case – Pattern
Using a Travel Sewing Case – Pattern might look complex at first, but it’s actually a beginner-friendly project when broken into steps. Here’s a general guide that you can adapt depending on the pattern or design you’re using.
First, cut out your fabric pieces according to your pattern. You’ll usually need a front, back, interior, lining, and interfacing. Some patterns may also include additional flaps, fold-over sections, or even a handle. Double-check your pattern’s instructions to avoid cutting errors.
Iron on your interfacing to the outer and/or lining pieces to add structure. This is a crucial step that ensures your finished case isn’t floppy or unbalanced. Be careful with heat settings and press, don’t drag, to avoid shifting your materials.
Sew the interior compartments next. This includes the pockets, elastic bands, or vinyl sections. Attach them to the inside lining fabric before assembling the case itself. Pay attention to spacing so your tools fit snugly without overcrowding the layout.
Now you’re ready to construct the case. Pin or clip the outer pieces together (right sides facing), and sew around the edges, leaving a gap for turning. For zippered versions, insert the zipper before sewing the case closed.
Once the case is sewn, trim any excess threads, clip corners for a cleaner turn, and turn your project right-side out. Iron it flat, paying attention to seams and corners. Topstitch around the edge if desired for extra strength and a clean finish.
Finally, fill your travel sewing case with the essentials. Place each item in its designated pocket, make sure everything closes securely, and enjoy your handmade, personalized sewing companion—ready for all your adventures.
4. Creative Ways to Customize Your Travel Sewing Case
One of the joys of working with a Travel Sewing Case – Pattern is how easy it is to personalize. Whether you want something bold and fun or sleek and minimalist, your sewing case can reflect your unique style and needs.
Start by choosing a theme. Are you a fan of florals? Go with vintage-inspired fabric. Want something modern? Try geometric patterns or monochrome colors. Animal lovers might choose prints with cats, birds, or even sewing-themed designs like spools and scissors.
Add labels or tags to each section. You can embroider words like “Needles,” “Threads,” or “Pins” next to each pocket, making it even easier to organize. Labels add charm and functionality—and they’re especially helpful for beginners or kids.
Include a built-in pincushion. Sew a small padded rectangle into the center of your case for easy access to pins and needles. Use felt or fleece, and fill it with polyester stuffing or even crushed walnut shells for a professional feel.
If you’re handy with embroidery, stitch your initials or a design onto the outside of the case. It’s a great way to personalize the case or make it a thoughtful gift. You could also add lace, buttons, or even appliqué for decorative flair.
Want more functionality? Add a small removable pouch with a snap or zipper. This can hold sharp items like scissors or extra buttons and can be taken out separately for quick fixes without bringing the whole case.
Don’t forget about size variations. You can make a mini case for your purse or a larger version for your suitcase. Having a travel-sized sewing kit tailored to your exact needs means you’ll always be prepared—whether at a hotel, on a plane, or backstage at a performance.
FAQ: Travel Sewing Case – Pattern
Q1: Is a travel sewing case hard to make for beginners?
Not at all! Most Travel Sewing Case – Patterns are beginner-friendly and require only basic sewing techniques like straight stitching and zipper insertion.
Q2: What should I include in a travel sewing case?
Essential items include needles, thread, small scissors, pins, buttons, a seam ripper, and safety pins. Customize it based on your needs and space.
Q3: Can I make a no-zipper version?
Yes! Velcro, snaps, fabric ties, or elastic loops can be used as closures if you’re not comfortable sewing zippers.
Q4: Where can I find a good Travel Sewing Case – Pattern?
There are many free and paid patterns available on blogs, Etsy, Pinterest, and crafting sites. Look for one with clear instructions and a materials list.
Q5: Can I wash my fabric sewing case?
Yes, if you use washable fabrics and materials. Just avoid machine drying if your case has delicate features or interfacing that may shrink.
Q6: Can I sell travel sewing cases I make?
Absolutely! Just ensure the Travel Sewing Case – Pattern you use allows for commercial use. Always credit the designer if required.
Conclusion
The **Travel Sewing Case –
Pattern** is a fantastic DIY project that combines creativity, organization, and utility into one neat package. From choosing the perfect fabrics to adding personal touches, each step of making your own case is deeply satisfying—and the result is something you’ll use for years to come.
We’ve covered why you should make one, what materials to use, how to follow a basic pattern, and ways to personalize your sewing case. Whether you’re a novice or a seasoned sewist, this is one project that checks every box: fun, practical, and totally customizable.
We’d love to hear your thoughts! If you’ve tried a Travel Sewing Case – Pattern, please share your honest opinion and creative suggestions in the comments. Your experience could inspire someone else to start their own project today.