If you’re looking to add a handmade, eye-catching touch to your table decor, this Tutorial, DIY, Step by Step Star Shaped Centerpiece – Pattern is the perfect project. Whether for holiday celebrations, dinner parties, or everyday beauty, this star-shaped design brings elegance and charm to any table setting. The best part? It’s beginner-friendly, fun to make, and doesn’t require advanced sewing or crafting skills.
Creating your own star shaped centerpiece offers the satisfaction of crafting something truly personal. With just a few tools, some fabric or felt, and this detailed tutorial, you can build a beautiful piece that’s reusable, customizable, and ideal as a gift or home decor accent. The step-by-step approach ensures that even those new to sewing or crafting can follow along with ease.
In this article, we’ll walk you through the entire Tutorial, DIY, Step by Step Star Shaped Centerpiece – Pattern, including tools you’ll need, materials to choose, cutting and assembly instructions, as well as tips to personalize your piece. You’ll also find a handy FAQ section and a final recap to wrap everything together. Let’s get started on bringing this stunning centerpiece to life.
1. Materials and Tools You’ll Need
Before jumping into the process, it’s important to gather the right materials and tools. For this Tutorial, DIY, Step by Step Star Shaped Centerpiece – Pattern, you won’t need anything too fancy—just basic crafting or sewing supplies.
Start with fabric or felt in two or three coordinating colors. Cotton fabrics are popular for their durability and easy handling, while felt adds a rustic, cozy look that’s perfect for holidays or seasonal décor. Choose colors that match your dining room or festive theme.
You’ll also need interfacing or batting to give your centerpiece structure. This keeps the star shape flat and crisp on the table, while adding a touch of softness and volume. Lightweight fusible interfacing works great for beginners.
For cutting, make sure you have a rotary cutter or sharp scissors. Accuracy is key for symmetrical pieces, especially when creating points on a star. A cutting mat and clear quilting ruler will also help maintain precision.
A sewing machine is optional but recommended for stronger seams and faster assembly. If you prefer, you can hand sew using a strong thread and a fine needle. Embroidery thread can add decorative flair if you want visible stitching.
Other helpful tools include fabric pins, a hot iron, and a star template. You can either draw your own star pattern or download one online. Just be sure the size matches the look you want for your finished centerpiece.
Once you have everything ready, you’re set to begin the fun part—cutting and creating your star shaped centerpiece!
2. Cutting and Preparing Your Star Pieces
With your materials ready, it’s time to start cutting the fabric for your Tutorial, DIY, Step by Step Star Shaped Centerpiece – Pattern. Precision is key here—clean edges and symmetrical shapes will make the final result much more professional.
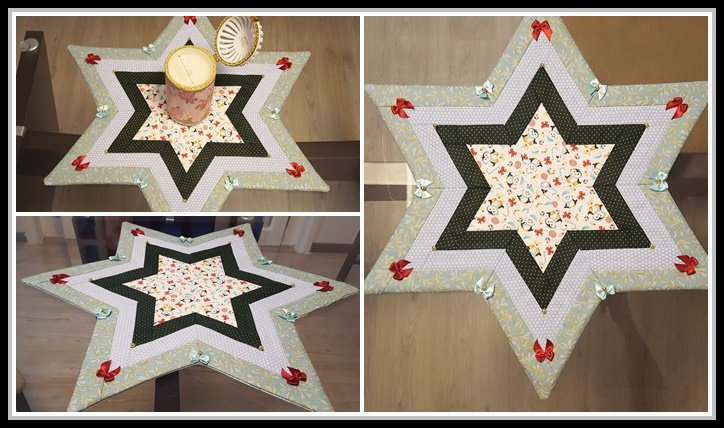
Begin by selecting your star template. A five-point or six-point star works well, but feel free to experiment with more elaborate designs if you’re feeling confident. Trace your star shape onto the wrong side of your fabric using a fabric marker or chalk.
Cut two identical star shapes from your main fabric. These will form the front and back of your centerpiece. If you’re using different fabrics for a reversible look, cut one from each fabric. This adds versatility and seasonal charm.
Next, cut a matching star from your batting or interfacing. If using fusible interfacing, you can iron it onto the wrong side of one fabric star following the product instructions. This gives your centerpiece body and helps it lay flat.
If you’re planning to add a border or trim—like lace, rickrack, or piping—pin it around the edge of one star shape now. Make sure the decorative edge faces inward, as it will turn out when the piece is flipped right side out after sewing.
Once all pieces are cut and prepped, stack them in this order: one fabric star right side up, the second fabric star right side down on top, and the batting or interfacing on the very top. Pin everything together securely.
Leave a 2–3 inch opening in one of the straight sides of a star point. This will be your turning hole. You’re now ready to move on to sewing your DIY star centerpiece together.
3. Sewing and Assembling the Centerpiece
This part of the Tutorial, DIY, Step by Step Star Shaped Centerpiece – Pattern focuses on sewing the pieces together. Whether you’re using a machine or sewing by hand, slow and steady stitching will yield the best results.
Start sewing from one side of the opening, following the star outline as closely as possible. Take your time when you reach the corners—pivot carefully to maintain clean, sharp points. A shorter stitch length helps with tighter turns and smoother curves.
Once you’ve sewn all the way around—except for the opening—trim the excess fabric near the corners. Be careful not to cut through your stitches. Clipping the inner corners and notching the outer points helps the star turn out crisp and symmetrical.
Now turn your star right side out through the opening. Use a chopstick, pencil, or corner-turning tool to gently push out the star points. Take your time here; rushing can stretch or distort the shape.
Give your piece a good press with a hot iron. Make sure all edges are flat and the corners are neat. If you used fusible interfacing, this is a great time to secure everything in place fully.
To close the turning hole, fold in the raw edges and stitch it shut with a small invisible hand stitch or topstitch around the edge for a decorative finish. This step not only seals the hole but can also add a touch of style.
At this point, your star shaped centerpiece is complete! You can leave it as-is, or move on to adding embellishments like buttons, embroidery, or seasonal accents for a more festive look.
4. Personalization and Decorative Ideas
Now that you’ve completed the basics of the Tutorial, DIY, Step by Step Star Shaped Centerpiece – Pattern, it’s time to let your creativity shine. There are so many ways to personalize your centerpiece and make it uniquely yours.
One fun idea is to embroider names or messages onto the fabric. This is great for holiday table settings, weddings, or birthday celebrations. You can use a simple backstitch or even machine embroidery for speed and accuracy.
Another option is to add decorative trim around the edges. Consider using gold or silver thread, lace, or metallic bias tape to give your centerpiece a festive sparkle. Ribbon bows at each point can also add a charming touch.
For seasonal flair, swap out fabrics based on holidays—reds and greens for Christmas, orange and brown for autumn, pastels for spring. Reversible designs allow you to get multiple uses from one item just by flipping it over.
You can also experiment with layered star shapes. Stack a smaller star on top of a larger one using a contrasting fabric and sew it in place. This creates a dimensional, eye-catching effect that looks great on rustic or farmhouse-style tables.
Add texture with quilting or topstitching. Stitching along the star’s edges or across its center in patterns like snowflakes, flowers, or geometric lines can make your centerpiece stand out even more.
Lastly, turn your star into a functional item by using it as a base for candles, vases, or small trays. You could even add pockets to the points for cutlery or holiday treats. The possibilities are endless!
FAQ – Tutorial, DIY, Step by Step Star Shaped Centerpiece – Pattern
Q1: Is this star-shaped centerpiece suitable for beginners?
A1: Yes! This pattern is beginner-friendly and doesn’t require complex sewing techniques. Even those new to sewing or crafting can complete it successfully.
Q2: Can I hand sew the centerpiece instead of using a machine?
A2: Absolutely. Hand sewing works well for this project. Just be sure to use strong thread and tight stitches for durability.
Q3: What type of fabric is best for this pattern?
A3: Cotton fabric or felt is ideal. They’re easy to work with and hold the star shape well. Avoid slippery or stretchy fabrics.
Q4: How do I make the star look symmetrical?
A4: Use a printed or measured star template, and cut your fabric carefully. Pressing and clipping corners helps achieve clean points.
Q5: Can I wash the finished centerpiece?
A5: Yes, but it depends on the materials used. Machine washable fabrics and batting are best. Hand washing is recommended for items with embellishments.
Q6: What size should I make the star?
A6: That depends on your table size. A good rule of thumb is 12 to 16 inches across for small tables, and 18 to 24 inches for larger centerpieces.
Conclusion
This Tutorial, DIY, Step by Step Star Shaped Centerpiece – Pattern gives you everything you need to create a beautiful, handmade addition to your home. From choosing fabrics and cutting with care to sewing and personalizing the final piece, each step is designed to be approachable, creative, and fulfilling.
Whether you’re decorating for the holidays, giving a handmade gift, or just adding
charm to your own dining table, this project is a great way to explore your creativity and enjoy the process of making something special.
If you enjoyed this guide or tried the pattern yourself, we’d love to hear your feedback! Leave your honest opinion and share any suggestions or ideas you have—we’re always looking to improve and inspire the crafting community.
Happy crafting! 🌟