The Weathervane Quilt Block – Pattern is a timeless and versatile quilting design that adds a touch of elegance to any quilt.
Whether you’re a seasoned quilter or just starting, this block is a great way to learn new techniques while creating a beautiful and meaningful piece of art.
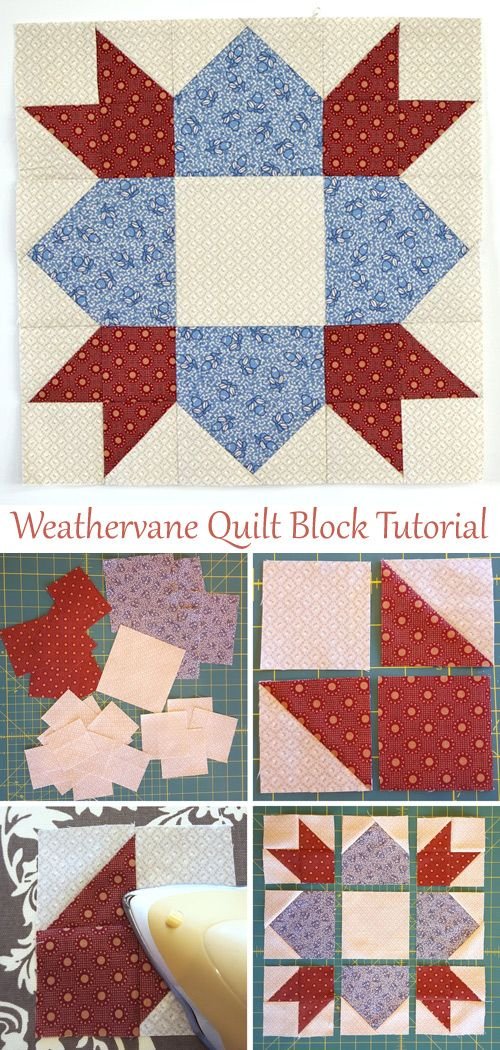
Inspired by the shape of traditional weathervanes, this block features a unique arrangement of shapes that create a stunning visual impact.
The Weathervane Quilt Block – Pattern can be used in various quilting projects, from bed quilts to wall hangings, and is perfect for both beginners and experienced quilters alike. The beauty of this design lies in its simplicity, combined with the versatility to adapt to a wide range of color schemes and fabric choices. This article will guide you through the process of creating this classic block, from gathering materials to assembling the block, and even offer tips on how to incorporate it into larger quilt designs.
Quilting, in general, is a wonderful way to express creativity and produce functional art. The Weathervane Quilt Block – Pattern can be easily adapted to fit different themes or color palettes, making it an ideal choice for quilters looking to create something unique. Whether you want a traditional look or a more modern twist, this pattern offers endless possibilities for customization.
1. Materials Needed for the Weathervane Quilt Block
Before you begin your journey into creating the Weathervane Quilt Block – Pattern, it’s important to gather the right materials. Using high-quality fabrics and the correct tools will ensure that your quilt block turns out beautifully and lasts for years to come.
Fabric Selection
The first step in creating your Weathervane Quilt Block – Pattern is choosing the right fabric. For this block, it’s recommended to use quilting cotton fabric for its durability and easy handling. You’ll need a variety of fabrics, including a background fabric and several contrasting fabrics for the shapes that make up the weathervane design. When choosing your fabrics, consider the overall color scheme and how the colors will interact with one another. Bright, bold colors can create a modern look, while more muted tones work well for a traditional style.
Rotary Cutter and Cutting Mat
A rotary cutter is an essential tool when creating quilt blocks. It allows for precise cuts and helps you cut fabric pieces quickly and efficiently. Pair your rotary cutter with a self-healing cutting mat to protect your work surface and ensure accuracy. Accurate cutting is key to creating well-aligned quilt blocks.
Quilting Ruler
A quilting ruler is another must-have tool for the Weathervane Quilt Block – Pattern. It helps ensure straight and consistent cuts for your fabric pieces. Look for a ruler with both inch and centimeter markings for greater flexibility, and choose one that’s long enough to cover the full length of your fabric pieces.
Thread and Sewing Machine
Choose a thread color that matches or complements your fabric colors for the sewing process. It’s advisable to use high-quality quilting thread, as it’s strong and durable. A sewing machine with a straight stitch is all you need for this pattern, though if you wish to add decorative stitching, you can opt for a machine that offers additional stitch options.
Iron and Ironing Board
Pressing your fabric pieces is an important step in quilting. A well-pressed quilt block will help ensure your seams are flat and your block pieces align properly. Invest in a good iron and ironing board to make the process easier. Pressing after each step helps to keep your work neat and professional.
2. How to Assemble the Weathervane Quilt Block
Now that you have all your materials ready, it’s time to dive into assembling the Weathervane Quilt Block – Pattern. This block is made up of several triangles and squares arranged in a unique way to form the weathervane shape.
Step 1: Cutting the Fabric Pieces
Start by cutting your fabric into the required shapes for the Weathervane Quilt Block – Pattern. Typically, you’ll need squares and triangles. Use your rotary cutter, quilting ruler, and cutting mat to accurately cut the fabric pieces. Make sure to follow the pattern’s measurements carefully to ensure all pieces fit together properly. If you’re using multiple colors, keep the pieces organized to avoid confusion.
Step 2: Sewing the Triangles
The next step is to sew the triangles together. Start by stitching the smaller triangles to the larger ones to form half-square triangles or other shapes as indicated in your pattern. Press the seams as you go to keep everything flat and neat. This step is crucial for ensuring that the overall block remains aligned and the seams match up correctly.
Step 3: Assembling the Block
Once you’ve completed the individual pieces, start piecing them together to form the Weathervane Quilt Block – Pattern. You’ll need to sew the triangles and squares in a specific arrangement to form the iconic weathervane design. Take your time and carefully align the seams before sewing to ensure that everything fits together properly. Use pins or clips to hold the pieces in place while sewing.
Step 4: Pressing the Seams
After each seam, press the fabric with your iron. Pressing each seam flat helps to ensure that your block stays square and that the fabric doesn’t bunch up or shift during the sewing process. Be sure to press seams toward the darker fabric when possible to avoid creating bulky seams.
Step 5: Square Up the Block
Once all the pieces are sewn together, it’s time to square up the block. Use your quilting ruler to measure and trim the block to the correct size. This step is crucial for making sure your Weathervane Quilt Block – Pattern fits perfectly into the rest of the quilt. Trimming the block ensures that all the edges are even and aligned.
Step 6: Repeat for Multiple Blocks
To make a full quilt, you’ll need to repeat the process for as many blocks as your quilt design calls for. Once you have all your blocks made, lay them out in the arrangement you prefer, and sew them together to create your quilt top.
3. Tips for Success with the Weathervane Quilt Block
To ensure that your Weathervane Quilt Block – Pattern turns out perfectly, here are some useful tips for success.
1. Take Your Time with the Cutting
Accurate cutting is essential for making sure the pieces fit together properly. Take your time and double-check your measurements before cutting the fabric. A slight mistake in the cutting process can lead to misaligned blocks later on.
2. Use a Consistent Seam Allowance
Be sure to use a consistent seam allowance throughout the quilt block. Typically, a quarter-inch seam allowance is used for quilting, but be sure to follow the pattern’s instructions if they differ. Using the same seam allowance consistently will ensure your blocks are uniform in size.
3. Press After Every Step
Pressing is one of the most important steps in quilting. Press after each seam to ensure your block stays neat and your seams stay flat. This will help prevent puckering and ensure a professional-looking quilt.
4. Experiment with Fabrics
The Weathervane Quilt Block – Pattern is versatile and can be customized with a variety of fabrics. Experiment with different color schemes, fabric prints, and textures to create a quilt that reflects your personal style. Don’t be afraid to mix traditional and modern fabrics for a unique twist.
5. Measure Your Block Frequently
As you sew your block, measure it frequently to ensure it remains the correct size. It’s easy for blocks to become stretched or uneven during the sewing process, so measuring every few steps can help you catch any issues early.
6. Have Patience
Quilting can be a time-consuming process, especially when working with more intricate designs like the Weathervane Quilt Block – Pattern. Be patient and take your time to ensure each step is done correctly. The effort you put in will be reflected in the final product.
4. Creative Ideas for Using the Weathervane Quilt Block
The Weathervane Quilt Block – Pattern is incredibly versatile and can be incorporated into many different quilt designs. Here are some creative ideas for using this block in your next quilting project.
1. Create a Quilt with a Weathervane Theme
Use the Weathervane Quilt Block – Pattern to create a quilt entirely made of these blocks. You can use a traditional color scheme, or mix and match modern fabrics to create a more contemporary look. This type of quilt will have a cohesive and visually striking theme.
2. Add Borders for Extra Detail
Consider adding a border around your quilt blocks to frame the design and give your quilt a polished, finished look. You can choose a contrasting color or use fabric from the same color palette to add subtle depth.
3. Use the Block for a Table Runner
If you want to create something smaller, try using the Weathervane Quilt Block – Pattern to make a table runner or placemats. This is a great way to practice your quilting skills while creating a functional, decorative item for your home.
4. Incorporate the Block in a Quilt-as-You-Go Project
For a faster quilt-making process, you can use the quilt-as-you-go method to create the Weathervane Quilt Block – Pattern. This technique allows you to quilt each block as you make it, saving time when assembling the quilt top.
5. Create a Pillow Cover
Another fun idea is to use the Weathervane Quilt Block – Pattern to make a decorative pillow cover. This is a great way to add personalized touches to your living space without the need for a full quilt.
6. Experiment with Alternate Block Arrangements
To change up the traditional layout, try arranging the Weathervane Quilt Block in different configurations. Play with diagonal or zigzag patterns for a modern twist on the classic design.
FAQ: Common Questions About the Weathervane Quilt Block
Q1: Can I use other fabrics for the Weathervane Quilt Block?
A: Yes! While quilting cotton is recommended, you can experiment with other fabric types, such as flannel or linen,
for a different look and feel.
Q2: How do I make my Weathervane Quilt Block larger?
A: To make the block larger, simply increase the size of the individual fabric pieces while maintaining the proportions of the pattern.
Q3: How can I make my Weathervane Quilt Block more colorful?
A: Experiment with different color combinations and fabric prints for a vibrant and eye-catching quilt. You can use different colors for each triangle or keep a cohesive color palette for a more uniform look.
Q4: How do I keep my seams from puckering?
A: Make sure your fabric is cut accurately, press your seams after each step, and use a consistent seam allowance to avoid puckering.
Q5: Can I make a smaller quilt using the Weathervane Quilt Block?
A: Absolutely! The Weathervane Quilt Block – Pattern can be used for smaller projects like wall hangings, table runners, or even pillow covers.
Conclusion
The Weathervane Quilt Block – Pattern is a classic design that’s perfect for quilters of all skill levels. With a few basic materials and techniques, you can create beautiful quilt blocks that will add charm to any space. Whether you’re making a full quilt or smaller projects, this block is versatile enough to suit a variety of styles. We hope this article has inspired you to try your hand at this timeless quilting design. If you have any questions or suggestions, please leave your feedback in the comments!