Bookmark Shaped Like Cups – Tutorial is the perfect creative project for anyone who loves the cozy combination of a warm beverage and a captivating story. There is something inherently charming about marking your place in a novel with a tiny, handcrafted teacup or coffee mug that reflects your personal style. Whether you are a seasoned crafter or a beginner looking for a quick weekend activity, this Bookmark Shaped Like Cups – Tutorial will guide you through the process of creating functional art that makes every reading session feel like a special occasion.
The beauty of a Bookmark Shaped Like Cups – Tutorial lies in its versatility and the joy of upcycling simple materials into something beautiful. In an age of digital screens, physical books offer a tactile escape, and a custom Bookmark Shaped Like Cups adds a layer of whimsy to that experience. By following this Bookmark Shaped Like Cups – Tutorial, you will learn how to master the shapes, textures, and structural integrity needed to keep your pages safe while expressing your love for café culture.
Engaging with a Bookmark Shaped Like Cups – Tutorial is also a fantastic way to create thoughtful, handmade gifts for the bibliophiles in your life. Imagine gifting a bestseller accompanied by a Bookmark Shaped Like Cups that matches the recipient’s favorite mug. This Bookmark Shaped Like Cups – Tutorial focuses on clear, actionable steps and SEO-optimized crafting techniques to ensure your finished product is both durable and adorable. Let’s dive into the essential components and techniques required to bring these miniature vessels to life.
1. Essential Materials for Your Bookmark Shaped Like Cups – Tutorial
To begin your Bookmark Shaped Like Cups – Tutorial, you first need to gather high-quality materials that provide both aesthetic appeal and longevity. The foundation of a great Bookmark Shaped Like Cups is often a sturdy cardstock, felt, or even lightweight denim if you prefer an upcycled look. Choosing the right weight of material ensures that your Bookmark Shaped Like Cups doesn’t slip out of the book or become too bulky, which could damage the spine of your favorite hardback.
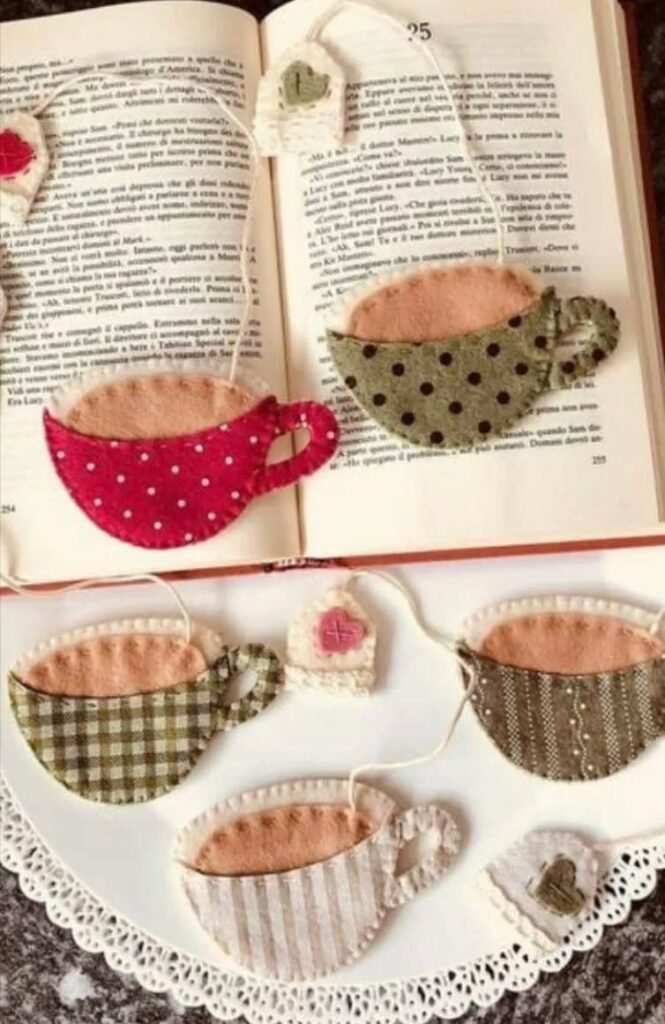
In this Bookmark Shaped Like Cups – Tutorial, we recommend using fabric scraps or patterned paper to give your cups character. If you are opting for a sewn version, high-quality embroidery floss is essential for adding details like “steam” rising from the cup or intricate floral designs on the “porcelain.” The goal of this Bookmark Shaped Like Cups – Tutorial is to help you create a DIY craft that looks professional and feels personal.
Adhesives play a critical role in any Bookmark Shaped Like Cups – Tutorial. If you are working with paper, a acid-free glue stick or double-sided tape prevents warping. For those following the textile path in this Bookmark Shaped Like Cups – Tutorial, a fabric glue or a simple blanket stitch will keep your layers secure. Don’t forget a pair of precision scissors to handle the delicate curves of the cup’s handle, which is often the most defining feature of a Bookmark Shaped Like Cups.
Customization is a recurring theme in this Bookmark Shaped Like Cups – Tutorial. You might want to include sequins, beads, or even watercolors to simulate the look of tea or coffee inside your Bookmark Shaped Like Cups. The more detail you add during the Bookmark Shaped Like Cups – Tutorial process, the more unique your final piece will be. Always keep a pencil and eraser handy for sketching your initial cup template before you start cutting your final materials.
For the “bookmark” part of this Bookmark Shaped Like Cups – Tutorial, you can use ribbon, tassels, or a laminated paper strip. The cup usually sits at the top, peeking out from the pages, while the tail stays tucked inside. This Bookmark Shaped Like Cups – Tutorial encourages you to experiment with different lengths of ribbon to accommodate various book sizes, from pocket paperbacks to large coffee table books.
Finally, ensure you have a clean workspace before starting your Bookmark Shaped Like Cups – Tutorial. Having all your tools within reach—like a ruler for straight edges and a bone folder for crisp paper creases—makes the crafting process much smoother. This Bookmark Shaped Like Cups – Tutorial is designed to be a relaxing experience, so take your time selecting colors that make you feel inspired and ready to create.
2. Step-by-Step Template Creation and Cutting
The most important part of a Bookmark Shaped Like Cups – Tutorial is creating a balanced template. Start by sketching a simple “U” shape for the body of the cup on a piece of scrap paper. In this Bookmark Shaped Like Cups – Tutorial, we emphasize that the handle should be slightly oversized to ensure it is sturdy enough to be handled frequently. Once you are happy with the silhouette of your Bookmark Shaped Like Cups, cut it out to use as your master stencil.
Trace your stencil onto your chosen material—be it felt, denim, or heavy paper. This Bookmark Shaped Like Cups – Tutorial suggests tracing on the back of the material to avoid visible pencil marks on the finished Bookmark Shaped Like Cups. If you are making a double-sided bookmark, trace the shape twice. Ensuring symmetry at this stage of the Bookmark Shaped Like Cups – Tutorial will result in a much cleaner, more professional-looking handmade bookmark.
When cutting out your shapes, follow the lines slowly. This Bookmark Shaped Like Cups – Tutorial highlights that the curve of the handle and the rim of the cup require a steady hand. Using small craft scissors can help you navigate the tight corners of the Bookmark Shaped Like Cups more effectively than large kitchen shears. Accuracy here is what separates a standard craft from the high-quality results promised by this Bookmark Shaped Like Cups – Tutorial.
If you are using fabric for your Bookmark Shaped Like Cups – Tutorial, consider using pinking shears around the edges to prevent fraying, or apply a small amount of fray check. This is a pro-tip included in our Bookmark Shaped Like Cups – Tutorial to increase the lifespan of your craft. For paper-based versions, you can use a corner rounder on the base of the cup to give it a softer, more “ceramic” feel that fits the Bookmark Shaped Like Cups aesthetic perfectly.
Layering is a great technique to learn in this Bookmark Shaped Like Cups – Tutorial. You can cut a smaller “liquid” shape out of a different color—perhaps brown for coffee or green for matcha—to glue inside the rim of your cup. This adds a 3D effect to your Bookmark Shaped Like Cups. Following these layering steps in the Bookmark Shaped Like Cups – Tutorial adds depth and makes the final product pop against the pages of a book.
Once all your pieces are cut, lay them out to visualize the final assembly. This Bookmark Shaped Like Cups – Tutorial advises checking the proportions one last time. Does the handle look right? Is the cup body wide enough? This “dry run” is a crucial step in the Bookmark Shaped Like Cups – Tutorial to ensure that when you apply glue or start stitching, everything aligns perfectly for your Bookmark Shaped Like Cups.
3. Decorating and Personalizing Your Cup Design
Now comes the most creative phase of the Bookmark Shaped Like Cups – Tutorial: decoration! This is where your Bookmark Shaped Like Cups truly takes on a life of its own. You can use fine-liner pens to draw “steam” swirls or “cracks” for a vintage chic look. In this Bookmark Shaped Like Cups – Tutorial, we encourage you to think about themes—perhaps a floral “English Tea” cup or a bold, modern “Espresso” mug for your Bookmark Shaped Like Cups.
For those who enjoy needlework, this Bookmark Shaped Like Cups – Tutorial suggests using a satin stitch to fill in small details. Adding a tiny “tea bag” tag hanging off the side of your Bookmark Shaped Like Cups is a delightful detail that always gets compliments. Little touches like this are what make a Bookmark Shaped Like Cups – Tutorial so engaging for creators who love whimsical stationery.
If you are a fan of mixed media, this Bookmark Shaped Like Cups – Tutorial is the perfect place to experiment. Try using washi tape to create stripes on your cup or glitter glue for a “sugar-rimmed” effect. The goal is to make a Bookmark Shaped Like Cups that reflects your personality. This Bookmark Shaped Like Cups – Tutorial is merely a roadmap; your imagination is the engine that drives the design.
Don’t forget the back of your Bookmark Shaped Like Cups. This Bookmark Shaped Like Cups – Tutorial recommends either mirroring the front design or adding a motivational reading quote. Use a permanent marker to write something like “Just one more chapter” on the back of your Bookmark Shaped Like Cups. Adding text is a great way to utilize the space effectively, as taught in this Bookmark Shaped Like Cups – Tutorial.
Texture is another element we explore in this Bookmark Shaped Like Cups – Tutorial. If you are using paper, try embossing the surface to give it a raised pattern. For fabric, adding a small piece of lace at the bottom can simulate a doily. These advanced techniques in our Bookmark Shaped Like Cups – Tutorial help you elevate your Bookmark Shaped Like Cups from a simple craft to a piece of art.
Finally, let your decorations dry completely before moving to the assembly phase of the Bookmark Shaped Like Cups – Tutorial. Smudging your hard work is the only way to dampen the fun of creating a Bookmark Shaped Like Cups. Patience is a virtue emphasized throughout this Bookmark Shaped Like Cups – Tutorial, especially when working with paints or heavy glues that require cure time.
4. Final Assembly and Attachment Techniques
The final stage of our Bookmark Shaped Like Cups – Tutorial is attaching the “cup” to the actual bookmark mechanism. Most creators prefer using a long ribbon or a stiff strip of cardstock. In this Bookmark Shaped Like Cups – Tutorial, we recommend sandwiching the top of the ribbon between two cup shapes. This hides the attachment point and makes your Bookmark Shaped Like Cups look neat from every angle.
If you are using a metal paperclip as the base for your Bookmark Shaped Like Cups, this Bookmark Shaped Like Cups – Tutorial suggests using hot glue for a permanent bond. Simply apply a small bead of glue to the top of the clip and press your cup firmly against it. This creates a “planner clip” style Bookmark Shaped Like Cups that is perfect for journals and thinner books, as explained in this Bookmark Shaped Like Cups – Tutorial.
For a traditional dangling bookmark, this Bookmark Shaped Like Cups – Tutorial teaches you how to punch a small hole at the bottom of the cup. Thread a tassel or a braided yarn string through the hole. This allows the Bookmark Shaped Like Cups to sit on the outside of the book’s spine while the string marks the page. This method is a favorite in our Bookmark Shaped Like Cups – Tutorial for its classic look.
Durability is key, so this Bookmark Shaped Like Cups – Tutorial suggests a final coat of clear sealant or mod podge if you used paper. This protects your Bookmark Shaped Like Cups from finger oils and accidental spills. Following this protection step in the Bookmark Shaped Like Cups – Tutorial ensures that your handmade gift lasts for years of reading adventures.
Test the functionality of your new creation! Open a book and slide the Bookmark Shaped Like Cups into place. This Bookmark Shaped Like Cups – Tutorial reminds you to check that the cup doesn’t pull the ribbon too taut or cause the paper to tear. The best Bookmark Shaped Like Cups is one that is as practical as it is beautiful. If you followed every step of this Bookmark Shaped Like Cups – Tutorial, you should have a perfect result.
Congratulations on completing the Bookmark Shaped Like Cups – Tutorial! You now have a unique accessory that celebrates your love for books and crafts. Share your results with the crafting community and perhaps start a new trend. This Bookmark Shaped Like Cups – Tutorial is just the beginning—once you master the cup shape, you can move on to teapots, spoons, and more to complete your collection of Bookmark Shaped Like Cups.
FAQ: Frequently Asked Questions about Bookmarks Shaped Like Cups
What is the best material for a Bookmark Shaped Like Cups?
For durability and ease of use, heavy cardstock (250gsm or higher) or stiffened felt are the best options. These materials hold their shape well and provide a good surface for decorations like ink, paint, or embroidery.
Can I use this Bookmark Shaped Like Cups – Tutorial for kids?
Absolutely! This tutorial is very kid-friendly. Children can use foam sheets and pre-cut stickers to decorate their cups, making it a safe and engaging classroom or rainy-day activity.
How do I prevent the cup from falling out of the book?
Ensure the “tail” of the bookmark (the ribbon or paper strip) is at least 6-8 inches long. The weight of the pages pressing against the tail will keep the cup securely positioned at the top of the book.
Can I make these bookmarks waterproof?
While you can’t make them fully “submersible,” you can make them water-resistant by laminating the paper cup or applying a few thin coats of clear acrylic sealer spray. This protects them from light splashes or damp hands.
What other shapes can I make using this same technique?
The “sandwich” technique used in this tutorial works for almost any shape! You can adapt it to make teapots, cupcakes, stars, or even little animals. The principle of attaching a decorative top to a functional tail remains the same.
Conclusion
In this Bookmark Shaped Like Cups – Tutorial, we have explored the delightful world of creating personalized, beverage-themed book accessories.
From selecting the right crafting materials and creating a custom stencil to the intricate details of decoration and the final assembly, you now have the skills to produce a high-quality Bookmark Shaped Like Cups. These little creations are more than just placeholders; they are expressions of creativity that enhance the reading experience.