Mini Crochet Bags with Flowers – Tutorial is the perfect project for anyone looking to combine functionality with artistic flair. These charming accessories have taken the fashion world by storm, offering a sustainable and handmade alternative to mass-produced items. Whether you are a seasoned artisan or a curious beginner, learning how to create these handmade accessories allows you to express your personality through vibrant colors and intricate textures.
The beauty of a Mini Crochet Bags with Flowers – Tutorial lies in its versatility and the joy of the process itself. These tiny purses are not just for carrying essentials like lipstick or keys; they serve as a canvas for floral crochet patterns that can brighten any outfit. By mastering the basic stitches and assembly techniques, you unlock the ability to gift unique, personalized items to friends or even start a small business focusing on crochet fashion trends.
In this comprehensive guide, we will dive deep into every aspect of making these pieces, ensuring your crochet journey is smooth and rewarding. We will cover the essential materials, the step-by-step construction of the bag body, and the delicate art of attaching 3D crochet flowers. By the end of this long-form guide, you will have all the knowledge necessary to produce professional-looking crochet mini bags that stand out for their quality and aesthetic appeal.
1. Essential Materials for Your Mini Crochet Bags with Flowers – Tutorial
Starting your project with the right tools is the first step toward a successful DIY crochet project. For a high-quality finish, you will need premium cotton yarn, which provides the necessary structure and stitch definition for small bags. A 3.5mm or 4.0mm crochet hook is usually ideal, depending on your tension and the weight of the yarn you choose.
Don’t forget the small but vital notions that make the assembly easier and more professional. You will need a tapestry needle for weaving in ends and sewing your floral embellishments securely to the bag. Sharp craft scissors are essential for clean cuts, preventing the yarn from fraying during the delicate finishing stages of your crochet tutorial.
Stitch markers are highly recommended, especially when working in rounds to create the base of the bag. These little clips help you keep track of your crochet increases and ensure the symmetry of your design. Using markers prevents the common frustration of losing your place, making the crafting experience much more relaxing and organized.
To give your bag a polished look, consider adding hardware like a magnetic snap or a decorative button. These closures ensure that your belongings stay safe inside the mini crochet purse. If you want a more rustic or bohemian vibe, a simple drawstring made of braided yarn works beautifully and adds a touch of handmade charm.
For the floral decorations, having a variety of yarn colors on hand is a great way to make your mini crochet bags pop. You can use scraps from previous projects, making this an eco-friendly way to upcycle your yarn stash. Bright yellows, soft pinks, and vibrant greens are classic choices for creating realistic and eye-catching crochet blossoms.
Lastly, keep a measuring tape nearby to ensure your bag reaches the desired dimensions. Consistency is key when making miniature crochet items, as even a slight variation in tension can change the final size. Having all these materials organized before you begin will streamline your Mini Crochet Bags with Flowers – Tutorial and help you focus on the creativity.
2. Master the Foundation: Stitching the Bag Body
The foundation of any Mini Crochet Bags with Flowers – Tutorial is a sturdy and well-shaped base. Most mini bags start with a magic ring or a foundation chain, followed by several rounds of single or double crochet. This creates a flat bottom that allows the bag to sit upright, providing a professional structure to your handmade crochet bag.
Once the base is complete, you will transition to the sides by working into the back loops only for one round. This technique creates a distinct edge, signaling the “turn” from the bottom to the walls of the mini bag. It is a subtle detail that significantly improves the overall silhouette of your crochet accessory, making it look more like a store-bought item.
For the body of the bag, the half double crochet stitch is a favorite among crafters because it offers a perfect balance of height and density. It creates a fabric that is thick enough to hold items without them poking through the holes, yet flexible enough to have a soft drape. Consistency in your tension is vital here to keep the sides even and straight.
As you work your way up, you can experiment with different stitch patterns, such as the moss stitch or the shell stitch, to add texture. However, for a bag that will be heavily decorated with flowers, a simple and clean background often works best. This ensures that the floral embellishments remain the focal point of your Mini Crochet Bags with Flowers – Tutorial.
Adding the handles is the final structural step for the body. You can crochet long straps for a crossbody crochet bag style or short loops for a cute handheld version. Reinforcing the points where the handles attach to the bag is crucial for durability, especially if you plan on using the bag frequently for daily essentials.
Remember to weave in all your ends as you go or at the very end using a secure knotting technique. A clean interior is just as important as a beautiful exterior in high-quality crochet craftsmanship. Taking the time to finish the body properly sets the stage for the most exciting part: the floral decorations that define this crochet tutorial.
3. Creating and Attaching Decorative Crochet Flowers
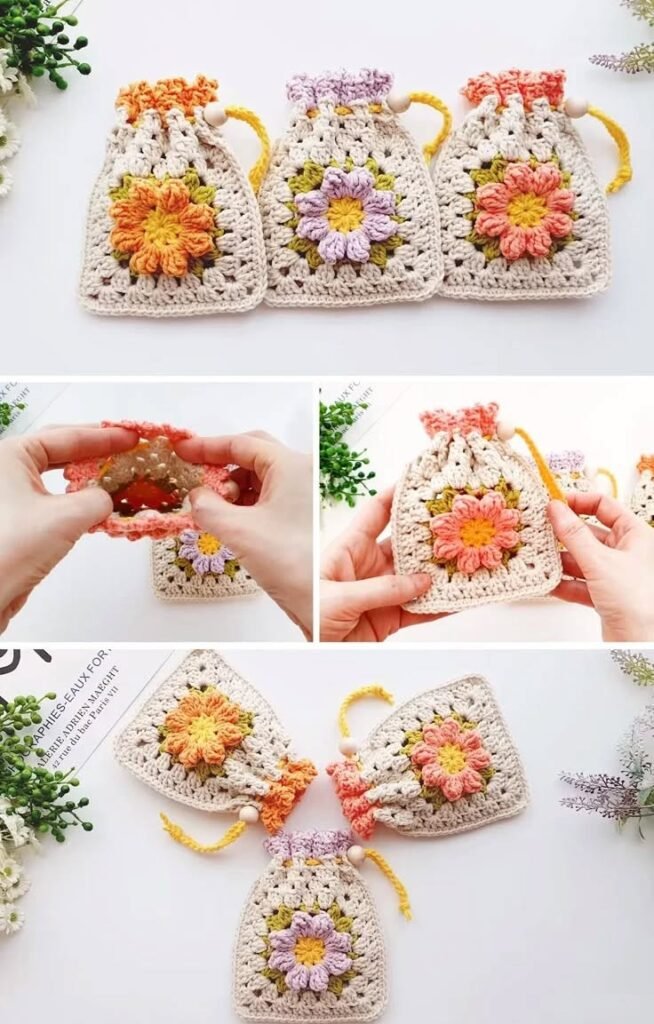
The “Flowers” part of the Mini Crochet Bags with Flowers – Tutorial is where you can truly let your creativity shine. There are dozens of ways to crochet a flower, from simple five-petal flat designs to complex multi-layered roses. For a mini bag, small daisies or lavender sprigs are currently very popular in the crochet community.
To create a basic 3D flower, start with a center color and work a series of stitches into a magic circle. Switch to your petal color and use a combination of chains and high-reaching stitches like the treble crochet to create volume. These small pops of color transform a plain bag into a piece of wearable art that draws compliments everywhere.
When it comes to placement, you have several aesthetic options to consider for your mini bag design. You can scatter small flowers across the entire surface for a “meadow” look or cluster three different-sized flowers in one corner for a sophisticated accent. Planning your layout before sewing is a key tip in any Mini Crochet Bags with Flowers – Tutorial.
Attaching the flowers requires a steady hand and your tapestry needle. It is best to use the same yarn used for the flowers to sew them onto the bag body, ensuring the stitches are invisible. Make sure to sew through the stitches of the bag and not just the gaps to ensure the floral decor stays firmly in place over time.
For an extra touch of detail, you can add small crochet leaves in varying shades of green. Leaves provide a natural contrast to the bright petals and help ground the design visually. This attention to detail is what elevates a simple project into a high-end handcrafted crochet gift that looks intricately designed.
If you want to add a bit of sparkle, consider sewing a small bead or a pearl into the center of each flower. This adds a “jewelry” element to your Mini Crochet Bags with Flowers – Tutorial, making the bag suitable for special occasions like weddings or garden parties. Small additions like these make your crochet work unique and memorable.
4. Professional Finishing Touches and Care Tips
The final phase of our Mini Crochet Bags with Flowers – Tutorial involves refining the details to ensure longevity and style. Blocking your finished bag is a step many beginners skip, but it makes a world of difference. By lightly steaming or damp-blocking the piece, you even out the stitches and give the bag its final, intended shape.
Adding a fabric lining is a fantastic way to take your crochet bag to the next level. A simple cotton liner prevents the crochet fabric from stretching out over time and keeps small items like pins or coins from slipping through the stitches. It adds a professional “boutique” feel to your Mini Crochet Bags with Flowers – Tutorial results.
Consider the branding of your piece if you are making this as a gift or for sale. Adding a small “Handmade” leather tag or a personalized woven label can significantly increase the perceived value of your work. These small markers of quality show that the mini crochet bag was made with care and intention.
Learning how to care for your crochet creations is just as important as making them. Since these bags are often made of cotton or acrylic, they can usually be hand-washed in cool water with a mild detergent. Teaching your customers or gift recipients proper crochet care ensures the bag and its flowers stay vibrant for years.
In terms of styling, these mini floral bags are incredibly versatile. They pair perfectly with a summer sundress, adding a touch of cottagecore aesthetic to your look. They also work surprisingly well as decorative organizers inside a larger tote bag, keeping your most important items easy to find and beautifully protected.
As you gain confidence with this Mini Crochet Bags with Flowers – Tutorial, don’t be afraid to experiment with yarn weights and hook sizes to create different scales. The techniques you’ve learned here can be applied to larger totes, hats, or even home decor. Crocheting flowers is a foundational skill that will serve you well in countless future projects.
FAQ – Frequently Asked Questions
What is the best yarn for a Mini Crochet Bag?
For the best results in this Mini Crochet Bags with Flowers – Tutorial, use 100% mercerized cotton. It is durable, has a slight sheen, and doesn’t pill as easily as acrylic or wool, which is essential for items that will be handled frequently.
How long does it take to make one mini bag?
Depending on your skill level and the complexity of the flowers, a single bag can take anywhere from 2 to 5 hours. It is an excellent “weekend project” for those looking for a quick and satisfying crochet win.
Can a beginner finish this tutorial?
Absolutely! This Mini Crochet Bags with Flowers – Tutorial is designed to be accessible. If you know how to do a single crochet, double crochet, and slip stitch, you have all the skills needed to complete this project.
Are these bags durable enough for everyday use?
Yes, especially if you use cotton yarn and add a lining. The crochet structure is naturally flexible but strong. Just avoid overfilling the bag with very heavy items to prevent the strap from stretching.
How do I choose the best color palette?
Look at nature for inspiration! Complementary colors like purple and yellow or analogous colors like pink and orange always work well. Using a neutral color for the bag body (like cream or tan) makes the colorful crochet flowers stand out.
Conclusion
Creating Mini Crochet Bags with Flowers – Tutorial is a rewarding journey into the world of fiber arts, combining practical construction with delicate floral design.
Throughout this guide, we have explored the necessity of choosing the right materials, the steps to building a solid bag body, the creative process of making 3D flowers, and the professional finishing touches that make a handmade item shine. These small bags represent more than just a trend; they are a testament to the beauty of slow fashion and the skill of the maker.