Learning how to master the Flying Geese Quilt – Tutorial is a fundamental milestone for any quilter, as this iconic block is one of the most versatile and frequently used elements in traditional and modern patchwork. The design features a large central triangle representing a bird in flight, flanked by two smaller triangles known as the “sky,” creating a rectangular unit that can be combined into endless patterns. Whether you are looking to create a classic “Stars over Alabama” design or a sleek, contemporary wall hanging, understanding the geometry and precision required for this block will elevate your quilting skills to a professional level.
This Flying Geese Quilt – Tutorial is designed to simplify the construction process, moving away from the frustration of lost points and uneven edges toward a method that ensures crisp, sharp triangles every time. Precision is key in patchwork quilting, and the Flying Geese block is notorious for testing a quilter’s ability to maintain a consistent quarter-inch seam allowance. By following a structured approach, you will learn how to calculate your fabric requirements, choose the right tools, and execute various construction methods that minimize fabric waste while maximizing efficiency at your sewing machine.
In the following sections of this Flying Geese Quilt – Tutorial, we will dive into the most popular techniques, including the “no-waste” method and the “stitch-and-flip” style. We will also discuss the importance of fabric contrast, color theory, and how to troubleshoot common issues like “blunted points” or “wonky blocks.” By the end of this comprehensive guide, you will have the confidence to incorporate the Flying Geese Quilt – Tutorial techniques into large-scale quilts, borders, and decorative accents, ensuring your handmade projects are as beautiful as they are durable.
1 Essential Materials for the Flying Geese Quilt – Tutorial
The foundation of a successful Flying Geese Quilt – Tutorial begins with high-quality quilting cotton fabric. Choosing fabrics with a tight weave prevents fraying and ensures that your triangles maintain their shape during the cutting and sewing process. For a classic look, pick a vibrant print for the “goose” and a neutral, solid fabric for the “sky” portions to make the geometric shapes truly pop against the background.
A sharp rotary cutter and a self-healing cutting mat are indispensable tools for this Flying Geese Quilt – Tutorial. Precision starts at the cutting table; even a sixteenth of an inch error in your initial squares can lead to blocks that don’t fit together properly. Make sure your blade is fresh to avoid skipped threads, which can cause the fabric to pull and distort your delicate diagonal seams.
An accurate quilting ruler with clear 45-degree markings is vital for checking your angles. In this Flying Geese Quilt – Tutorial, we often use the ruler to trim away excess fabric after the “stitch-and-flip” process. Having a ruler that doesn’t slip on the fabric will help you maintain the required 1/4 inch seam allowance from the tip of the triangle, preserving those precious points during assembly.
Thread choice is another detail highlighted in this Flying Geese Quilt – Tutorial. Using a 50wt cotton thread is ideal because it is thin enough to not add bulk to your seams but strong enough to hold the quilt together for generations. Thicker threads can actually take up space in the seam, making your blocks slightly smaller than intended and causing alignment issues when joining rows.
Proper pressing tools, such as a high-quality steam iron and a wool pressing mat, are essential for achieving the professional finish described in this Flying Geese Quilt – Tutorial. Pressing—not ironing—is the secret to flat blocks. Moving the iron back and forth can stretch the fabric along the bias edges, leading to wavy blocks that are difficult to quilt later on.
Lastly, consider using marking pens or specialized tape on your sewing machine to guide your diagonal lines. In many steps of the Flying Geese Quilt – Tutorial, you will need to sew exactly from corner to corner. Having a visible guide helps you maintain a straight path, ensuring that the “wings” of your geese are perfectly symmetrical and aligned with the central body.
2 Mastering the No-Waste Flying Geese Quilt – Tutorial Method
The “No-Waste” technique is a highlight of this Flying Geese Quilt – Tutorial because it allows you to create four blocks at once without losing any fabric to the scrap bin. This method involves starting with one large square for the “geese” and four smaller squares for the “sky.” It is mathematically optimized to produce perfect rectangles, making it a favorite for efficient quilting and large-scale projects.
To begin this part of the Flying Geese Quilt – Tutorial, you will place two small squares diagonally on top of the large square, right sides together. You will then sew a seam a quarter-inch away from both sides of a center diagonal line. This “assembly line” approach saves time and thread, a technique often referred to by seasoned quilters as chain piecing.
After the first set of seams is sewn, the Flying Geese Quilt – Tutorial requires you to cut down the center line and press the small triangles open. You are then left with two units that look a bit like hearts. Adding the remaining two small squares to the corners of these units and repeating the sewing and cutting process will yield four completed Flying Geese blocks with minimal effort.
Precision trimming is a key step in the Flying Geese Quilt – Tutorial to ensure your blocks are “squared up.” Even with the best sewing, fabric can shift slightly. Using a specialized Flying Geese ruler allows you to trim all four sides of the block while keeping the point exactly in the center, which is crucial for when you sew the blocks into a larger quilt top.
One common mistake addressed in this Flying Geese Quilt – Tutorial is sewing exactly on the drawn line instead of slightly to the outside. Because the fabric must fold over the seam, you actually lose a tiny bit of width. Sewing a “scant” quarter-inch allows the fabric to fold perfectly to the edge, a secret tip for precision patchwork that experts swear by.
This method is perfect for scrap quilting because you can mix and match different small squares with a consistent large square background. The Flying Geese Quilt – Tutorial encourages experimentation with color; by using four different fabrics for the “wings,” you can create a “scrappy” look that still feels organized and intentional within the geometric grid of the quilt.
3 Troubleshooting Points and Seams in the Flying Geese Quilt – Tutorial
One of the biggest challenges in the Flying Geese Quilt – Tutorial is avoiding “chopped-off points.” This happens when the seam allowance of the next row crosses over the tip of the triangle. To prevent this, always ensure that your stitching line is exactly a quarter-inch above the “V” where the two wing fabrics meet, which preserves the visual integrity of the geese.
If your blocks are coming out “wonky” or distorted, this Flying Geese Quilt – Tutorial suggests checking your fabric’s grainline. The diagonal seams in these blocks are cut on the bias, which is the stretchiest part of the fabric. Handle your pieces gently and avoid pulling them through the sewing machine, as stretching the bias will result in blocks that won’t lay flat.
Using quilting pins or fabric clips is highly recommended in this Flying Geese Quilt – Tutorial. When joining multiple geese into a vertical column, pinning exactly at the point where the seams intersect will help you maintain perfect alignment. This attention to detail is what separates a beginner project from a heirloom-quality quilt that looks perfect from every angle.
Maintaining a consistent seam allowance is the golden rule of this Flying Geese Quilt – Tutorial. If your seams vary even slightly, the cumulative error across a row of ten blocks can be as much as half an inch. Using a specialized quarter-inch foot on your sewing machine can provide a physical guide to keep your seams straight and uniform throughout the project.
In this Flying Geese Quilt – Tutorial, we also discuss the importance of “pressing to the dark side.” This means folding your seam allowances toward the darker fabric so they don’t show through the lighter “sky” fabric. If you have many intersecting seams, you might also consider pressing seams open to reduce bulk, which makes the quilting process much smoother later on.
Lastly, if a block is simply too small or too distorted to fix, the Flying Geese Quilt – Tutorial advice is to set it aside and start fresh. Trying to force a bad block into a quilt top will cause puckers and ripples during the quilting and binding phases. Experience comes from practice, and every “failed” block is actually a lesson in tension, cutting, and fabric behavior.
4 Layout and Design Variations for the Flying Geese Quilt – Tutorial
Once you have a pile of finished blocks from this Flying Geese Quilt – Tutorial, the design possibilities are endless. You can arrange them in a “Dutchman’s Puzzle” layout, where four geese point toward a center, or in a “Chevron” pattern by alternating the direction of the rows. These block arrangements can completely change the energy and movement of your quilt.
For a modern twist on the Flying Geese Quilt – Tutorial, try using “negative space.” Arrange a single column of geese on a large, solid-colored background to create a minimalist aesthetic. This approach highlights the geometric beauty of the quilt block and is a popular trend in modern quilt shows and interior design galleries.
Another creative idea from the Flying Geese Quilt – Tutorial is to vary the size of your geese. By mixing large 4×8 inch blocks with tiny 1×2 inch blocks, you can create a “fragmented” look that mimics a flock of birds scattering. This improvised quilting style allows for a lot of artistic expression while still using the basic construction techniques you’ve mastered.
The Flying Geese Quilt – Tutorial is also perfect for creating borders. A “running geese” border, where the blocks circle the entire quilt, adds a sense of motion and helps frame the central design. This is an excellent way to use up leftover fabric from the main quilt body, ensuring a cohesive color palette throughout the entire piece.
Consider the impact of ombre fabrics in your Flying Geese Quilt – Tutorial project. Using a fabric that fades from light to dark can give the illusion of depth and light, making your geese appear as if they are flying through a sunset or a misty morning. This use of specialty fabrics can turn a simple pattern into a stunning work of textile art.
Finally, the Flying Geese Quilt – Tutorial can be adapted for seasonal projects. Use reds and greens for a festive holiday runner, or bright yellows and blues for a summery picnic blanket. Because the block is so fundamental, it acts as a blank canvas for your creative vision, allowing you to celebrate any occasion with a handmade, quilted gift.
FAQ – Frequently Asked Questions
What is a “scant” quarter-inch seam in a Flying Geese Quilt – Tutorial?
A scant quarter-inch is a seam that is just a thread’s width narrower than a true 1/4 inch. This tiny bit of extra room accounts for the space the fabric takes up when it is folded over the seam, ensuring your finished Flying Geese Quilt – Tutorial block ends up exactly the right size.
Can I make Flying Geese using paper piecing?
Absolutely! While this Flying Geese Quilt – Tutorial focuses on traditional piecing, foundation paper piecing (FPP) is an excellent alternative for achieving extreme precision, especially for very small blocks. It involves sewing the fabric directly onto a paper template, which is later removed.
Why are my Flying Geese points getting cut off?
This usually happens because the seam joining your blocks is too deep. When following this Flying Geese Quilt – Tutorial, make sure your sewing line passes right through the “V” intersection. If you sew too far below it, you lose the point; too far above it, and there will be a gap between the point and the edge.
How do I calculate the size for the “No-Waste” method?
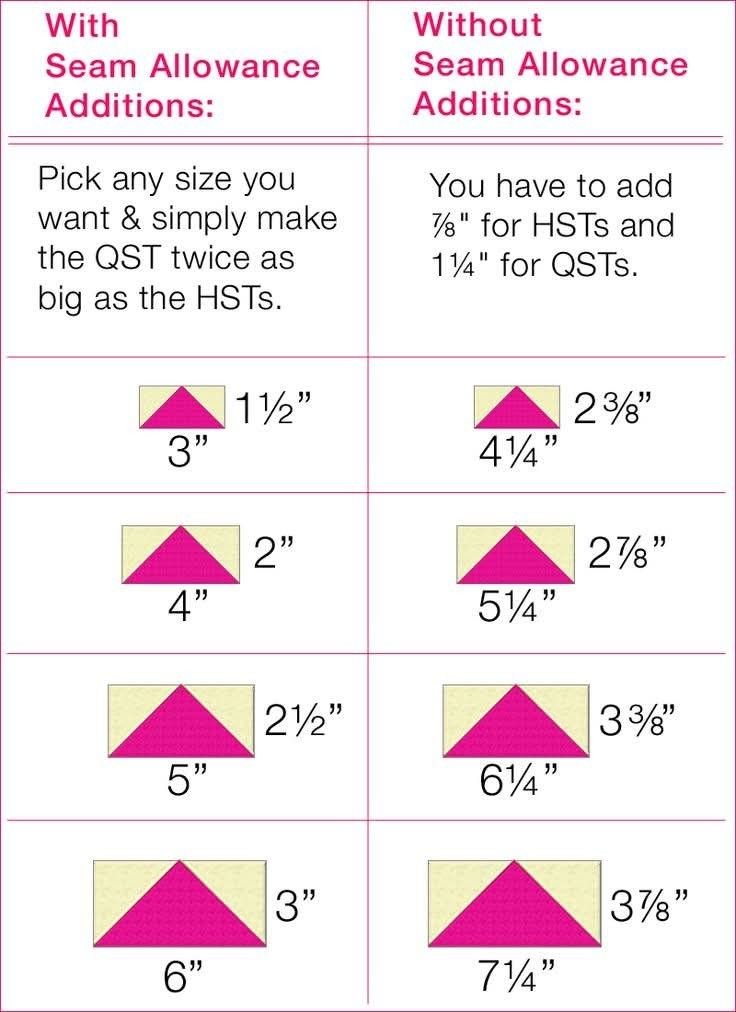
In this Flying Geese Quilt – Tutorial, the formula is simple: add 1-1/4 inches to the finished width for the large square, and add 7/8 inch to the finished height for the four small squares. For example, for a 2×4 inch finished block, you would start with a 5-1/4 inch large square and 2-7/8 inch small squares.
Is it better to press seams open or to the side?
In the context of a Flying Geese Quilt – Tutorial, pressing to the side (toward the “goose”) is traditional and makes the seams stronger. However, if you are working with many layers of fabric, pressing open can help the quilt top lay flatter, which is often preferred by longarm quilters.
Conclusion
This Flying Geese Quilt – Tutorial has provided you with a comprehensive roadmap to mastering one of the most beloved blocks in the quilting world. We have covered everything from the essential tools and fabric selection to the efficient “No-Waste” method and essential troubleshooting tips for perfect points. By understanding the math and the mechanics behind the block, you have unlocked a toolset that will allow you to tackle hundreds of different quilt patterns with ease and precision.
Remember that quilting is a journey of patience and practice. Your first few blocks might not be perfect, but the skills developed through this Flying Geese Quilt – Tutorial will serve as a foundation for all your future textile art projects. The Flying Geese block is more than just a shape; it is a symbol of movement, direction, and the timeless tradition of handmade craft.