Learning how to create a Crochet Butterfly – Tutorial is one of the most rewarding projects for crafters of all skill levels, offering a perfect blend of creativity and relaxation. These delicate, winged wonders are not just beautiful to look at; they serve as versatile embellishments for everything from sun hats and baby blankets to home decor and hair accessories. Whether you are a seasoned pro or picking up a hook for the first time, mastering the art of the Crochet Butterfly allows you to transform simple strands of yarn into a vibrant piece of art that captures the essence of nature.
The beauty of following a Crochet Butterfly – Tutorial lies in the simplicity of the basic stitches required to achieve a professional-looking result. Most patterns rely on foundational techniques like the magic ring, double crochet, and chain stitches, making it an accessible entry point for beginners. Beyond the technical aspect, crocheting these butterflies is a fantastic way to use up scrap yarn, allowing you to experiment with a kaleidoscope of colors without needing to purchase large quantities of new materials. It is a sustainable and joyful way to practice your tension and stitch consistency.
In this comprehensive guide, we will dive deep into every aspect of the Crochet Butterfly – Tutorial, ensuring you have the knowledge to create your own fluttery fleet. We will cover the essential materials you need, the step-by-step process of constructing the wings, and the final touches that bring your creation to life. By focusing on SEO-optimized crochet techniques and clear, humanized instructions, this article aims to be your go-to resource for all things related to yarn butterflies and fiber arts. Get your hooks ready, choose your favorite colors, and let’s begin this creative journey together.
1 Understanding the Crochet Butterfly – Tutorial Basics
The first step in any Crochet Butterfly – Tutorial is gathering the right supplies to ensure your project has the desired structure and aesthetic. For a standard butterfly, a 3.5mm crochet hook paired with DK weight cotton yarn is often recommended because it provides excellent stitch definition. Cotton yarn is particularly useful for amigurumi-style butterflies because it doesn’t stretch as much as acrylic, helping the wings maintain their shape over time.
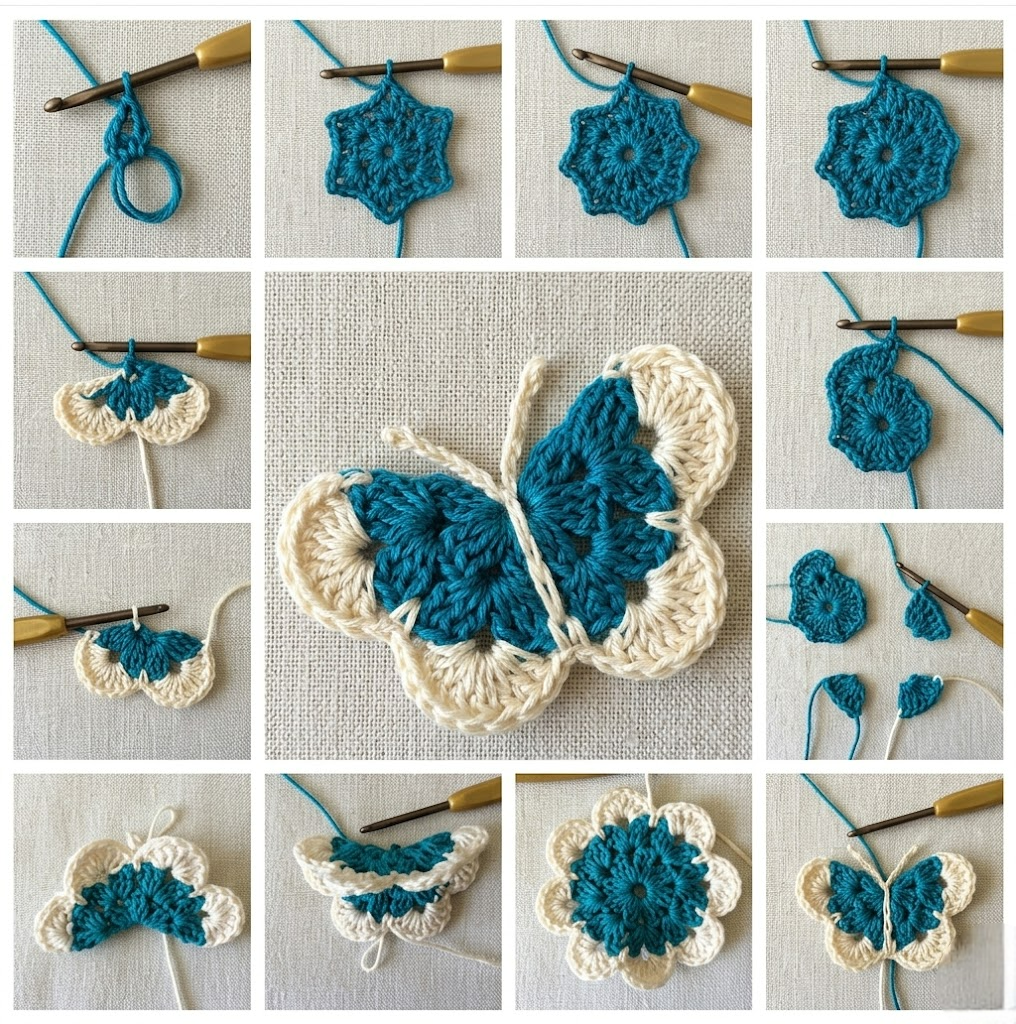
A Crochet Butterfly – Tutorial typically begins with the magic ring (or magic circle) technique, which is a way to start crocheting in the round without leaving a hole in the center. This is a crucial skill for making the body of the butterfly look neat and professional. If you are a beginner, practicing the magic ring might take a few tries, but it is the secret to a high-quality finish in many crochet patterns.
The core of the Crochet Butterfly – Tutorial involves working several clusters of stitches into that initial ring to create the segments of the wings. Most designs use a combination of half-double crochets and treble crochets to create the sloping, organic curves of a butterfly’s wing. Understanding how these heights vary is essential for achieving that iconic butterfly silhouette that looks realistic yet whimsical.
In this Crochet Butterfly – Tutorial, we emphasize the importance of stitch markers. When working in rounds or complex clusters, it is very easy to lose track of where your first stitch began. Using a simple plastic marker or a scrap piece of contrasting yarn will save you time and frustration, ensuring your symmetrical crochet wings are perfectly even on both sides.
Another key element of the Crochet Butterfly – Tutorial is learning how to read a crochet chart or written pattern instructions effectively. We use standard US terminology here, focusing on the slip stitch (sl st) to join rounds and the chain (ch) to create height. Mastering these basic terms will allow you to follow almost any butterfly crochet pattern you find in the future.
Lastly, the Crochet Butterfly – Tutorial wouldn’t be complete without discussing color theory. Choosing high-contrast colors for the wing borders or using variegated yarn can make your butterfly pop. Since butterflies in nature are known for their vibrant patterns, don’t be afraid to use bold yarn colors like turquoise, magenta, or bright orange to make your project stand out.
2 Step-by-Step Guide to the Crochet Butterfly – Tutorial Wings
The most exciting part of the Crochet Butterfly – Tutorial is watching the wings take shape under your fingers. To start, you will work a series of shell stitches into your central ring. These shells are created by working multiple double crochets into the same space, which naturally fans the yarn out into a rounded shape. This technique is the foundation of most 3D crochet butterflies.
As you progress through the Crochet Butterfly – Tutorial, you will notice that the upper wings are usually larger than the lower ones. To achieve this, you will increase the number of yarn-overs in your stitches, moving from double crochet to treble crochet for the top section. This height difference is what gives the crocheted insect its aerodynamic and graceful appearance.
In the middle of this Crochet Butterfly – Tutorial, we focus on the “fold” method. Many popular patterns involve crocheting a flat, circular flower-like shape first and then folding it in half to create the butterfly wings. This flat-to-folded crochet technique is highly popular because it’s fast, easy to memorize, and produces a sturdy, double-layered butterfly that holds its shape well.
Tension is a major factor highlighted in this Crochet Butterfly – Tutorial. If your stitches are too loose, the wings might droop; if they are too tight, the butterfly might curl inward. Finding a consistent crochet tension is key. We recommend using a hook size slightly smaller than what is listed on the yarn label to ensure the fabric is dense enough to stand on its own.
During the wing construction phase of the Crochet Butterfly – Tutorial, you can also incorporate picot stitches at the peaks of the wings. A picot is a small decorative loop made of three chains joined back to the base. Adding these small details gives your handmade butterfly a delicate, “lacy” look that mimics the intricate edges found on real butterfly wings.
To finish the wings in our Crochet Butterfly – Tutorial, you will perform a fasten off and weave in your ends. Use a tapestry needle to carefully hide the yarn tails inside the stitches. This ensures that your work is secure and that no unsightly threads are visible, which is a hallmark of high-quality crochet craftsmanship.
3 Adding the Body and Antennae in the Crochet Butterfly – Tutorial
Once the wings are complete, the Crochet Butterfly – Tutorial moves toward the central body and the iconic antennae. The body can be made separately as a small, stuffed crochet tube or simply represented by a long chain of stitches wrapped around the center of the wings. For a minimalist look, a simple chain of 10-15 stitches works perfectly to cinch the wings together.
In this part of the Crochet Butterfly – Tutorial, the way you attach the body defines the butterfly’s posture. If you wrap the yarn tightly around the middle, the wings will flare out beautifully. This cinching technique is a clever trick to turn a simple 2D circle into a dynamic 3D creature. It’s one of the most satisfying “aha!” moments in crochet styling.
The antennae are the finishing touch in our Crochet Butterfly – Tutorial. These can be made using the yarn tails you left earlier. By tying small knots at the ends of two short strands of yarn, you create a realistic “clubbed” antenna look. Some crafters prefer using pipe cleaners or floral wire for the antennae to make them poseable, which is a great tip for crochet home decor.
For those who want a more detailed body, the Crochet Butterfly – Tutorial suggests using a surface slip stitch. This technique involves working directly onto the finished wings to create a raised, textured line that mimics the thorax and abdomen of the butterfly. It adds a layer of sophistication to your DIY crochet project without requiring extra sewing.
Safety is important if you are following this Crochet Butterfly – Tutorial to make toys for children. Instead of using beads or wire for the eyes and antennae, stick to embroidery thread or yarn. Embroidering the details ensures that the baby-safe crochet butterfly remains soft and free of small parts that could pose a choking hazard.
Finally, in this section of the Crochet Butterfly – Tutorial, we discuss blocking. Blocking crochet involves wetting your finished piece and pinning it into the perfect shape until it dries. While not always necessary for small items, blocking your butterflies can help the wings lay perfectly flat and symmetrical, which is ideal if you plan on framing them or using them as crochet appliqués.
4 Creative Uses for Your Crochet Butterfly – Tutorial Project
Now that you have mastered the Crochet Butterfly – Tutorial, it is time to think about how to use your creations. One of the most popular applications is turning them into crochet jewelry. By using embroidery floss and a tiny hook (0.75mm to 1.5mm), you can create miniature versions of the butterfly to serve as elegant earrings or a whimsical pendant necklace.
Another fantastic idea inspired by this Crochet Butterfly – Tutorial is creating a butterfly mobile for a nursery. By hanging several butterflies at different heights from a wooden hoop, you create a gentle, moving piece of art. This is a popular handmade gift idea that parents love because it adds a touch of handmade charm to a child’s room.
If you enjoy garment making, use the skills from this Crochet Butterfly – Tutorial to decorate sweaters and cardigans. These butterflies make excellent crochet patches to hide a small hole or simply to add some personality to a plain store-bought item. Attaching them with a few hidden stitches allows you to “upcycle” your wardrobe with boho-style crochet.
For holiday decorating, the Crochet Butterfly – Tutorial can be adapted to create unique ornaments. Stiffening the yarn with a mixture of water and glue allows the butterflies to hold their shape firmly, making them perfect for hanging on a spring-themed Christmas tree or as part of a festive table centerpiece for an outdoor garden party.
Don’t forget the world of scrapbooking and card making. A small butterfly made following our Crochet Butterfly – Tutorial can be glued onto the front of a handmade birthday card. It adds a tactile, 3D element that makes the card feel like a gift in itself. This is a great way for mixed-media artists to incorporate fiber arts into their paper crafts.
Lastly, this Crochet Butterfly – Tutorial can be a gateway to community giving. Many hospitals and charities accept small crochet comfort items to give to patients. These little butterflies can serve as “worry pets” or tokens of hope. Spreading joy through your crochet hobby is perhaps the most fulfilling way to use your new skills.
FAQ – Frequently Asked Questions
What is the best yarn for a Crochet Butterfly – Tutorial?
The best yarn is usually a mercerized cotton or a cotton blend. These yarns have a slight sheen and excellent stitch definition, which helps the intricate details of the butterfly wings stand out. However, if you want a fuzzy look, a light mohair can also be used for a more ethereal effect.
Is this Crochet Butterfly – Tutorial suitable for absolute beginners?
Yes! While it looks complex, the Crochet Butterfly – Tutorial uses basic stitches like the double crochet and chain stitch. As long as you can hold a hook and maintain basic tension, you can successfully complete this project.
How long does it take to finish one butterfly?
Once you are familiar with the Crochet Butterfly – Tutorial steps, a single butterfly can take anywhere from 15 to 30 minutes. This makes it an ideal “quick win” project for crafters who don’t have hours of uninterrupted time.
Can I wash my crochet butterflies?
If you used cotton or acrylic yarn, yes! It is best to hand wash them in cool water with a mild detergent and lay them flat to dry. If you used a stiffening agent, you should avoid washing them as it will dissolve the stiffener.
What hook size should I use for the Crochet Butterfly – Tutorial?
While it depends on your yarn weight, a 3.0mm or 3.5mm hook is standard for DK yarn. If you want a very tiny butterfly, you can drop down to a 1.5mm hook with crochet thread.
Conclusion
In this Crochet Butterfly – Tutorial, we have explored the journey from a simple magic ring to a beautifully finished winged embellishment. We covered the essential materials, the step-by-step wing construction using varied stitch heights, and the creative ways to finish the body and antennae.
Whether you are using these butterflies for jewelry, home decor, or as gifts, the techniques learned here provide a solid foundation for your future fiber art endeavors.