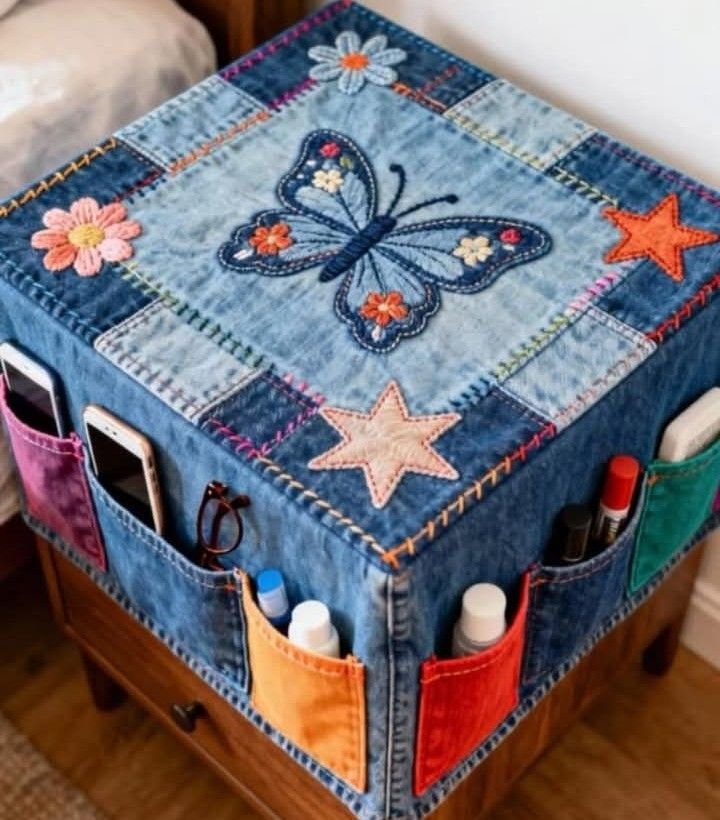
Creating a Pocket Box with Patchwork – Tutorial is one of the most rewarding projects for any sewing enthusiast looking to combine organization with artistic flair. This specific Pocket Box with Patchwork – Tutorial will guide you through the process of turning small fabric scraps into a structured, beautiful container that is perfect for storing jewelry, sewing notions, or even tech accessories. By mastering the patchwork technique, you not only create something functional but also give a second life to your favorite textile remnants, making this a sustainable and creative endeavor.
The beauty of a Pocket Box with Patchwork – Tutorial lies in its versatility and the way it allows for personal expression through color and pattern mixing. Whether you are a seasoned quilter or a beginner looking for a weekend project, this sewing guide provides a clear path to achieving a professional-looking finish. We will explore everything from choosing the right interfacing to mastering the blind stitch for a seamless look, ensuring that your final product is both durable and aesthetically pleasing.
In this comprehensive Pocket Box with Patchwork – Tutorial, we are going to focus on the “Quilt-as-you-go” method, which simplifies the assembly process significantly. This approach allows you to quilt your patchwork pieces directly onto the batting, providing the structural integrity needed for a fabric box to hold its shape. As we dive into the steps, remember that precision in cutting and a steady seam allowance are the keys to a symmetrical and high-quality handmade storage solution that looks like it came straight from a boutique.
1 Gathering Your Materials and Preparing the Patchwork
Before starting your Pocket Box with Patchwork – Tutorial, you must gather all the necessary supplies to ensure a smooth workflow. You will need various cotton fabric scraps, a piece of fusible fleece or heavy stabilizer, a rotary cutter, and a self-healing cutting mat. Having high-quality sewing thread in a neutral color is also essential for making the seams disappear within the design.
The first step in this patchwork tutorial is selecting a color palette that harmonizes well together. Since the box is small, choose prints that are scaled appropriately; small-scale florals or geometric patterns usually work best for a Pocket Box. Once selected, cut your fabric into uniform squares or strips, depending on the visual style you want to achieve for your quilted container.
Organization is key when dealing with small pieces of fabric for a DIY project. Lay out your pieces on a flat surface to visualize the final layout before you even touch the sewing machine. This step allows you to balance dark and light tones effectively, which is a fundamental principle of patchwork design and ensures the final box looks professionally curated.
Preparation also involves prepping your interfacing, which acts as the “bones” of your Pocket Box with Patchwork – Tutorial. Cut your stabilizer to the exact dimensions of the box template, usually a cross-shape or a large square that will be folded later. Using fusible stabilizer makes the process much easier, as it bonds the fabric directly to the support structure.
Don’t forget the importance of a sharp sewing machine needle. Since you will be sewing through multiple layers of fabric and batting, a 90/14 size needle is generally recommended to prevent skipped stitches. Keeping your iron nearby is also a non-negotiable part of the preparation, as pressing every seam is what differentiates a homemade look from a handcrafted masterpiece.
Finally, make sure you have fabric clips or pins ready. Because the layers of a quilted box can become quite thick, clips are often more effective than pins for holding the edges together without distorting the fabric. With your workspace cleared and your materials prepped, you are officially ready to begin the construction of your unique textile box.
2 Constructing the Patchwork Panels and Quilt Layers
The core of the Pocket Box with Patchwork – Tutorial is the assembly of the external panels. Begin by sewing your fabric scraps together using a 1/4 inch seam allowance, which is the standard for almost all quilting projects. Once your strips or squares are joined, press the seams open to reduce bulk, ensuring the surface remains as flat as possible for the next steps.
After creating your “fabric sheet,” it is time to attach it to the fusible fleece. Center your patchwork over the fleece and use a hot iron to bond them together. This creates a sturdy quilted panel that will serve as the exterior of your Pocket Box. The fleece provides the “cushion” look that is so iconic in patchwork crafts.
Now comes the quilting process. You can choose to “stitch in the ditch” (sewing directly over the seams) or create a decorative diamond quilt pattern across the surface. This step is not just for looks; it secures all three layers together and prevents the fabric from shifting over time, which is vital for a functional storage box.
Once the quilting is finished, trim the edges of your panel to match your desired box template. Accuracy here is vital for the Pocket Box with Patchwork – Tutorial to succeed, as even a few millimeters of error can lead to a lopsided box. Use a quilting ruler to ensure every corner is a perfect 90-degree angle before proceeding to the assembly.
For the interior, choose a solid or a subtle print fabric that complements the exterior. Cut the lining fabric to the same size as your quilted exterior panel. At this stage, you essentially have two identical shapes: the decorative patchwork exterior and the clean lining interior, ready to be joined into a three-dimensional form.
To add a professional touch to your Pocket Box, you might consider adding a small fabric label or a “handmade” tag during this phase. Sewing it into a side seam now is much easier than trying to add it later. This attention to detail is what makes patchwork sewing such a beloved hobby for those who appreciate the finer points of craft.
3 Assembling the Box and Shaping the Pockets
Assembling the Pocket Box with Patchwork – Tutorial requires transitioning from a flat piece of fabric to a 3D structure. Align the exterior and lining fabrics with right sides together. Sew around the perimeter, leaving a small 2-inch gap for turning the piece right side out, ensuring you backstitch at the start and end for seam durability.
After sewing, clip the corners to remove excess fabric. This is a crucial trick in this sewing tutorial because it allows the corners to be sharp and crisp once turned. Turn the entire piece right side out through the gap, using a turning tool or a chopstick to gently push out the corners without poking a hole through the fabric.
Press the entire piece flat once more, making sure the opening’s raw edges are tucked neatly inside. Use a topstitch very close to the edge around the entire perimeter; this not only closes the turning gap but also gives the Pocket Box a high-end, finished look. The topstitch adds extra stability to the edges of your handmade organizer.
To create the “box” shape, fold the sides up according to your template. In this Pocket Box with Patchwork – Tutorial, we typically use a “pinch and sew” method for the corners. By folding the corners and sewing a small vertical line, you create the depth of the box. The height of this seam determines how deep your patchwork box will be.
If you want to include internal pockets, sew small rectangles of fabric onto the lining before the final assembly. These pockets are perfect for holding needles, rings, or small SD cards. The multi-pocket design is what makes this specific container so useful for organization enthusiasts who love customized sewing.
Check the symmetry of your box as you go. If one side looks higher than the other, unpick the corner seam and adjust. Since this is a Pocket Box with Patchwork – Tutorial, the visual alignment of the patterns across the corners adds a level of sophistication that is very satisfying to achieve for any DIY crafter.
4 Finishing Touches and Embellishment Techniques
The final stage of the Pocket Box with Patchwork – Tutorial involves refining the details to make your creation stand out. You may want to add a magnetic snap or a button closure to keep the contents secure. If using a button, sew a small elastic loop into the top seam of the lid for an easy and charming fastening system.
Consider adding hand-embroidery over some of the patchwork seams. A simple sashiko stitch or a cross-stitch can add a rustic, “slow-stitch” aesthetic to your patchwork project. These small details elevate the Pocket Box from a simple utility item to a piece of textile art that reflects your personal style.
If your box feels a bit soft, you can insert small pieces of plastic canvas or heavy cardstock between the lining and the exterior before closing the final seams. However, for a soft Pocket Box, the layers of fleece and quilting usually provide enough structure for it to sit proudly on a desk or vanity without collapsing.
Cleaning up stray threads is a vital part of the finishing process. Go over your box with a pair of sharp embroidery scissors to snip any “whiskers.” A clean finish is the hallmark of a great sewing tutorial outcome. Give the box one final steam press to set the shape and flatten any bulky seams at the corners.
For those looking to sell their crafts, packaging the Pocket Box with Patchwork is the final step. These make excellent gifts because they are unique and handmade. Including a small note about the upcycled fabrics used can add a story to the item, increasing its value as a sustainable gift option.
Congratulations on completing your Pocket Box with Patchwork – Tutorial! You now have a beautiful, functional, and sturdy container. This project serves as a foundation—once you’ve mastered this size, you can scale the measurements up to create larger quilted baskets or down for tiny coin purses, using the same fundamental patchwork techniques.
FAQ – Frequently Asked Questions
What is the best fabric for a Pocket Box with Patchwork?
The most recommended fabric is 100% quilting cotton. it is easy to handle, doesn’t slip under the presser foot, and comes in endless patterns. You can also use linen or light canvas for a more textured, organic look.
Can I wash my patchwork pocket box?
Yes, if you used cotton fabrics and a washable stabilizer like fusible fleece. We recommend hand washing in cold water and air drying to maintain the shape and prevent the patchwork seams from fraying or shrinking unevenly.
Do I need a walking foot for this tutorial?
While not strictly necessary, a walking foot is highly recommended for the quilting stage. It helps feed the multiple layers (top, fleece, and lining) through the machine at the same rate, preventing puckering and ensuring your patchwork stays aligned.
How long does it take to finish this project?
For an intermediate sewer, this Pocket Box with Patchwork – Tutorial usually takes about 2 to 3 hours from cutting to finishing. Beginners might want to set aside a full afternoon to ensure they get the corner seams just right.
Can I make this box without a sewing machine?
Absolutely! You can use a backstitch for the construction and a running stitch for the quilting. It will take significantly longer, but a hand-sewn patchwork box has a wonderful “slow-craft” charm that machine sewing can’t quite replicate.
Conclusion
In this Pocket Box with Patchwork – Tutorial, we have covered the entire journey from selecting the perfect fabric scraps to the final decorative topstitching. We learned how to stabilize fabric using fusible fleece, the importance of precise 1/4 inch seams, and the techniques required to turn a flat quilted panel into a sturdy, three-dimensional storage solution. This project is a fantastic way to practice quilting on a small scale while creating something truly useful for your home or as a thoughtful gift.
The versatility of the patchwork method means that no two boxes will ever be the same, allowing your creativity to shine through every stitch. We hope this guide has inspired you to dig into your scrap bin and start creating.