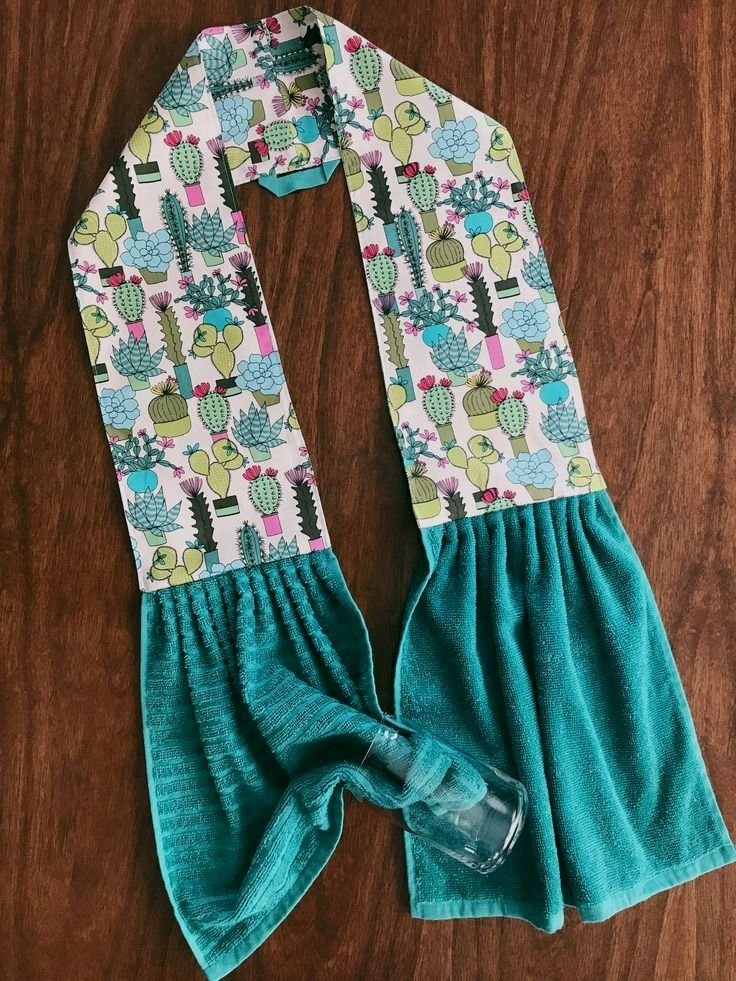
Creating a Kitchen Scarf with Towel – Tutorial is a fantastic way to combine practicality with personal style in the heart of your home. If you have ever found yourself constantly searching for a hand towel while cooking or baking, this project is the ultimate solution to your problem. A kitchen scarf, often called a boa towel or a stay-on towel, hangs comfortably around your neck, ensuring that a clean, absorbent surface is always within arm’s reach. This tutorial is designed to guide you through the process of making your own, whether you are a seasoned sewist or a beginner looking for a functional DIY kitchen project.
The beauty of a Kitchen Scarf with Towel – Tutorial lies in its versatility and the opportunity for upcycling textiles. By using high-quality cotton fabrics and absorbent terry cloth, you can create a kitchen accessory that is not only durable but also reflects your unique kitchen decor. These scarves make wonderful handmade gifts for housewarmings, bridal showers, or holiday celebrations. Because they are worn over the shoulders, they keep your clothes protected from messy hands while providing a convenient way to dry your fingers after washing vegetables or rinsing dishes.
In this comprehensive Kitchen Scarf with Towel – Tutorial, we will explore the best sewing techniques to ensure your scarf is comfortable and long-lasting. We will focus on choosing the right fabrics, understanding the pattern construction, and finishing the piece with professional-looking topstitching. By the end of this guide, you will have a beautiful, functional accessory that streamlines your workflow in the kitchen. Let’s dive into the essential steps and materials needed to bring this creative sewing idea to life and transform the way you navigate your culinary space.
1 Creating the Foundation for Your Kitchen Scarf
When you begin this Kitchen Scarf with Towel – Tutorial, the first step is selecting your materials. You will need a high-quality dish towel or hand towel, preferably one made of 100% cotton terry cloth for maximum absorbency. For the neck strap part of the scarf, choose a quilting cotton or a decorative fabric that complements your towel’s color and pattern.
The fabric dimensions for the neck piece are crucial for comfort. Generally, you will want a strip of fabric about 4 inches wide and 70 inches long. This length allows the kitchen scarf to drape comfortably over your shoulders without being too heavy or too short. If you are using shorter fabric scraps, you can sew them together using a 1/4 inch seam allowance to reach the desired length.
Preparation is key in any sewing tutorial. Before cutting, it is highly recommended to pre-wash your fabrics. Cotton and terry cloth have different shrinkage rates, and pre-washing ensures that your finished kitchen scarf won’t warp or pucker after its first trip through the laundry. Once washed, iron your fabrics flat to ensure accurate cutting and easier handling during the assembly process.
To start the construction, fold your chosen decorative fabric in half lengthwise with the right sides facing together. Use sewing pins or fabric clips to hold the edges in place. This will form the “tube” that sits around your neck. At this stage, you are preparing the bridge that will connect the two ends of your absorbent towel halves together.
Next, you will need to prepare the towel. Cut your kitchen towel in half widthwise. Most standard towels provide enough material for two ends of one scarf. To give the scarf a more professional look, you might want to create box pleats or gather the raw edge of the towel so it fits perfectly into the width of your fabric neck strap.
Using a rotary cutter and a self-healing mat will help you achieve the straightest lines possible. Precision at this stage makes the joining process much smoother. Remember, the goal of this Kitchen Scarf with Towel – Tutorial is to create a balanced piece where the weight of the towels doesn’t pull uncomfortably on the fabric strap around your neck.
2 Assembling the Neck Strap and Towel Ends
The assembly phase is where your Kitchen Scarf with Towel – Tutorial really starts to take shape. Take your fabric tube and sew along the long edge, leaving both ends open. Turn the tube right side out using a safety pin or a turning tool. Once turned, press the tube flat with an iron, ensuring the seam is either at the edge or centered on the back for a clean finish.
Now, take the raw ends of your fabric tube and fold the edges inward by about half an inch. Press these folds with your iron. This creates a neat pocket where the gathered towel will be inserted. This sewing method hides the raw edges of both the fabric and the towel, providing a high-quality garment finish that stands up to frequent use.
Insert the gathered or pleated end of your half-towel into the open end of the fabric strap. Make sure the towel is inserted at least an inch deep to ensure a secure hold. Pin the layers together firmly. It is often helpful to use a heavy-duty sewing needle (size 90/14) since you will be sewing through several layers of fabric and thick terry cloth.
Slowly sew across the pinned edge. A straight stitch is standard, but you can use a decorative stitch if your machine supports it to add more personality to your kitchen accessory. Ensure you backstitch at the beginning and end of this seam to provide extra strength, as this area will experience the most tension when the scarf is in use.
Repeat this process for the second towel half on the other end of the strap. Check that the two towel sections are facing the same direction so the kitchen scarf looks symmetrical when worn. This attention to detail is what separates a quick craft from a professional handmade product that you would be proud to sell or gift.
Finally, consider adding topstitching along the entire length of the neck strap. This isn’t just for aesthetics; it helps the strap keep its shape and prevents the fabric from rolling or twisting inside. Topstitching also gives your Kitchen Scarf with Towel – Tutorial project a crisp, boutique-style appearance that looks great in any kitchen setting.
3 Customizing Your Kitchen Scarf Design
One of the best parts of following this Kitchen Scarf with Towel – Tutorial is the ability to customize. You can use denim upcycling techniques by using old jeans for the neck strap, which adds a rustic and incredibly durable element to the design. Repurposed denim paired with a bright white towel creates a modern, farmhouse aesthetic that is very popular in home decor trends.
If you enjoy machine embroidery, you can add monograms or small kitchen-themed icons like whisks or rolling pins to the fabric strap. Personalizing the towel scarf makes it a thoughtful custom gift. You could even use fabric markers or applique to add seasonal designs, making a specific scarf for Christmas, Thanksgiving, or summertime BBQs.
For those who prefer a more bohemian look, consider adding pom-pom trim or lace edging to the bottom of the towels. While the primary goal is functionality, there is no reason your kitchen scarf shouldn’t be a fashion statement. Mixing and matching bold floral prints with solid-colored towels can brighten up your cooking routine and your kitchen space.
You can also adjust the width of the neck strap based on your preference. Some people find a wider strap more comfortable as it distributes the weight of the wet towels more evenly across the shoulders. In this tutorial, we suggest 4 inches, but you can experiment with 5 or 6 inches if you prefer a more substantial feel for your DIY wearable towel.
Think about the functionality of the towels themselves. Some crafters like to use microfiber towels for their quick-drying properties, while others prefer the classic look of waffle weave cotton. Each material offers a different texture and weight, so consider what feels best against your skin and what works most effectively for your specific cooking habits.
Another creative variation is making a reversible kitchen scarf. By using two different fabrics for the neck strap and sewing them together, you can flip the scarf to match different moods or kitchen themes. This versatile sewing project ensures that your handmade item remains a staple in your home for years to come, adapting to your changing style.
4 Care and Maintenance of Your Handmade Scarf
To ensure your creation from this Kitchen Scarf with Towel – Tutorial lasts a long time, proper care is essential. Since these scarves are used in the kitchen, they will inevitably come into contact with flour, grease, and water. Most handmade kitchen scarves are fully machine washable. Use a gentle cycle with like colors to keep the fabric dyes vibrant and the towel fibers soft.
Avoid using excessive fabric softener, as this can actually decrease the absorbency of the towel. Over time, fabric softeners build up a waxy coating on fibers, making it harder for the towel to soak up moisture. Instead, consider using a splash of white vinegar in the rinse cycle to keep your kitchen scarf smelling fresh and feeling soft without compromising its utility.
When it comes to drying, tumble dry on low or medium heat. High heat can sometimes cause the cotton fibers to become brittle over time or cause uneven shrinkage between the decorative strap and the terry cloth. If you notice any wrinkles in the neck strap after drying, a quick pass with a warm iron will restore its crisp, professional look.
Check the seams occasionally, especially where the towel meets the fabric. Because this area handles weight and movement, the stitching may eventually need a small reinforcement. A quick zigzag stitch over any loose areas will keep the scarf in perfect working order. Regular maintenance ensures your sewing project remains a reliable tool in your culinary arsenal.
If you have used upcycled materials like old jeans or vintage linens, be mindful that these fabrics may have different care requirements. Vintage fabrics can be more delicate, so hand washing or using a laundry bag might be necessary. This tutorial emphasizes durability, but the longevity of your scarf always depends on the quality of the base materials you choose.
Lastly, consider making multiple scarves so you always have a clean one available while others are in the wash. Having a “rotation” of kitchen scarves is a great way to keep your kitchen organized and sanitary. Plus, it gives you the chance to showcase different fabric patterns throughout the week, making every day in the kitchen a little more colorful and convenient.
FAQ – Frequently Asked Questions
-
What is the best fabric for the neck strap?
The best fabric is 100% quilting cotton because it is easy to sew, comes in endless patterns, and handles frequent washing very well. It is sturdy enough to hold the weight of the towels without stretching out of shape.
-
Can I make this without a sewing machine?
Yes, you can hand-sew a kitchen scarf, though it will take more time. Use a strong backstitch to ensure the towels are securely attached to the fabric strap, as this is a high-stress area.
-
How long should the kitchen scarf be?
A standard length is between 65 and 70 inches. This allows the towels to hang at waist level for most adults, making it easy to wipe your hands without bending down or pulling on the scarf.
-
What type of towel works best?
A medium-weight cotton terry cloth towel is ideal. Avoid overly thick “plush” bath towels as they can be too heavy for the neck strap and difficult to sew through. Flour sack towels are also a great lightweight alternative.
-
Is this project suitable for beginners?
Absolutely! This is an excellent beginner sewing project. It involves straight lines and basic gathering, making it a perfect way to practice sewing fundamentals while creating something useful.
-
How do I prevent the scarf from slipping off my shoulders?
Choosing a fabric with a bit of texture for the strap helps. You can also sew a small piece of non-slip fabric or a decorative button and loop to the inside of the strap to help it stay centered on your neck.
Conclusion
In this Kitchen Scarf with Towel – Tutorial, we have covered everything from selecting the right absorbent materials to the final topstitching details. You have learned how to construct a durable neck strap, attach towel halves securely, and customize the design to fit your personal style or home decor.
This project is a wonderful example of how functional sewing can solve everyday problems, keeping your towels handy and your clothes clean while you work in the kitchen. Whether you are upcycling denim or using fresh quilting cottons, the result is a high-quality accessory that brings both efficiency and charm to your home. We hope this guide inspires you to get creative with your sewing machine and start crafting these useful items for yourself and your loved ones.