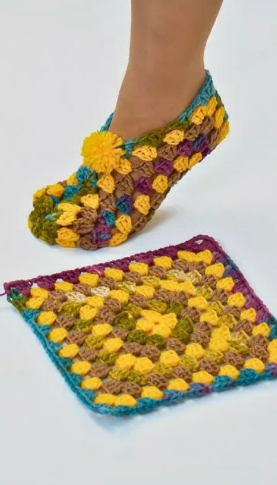
Cozying up at home with a pair of handmade crochet slippers is one of the ultimate simple pleasures of a chilly evening. If you have been searching for the perfect, comprehensive Crochet Slippers- Tutorial, you have officially landed in the right place to kickstart your next favorite crafting project. Making your own footwear is not only incredibly satisfying, but it also allows you to customize the fit, color, and texture to match your exact personal style and comfort needs.
This detailed Crochet Slippers- Tutorial is designed to guide you step-by-step through the entire process, ensuring that even if you are relatively new to the craft, you can follow along with absolute ease. Handcrafted footwear makes for an amazing, heartfelt gift for family and friends, or a wonderful self-care treat for your own feet. By utilizing just a few basic stitches and some affordable materials, you will be able to transform a simple skein of yarn into a plush, functional pair of house shoes.
Throughout this extensive Crochet Slippers- Tutorial, we will explore everything from choosing the right materials to mastering the stitching techniques required for a durable finish. We will look closely at how to adjust sizing, how to choose the best yarn for longevity, and how to add personalized touches that make your project truly unique. Grab your favorite hook, find a comfortable seat, and let’s dive deep into the wonderful world of making your own cozy footwear from scratch.
1. Choosing the Best Materials for Your Crochet Slippers
Selecting the right yarn is the absolute foundation of any successful Crochet Slippers- Tutorial because footwear naturally experiences a lot of friction and wear. For a pair of slippers that will last through many seasons, a sturdy worsted weight yarn or a bulky weight wool blend is highly recommended by experienced crafters. Acrylic yarn is an excellent, budget-friendly choice that offers great durability and can be easily tossed into the washing machine when your footwear needs a quick refresh. Wool blends offer incredible warmth and natural elasticity, but you must ensure they are washable so your hard work does not shrink in the laundry.
Equally important to your yarn selection is choosing the correct crochet hook size to achieve a tight, dense fabric. In this Crochet Slippers- Tutorial, we generally recommend using a hook that is a half-size or full-size smaller than what the yarn label suggests, such as a 5.0 mm (H-8) hook for worsted weight. A tighter gauge prevents the stitches from stretching out too much over time, which keeps the slippers snugly on your feet and stops your toes from poking through the fabric. Creating a dense stitch structure also provides better insulation, keeping your feet significantly warmer during the colder months of the year.
Beyond your yarn and hook, you will need a few essential notions to complete your project with a professional and polished finish. Make sure to have a sharp pair of scissors, a tapestry needle for weaving in your loose ends, and at least two stitch markers to keep track of your rounds or rows. Stitch markers are incredibly helpful when shaping the toe and heel sections, ensuring that your stitch counts remain perfectly symmetrical for both feet. Investing in a small bottle of non-slip fabric paint or puff paint to apply to the soles is also a fantastic safety measure to prevent slipping on smooth wooden or tiled floors.
2. Step-by-Step Stitch Guide for the Perfect Slipper Foundation
Every great Crochet Slippers- Tutorial begins with mastering the foundational stitches that build the structure of your cozy footwear. For this specific pattern, we will primarily utilize the single crochet (sc) and the half double crochet (hdc) stitches to create a firm, comfortable texture. If you want a slightly thicker sole for added comfort, you can even hold two strands of yarn together while working the bottom piece. We begin by creating a simple slip knot on your hook and chaining a specific number of stitches that matches the length of your foot from heel to toe.
Once your foundation chain is established, you will work along both sides of the chain to create an oval shape, which forms the sturdy base of your sole. To increase the width at the heel and toe, you will place multiple half double crochet stitches into the very first and very last chains of your row. This clever geometric shaping ensures that the sole mirrors the natural curves of a human foot, providing an ergonomic fit that feels custom-made. Keep your tension even and firm throughout this section so the sole remains flat and does not begin to curl prematurely.
After completing the sole rows, it is time to transition into the sides of the footwear by working into the back loops only (blo) for one entire round. This brilliant technique creates a clean, defined ridge that separates the bottom of the slipper from the upper body, causing the work to naturally turn upward. From this point forward, you will work regular rounds of single crochet without increasing, which builds up the walls around your foot. This section of the Crochet Slippers- Tutorial is incredibly relaxing, as you simply watch the project take shape over several quick and easy rounds.
3. Shaping the Toe Box and Decreasing Safely
Shaping the toe area is where the magic truly happens in this Crochet Slippers- Tutorial, turning a simple fabric cup into an actual wearable shoe. To pull the front of the slipper snugly over your toes, you will need to implement strategic crochet decreases, specifically the half double crochet two together (hdc2tog). You will use your stitch markers to identify the exact center points of the front half of your slipper before starting your decrease round. Working these decreases evenly across the front section draws the fabric inward, creating a smooth, rounded toe box that fits comfortably without pinching.
As you progress through the shaping rounds, the number of stitches at the front will rapidly decrease, while the heel section remains completely uniform. This targeted reduction creates the classic sloping shape of a loafer or a traditional house slipper, ensuring the opening sits perfectly on the top of your foot. It is a good idea to gently slip the project onto your foot at this stage to test the fit and ensure it isn’t pulling too tightly. If the toe box feels too snug, you can simply rip back a row and replace a few decreases with standard single crochet stitches.
Once the toe box is fully formed to your liking, you can choose to leave the ankle opening low for a classic loafer style or continue upward. If you prefer a warmer option, you can work additional rounds around the ankle opening to create a cozy, fold-over ribbed cuff. To achieve a beautiful ribbed texture, alternate between front post double crochet (fpdc) and back post double crochet (bpdc) stitches for three to five rounds. This elegant finishing touch not only looks beautiful and professional but also helps hug your ankle, trapping warmth inside your custom footwear.
4. Custom Sizing Tips and Professional Finishing Touches
Achieving a flawless fit is easy when you understand how to customize the measurements in this Crochet Slippers- Tutorial for different foot sizes. The easiest way to adjust the length is to simply add or subtract chains from your initial foundation chain, ensuring the length matches your actual foot footprint. Because yarn naturally stretches with wear, it is always best to design your footwear so it fits just a tiny bit snugly at first. Over the first few days of walking around your home, the fibers will relax and mold perfectly to the unique shape of your feet.
Finishing your project cleanly is just as crucial as the stitching itself if you want your handmade items to look truly high-end and professional. When you reach the end of your final round, join with a clean slip stitch to the first stitch of the round to create an even edge. Fasten off your yarn, leaving a generous six-inch tail, and use your tapestry needle to weave the yarn tail securely through the inside stitches. Weaving in a zigzag pattern ensures that the ends will never pop out or unravel, even after multiple trips through the washing machine.
To elevate your project further, consider adding decorative elements like a handmade yarn pom-pom, a cute crochet button, or contrasting color borders. Applying a non-slip backing to the soles is the final step, and you can easily do this by drawing small dots or patterns with silicone sealant or puffy fabric paint. Allow the non-slip material to dry completely for a full twenty-four hours before wearing your new creations on slippery surfaces. With these final steps complete, your beautiful, custom-made footwear is officially ready to bring warmth and comfort to your daily routine.
Frequently Asked Questions (FAQ)
What is the best type of yarn to use for making durable house slippers?
The best yarn for footwear is a high-quality worsted weight acrylic yarn or a sturdy wool blend. Acrylic is favored because it is highly durable, inexpensive, and fully machine washable, which is essential for items that walk on floors. Wool blends offer superior warmth and excellent elasticity, helping the slippers maintain their shape over time, but you must ensure the label states it is superwash wool to avoid accidental shrinking.
How do I make sure my handmade slippers don’t slip on hardwood or tile floors?
You can easily make your footwear safe and slip-resistant by applying an affordable non-slip backing to the finished soles. Popular methods include using dots of clear silicone sealant, puffy fabric paint, or adhering small patches of suede or leather fabric to the bottoms. Let the liquid sealants dry completely for at least 24 hours before walking in them to ensure the grip adheres permanently to the yarn.
Can a total beginner successfully complete this project?
Yes, absolutely! This project is highly accessible because it relies primarily on fundamental stitches like the single crochet and half double crochet. The step-by-step instructions break down the shaping process into simple terms, making it a fantastic first project for someone looking to move beyond basic blankets or scarves. Taking your time and using stitch markers will guarantee success.
How do I adjust this pattern to fit different shoe sizes accurately?
To adjust the size, simply measure the sole of the foot you are making them for and adjust the length of your starting foundation chain. The chain should be roughly three-quarters of an inch shorter than the actual foot length to account for the natural stretch of the yarn. You can add more rows around the sole to accommodate wider feet or reduce rows for narrower feet before building up the sides.
Is it better to use a large or a small crochet hook for footwear?
It is highly recommended to use a slightly smaller crochet hook than what is typically recommended on the yarn label. Using a smaller hook creates a much tighter, denser fabric that prevents gaps from forming between your stitches. This dense gauge ensures your toes don’t poke out, keeps the structure stable, and provides significantly better insulation to keep your feet cozy and warm.
Conclusion
In this Crochet Slippers- Tutorial, we have covered all the essential steps required to create a comfortable, durable, and perfectly fitting pair of handmade house shoes.
From choosing the ideal resilient yarn and selecting the right hook size to mastering the foundational sole stitches and shaping the toe box, you now possess the complete blueprint for crafting cozy footwear. Remember that the secret to long-lasting slippers lies in maintaining a tight stitch tension and applying a safe, non-slip backing to the soles before your first use.