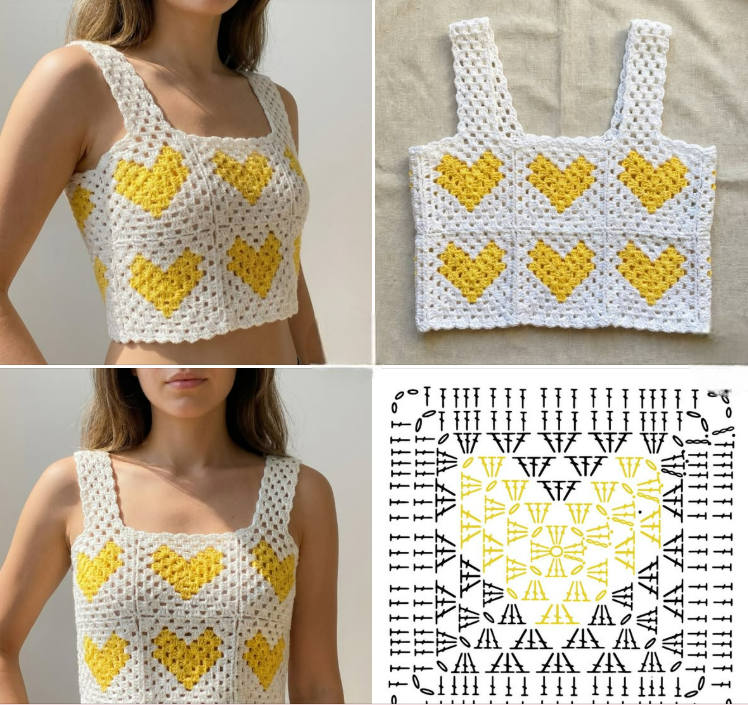
The Crochet Square Heart Cropped Top – Tutorial is your ultimate guide to creating a stunning, fashionable, and completely handmade wardrobe staple that combines retro charm with modern style. If you love the look of classic granny squares and want to elevate your crochet game, this projects blends romantic motifs with a trendy silhouette that looks incredible on any body type. Whether you are aiming to style this for a summer festival, a casual day out, or a cozy layered look, mastering this beautiful design will expand your crafting skills and give you a unique garment you can wear with absolute pride.
Crocheting your own clothes is a deeply rewarding experience, and this Crochet Square Heart Cropped Top – Tutorial breaks down the entire process so you can achieve professional-looking results at home. Using basic stitches alongside clever shaping techniques, this project allows you to play with vibrant color combinations or stick to a timeless monochromatic palette. By focusing on individual square construction before assembling the final piece, even intermediate beginners can comfortably follow along and successfully finish this gorgeous handmade top without feeling overwhelmed by complex garment shaping.
In this comprehensive Crochet Square Heart Cropped Top – Tutorial, we will explore everything from choosing the perfect yarn to assembling your finished squares and customizing the fit. This step-by-step guide is fully optimized to help you understand the anatomy of a crochet heart square, how to seamlessly connect your work, and how to add durable straps for a secure fit. Grab your favorite crochet hook, select your yarn colors, and let’s dive into this fun, creative journey that transforms simple loops of yarn into a breathtaking fashion statement.
1. Choosing the Right Yarn and Tools for Your Top
Selecting the perfect materials is the most critical first step for ensuring your Crochet Square Heart Cropped Top – Tutorial project turns out absolutely beautiful, comfortable, and durable. For a garment that sits directly against the skin, you want a fiber that is incredibly soft, breathable, and easy to wash. Cotton yarn or a high-quality cotton-acrylic blend is highly recommended because it offers excellent stitch definition, meaning your heart motifs will stand out crisply and look professionally made.
The weight of the yarn also plays a massive role in how the garment drapes over the body, so opting for a light worsted or DK weight yarn is ideal. These weights keep the cropped top light and airy for warm weather while ensuring the fabric isn’t too bulky or stiff under the arms. If you choose a yarn that is too heavy, your squares might end up too large, making it difficult to adjust the sizing accurately for a fitted look.
In addition to your yarn, you will need a matching crochet hook that complements your chosen fiber, typically ranging between a 3.5mm and 4.5mm hook size. Having a set of locking stitch markers on hand is also incredibly helpful for holding your pieces together during the assembly phase. A sharp pair of scissors and a sturdy tapestry needle are essential for weaving in those loose yarn ends neatly so your garment remains secure through multiple washes.
When planning your color palette, think about how the heart motif will interact with the background of each square. Using a contrasting color for the central heart makes the romantic design pop dramatically, while choosing a solid, single color yields a subtle, elegant texture. Take some time to swatch a single square beforehand to check your tension and ensure you like how the colors interact before committing to the full garment.
Proper tension is key when working on wearable items because consistency ensures all your individual squares match perfectly in size. If your stitches are too loose, the top may stretch out of shape quickly; if they are too tight, the fabric might feel stiff and uncomfortable against your skin. Treat your material selection as the foundation of your creative success, investing in textures that feel wonderful to work with.
Ultimately, preparing your workspace with the correct tools sets you up for a smooth, relaxing, and highly enjoyable crafting experience. Once you have gathered your breathable cotton yarn, the correct hook size, and your essential notions, you are fully equipped to begin making the individual pieces. Let’s move forward and look at how to construct the beautiful heart elements that form the core of this fashionable handmade design.
2. Step-by-Step Construction of the Heart Granny Square
The heart of this design lies in mastering the central motif, and this section of the Crochet Square Heart Cropped Top – Tutorial focuses on creating that perfect shape. To begin, you will start by working in a magic ring or a small chain circle to form the very base of your heart. Using a combination of taller stitches like double crochet and treble crochet, you will easily create the rounded tops of the heart shape in the very first round.
As you work around the circle, switching to shorter stitches like half double crochet and single crochet allows you to taper the bottom into a sharp, recognizable point. This clever manipulation of stitch heights is what gives the heart its signature look before you transition into framing it. It is vital to count your stitches carefully during these initial steps so that the heart remains completely symmetrical on both sides.
Once your central heart is complete, it is time to transform this rounded shape into a workable four-cornered square by introducing a background color. You will attach your new yarn color to any stitch on the perimeter and use strategically placed corner clusters to square off the edges. By placing double crochets, chains, and more double crochets into specific stitches, the round heart quickly morphs into a classic granny square format.
Building additional rounds around your squared heart allows you to grow the piece to the exact measurements required for your specific clothing size. Each subsequent round follows a predictable pattern of stitch clusters along the flat sides and dedicated increases inside the four corner spaces. Keep a measuring tape nearby so you can monitor the exact width and height of your squares as you complete each row.
To make a standard cropped top, you will typically need to crochet a specific number of these identical squares depending on your bust measurements. For a small or medium size, a grid of four to six squares for the front panel is often the perfect baseline. Enjoy the repetitive, meditative nature of producing these blocks, as mastering the first one makes the rest of the assembly move along incredibly fast.
Finishing each square with a clean slip stitch and fastening off securely ensures that your hard work will not unravel later during assembly. Taking a moment to weave in the yarn tails as you finish each individual block saves you from a massive chore at the very end of the project. With all your beautiful heart panels completed, you are now ready to join them together into a wearable garment structure.
3. Joining Your Squares and Shaping the Cropped Silhouette
Assembling your individual pieces is where the magic truly happens, transforming flat blocks into a beautiful three-dimensional garment using this Crochet Square Heart Cropped Top – Tutorial. Before you begin joining, it is highly recommended to block your squares using a bit of steam or water to ensure they are flat and uniform. This simple step makes aligning the edges vastly easier and results in much cleaner, flatter seams across the entire top.
There are several popular methods to join crochet squares, including the mattress stitch, the slip stitch join, or a decorative single crochet seam. For a completely flat, invisible look on the right side of the fabric, using a tapestry needle to whip stitch the back loops together works wonders. If you prefer a more textured, bohemian look, joining them with a crochet hook on the right side creates a lovely raised frame.
Begin by laying out your squares on a flat surface to plan the layout of your front panel and your back panel precisely. Arrange the heart motifs so they all face upright, ensuring that your color patterns match seamlessly across the rows and columns. Use your locking stitch markers to pin the corners together securely, keeping the edges perfectly aligned so your stitches line up one-for-one.
Once the front and back grids are securely joined into solid panels, you will place them right sides together to connect the side seams. Leave an appropriate opening at the top for your arms and head, tailoring the side closure to fit comfortably around your ribcage. It is always wise to try the uncompleted top on at this stage to check the fit and make any necessary adjustments before finalizing the seams.
Shaping a cropped silhouette means the bottom border should sit comfortably around your waist or midriff without riding up excessively. You can easily customize the length of your top by adding extra rows of solid double crochet or a decorative border directly to the bottom hem. This flexibility allows you to make the shirt as short or as long as you feel most confident wearing.
Take your time during the joining phase, as neat seams are the hallmark of high-quality, high-end handmade boutique clothing. Rushing this step can lead to puckered fabric or uneven edges, which detracts from the beautiful geometry of your heart motifs. With the main body panels beautifully joined together, you are ready to add the final supportive elements to your new top.
4. Crafting Comfortable Straps and Adding Elegant Borders
No handmade garment is complete without proper support and beautiful finishing touches, which is why this section of the Crochet Square Heart Cropped Top – Tutorial is so vital. The straps not only hold the top securely in place but also add to the overall aesthetic design of the piece. You can choose between thick, sturdy solid straps for excellent support or delicate, adjustable tie-straps for a fun summer look.
To create classic solid straps, join your yarn directly to the top corners of the front panel and work rows of single or half double crochet until they reach your shoulders. Walk the straps over your shoulder to measure the exact length needed to meet the back panel, keeping in mind that crochet fabric naturally stretches slightly over time. Fasten them securely to the back panel using your tapestry needle or a neat row of slip stitches.
If you love versatility, making long braided or chained ties allows you to tie the top at the shoulders, making the sizing completely adjustable. This is a fantastic option if you are gifting the top to a friend or selling your creations online, as it accommodates multiple body shapes beautifully. Ensure the ties are stitched robustly into the corners so they can withstand regular tying and untying without tearing.
Once your straps are firmly attached, adding a unified border around the entire neckline, armholes, and bottom edge ties the design together flawlessly. A simple round of single crochet creates a clean, crisp edge that prevents the fabric from curling or stretching out of shape with wear. For a more feminine touch, a delicate shell stitch or picot border adds an elegant, romantic flair that complements the hearts.
Weaving in your remaining yarn ends is the final technical step, and doing it carefully ensures your top looks pristine inside and out. Use your tapestry needle to hide the tails deeply within the matching color sections of your stitches, changing directions a few times for maximum security. Cut the excess yarn close to the fabric, being careful not to accidentally snip your beautiful stitches in the process.
Now that your borders are complete and your ends are safely tucked away, step back and admire your gorgeous new handmade clothing item. Your dedication to clean stitches, thoughtful material selection, and precise assembly has resulted in a spectacular, fashionable piece of wearable art. Taking care of your new top with gentle hand washing will keep it looking fresh, vibrant, and beautiful for many seasons to come.
Frequently Asked Questions (FAQ)
What is the best type of yarn to use for a crochet cropped top?
The most recommended fiber for a wearable top is 100% cotton or a cotton-acrylic blend in a DK or light worsted weight. Cotton is highly breathable, absorbs moisture well, and holds its shape brilliantly, making it perfect for summer clothing. It also offers exceptional stitch definition, which helps your heart motifs stand out clearly.
How do I adjust this pattern to fit different clothing sizes?
Adjusting the size is incredibly simple because you can easily alter the size of each individual square or change the total number of squares used. Adding more rounds to the outside of each square will increase the overall width and length of the panels. You can also customize the fit by widening the side seams or adding extra rows of crochet to the borders.
Is this project suitable for absolute beginners?
This project is ideal for intermediate beginners who are already comfortable with basic stitches like single, half double, and double crochet. While making a garment can seem intimidating, breaking it down into individual square panels makes the process highly manageable. Following a step-by-step tutorial ensures you learn new shaping techniques without feeling overwhelmed.
Can I wash my handmade crochet top in a washing machine?
If you used a machine-washable cotton or acrylic blend, you can wash it on a gentle, cold cycle inside a mesh laundry bag to protect the stitches. However, to keep your handmade top looking brand new and to prevent stretching, hand washing in cool water with a mild detergent and laying it flat to dry is always the safest option.
How many squares do I need to make a complete top?
The total number of squares depends entirely on your desired layout and body size, but a standard design typically uses between 8 and 12 squares for the main body. A common layout features a grid of four squares for the front and four for the back, with additional rows or borders added for length. You can experiment with layouts to get the exact coverage you want.
Conclusion
In this Crochet Square Heart Cropped Top – Tutorial, we have walked through the entire creative journey of designing, crocheting, and assembling a gorgeous, custom-fitted summer garment.
From handpicking the softest cotton yarns to mastering the symmetrical heart motifs and joining the panels with clean seams, you now possess the knowledge to create an absolute masterpiece. This project perfectly demonstrates how traditional crafting techniques can be seamlessly transformed into modern, chic boutique fashion.