
Mini fabric keychain for headphones – Tutorial: Have you ever found yourself untangling a knotted mess of cords at the bottom of your bag, wishing for a stylish, compact solution? If so, creating a mini fabric keychain for headphones is the perfect weekend DIY project that combines everyday functionality with personal flair. This simple yet incredibly useful accessory ensures your earbuds stay organized, protected, and always within arm’s reach while adding a charming handmade touch to your keys or backpack.
Whether you are a seasoned sewing enthusiast or a complete beginner looking for an easy introductory project, crafting a mini fabric keychain for headphones is both rewarding and budget-friendly. Using just a few scraps of material, some basic hardware, and a little bit of time, you can design a custom holder that matches your unique style. It also makes for a thoughtful, practical gift for friends, family, or coworkers who are constantly on the go and tired of losing their tech accessories.
In this comprehensive guide, we will walk you through the entire process of making your own mini fabric keychain for headphones, from selecting the right materials to the final assembly steps. We will explore how choosing high-quality, durable fabrics and the right structural elements can elevate your project from a simple craft to a premium, long-lasting accessory. Grab your sewing supplies, clear your workspace, and let’s dive into this fun and creative tutorial that will revolutionize the way you carry your daily audio gear.
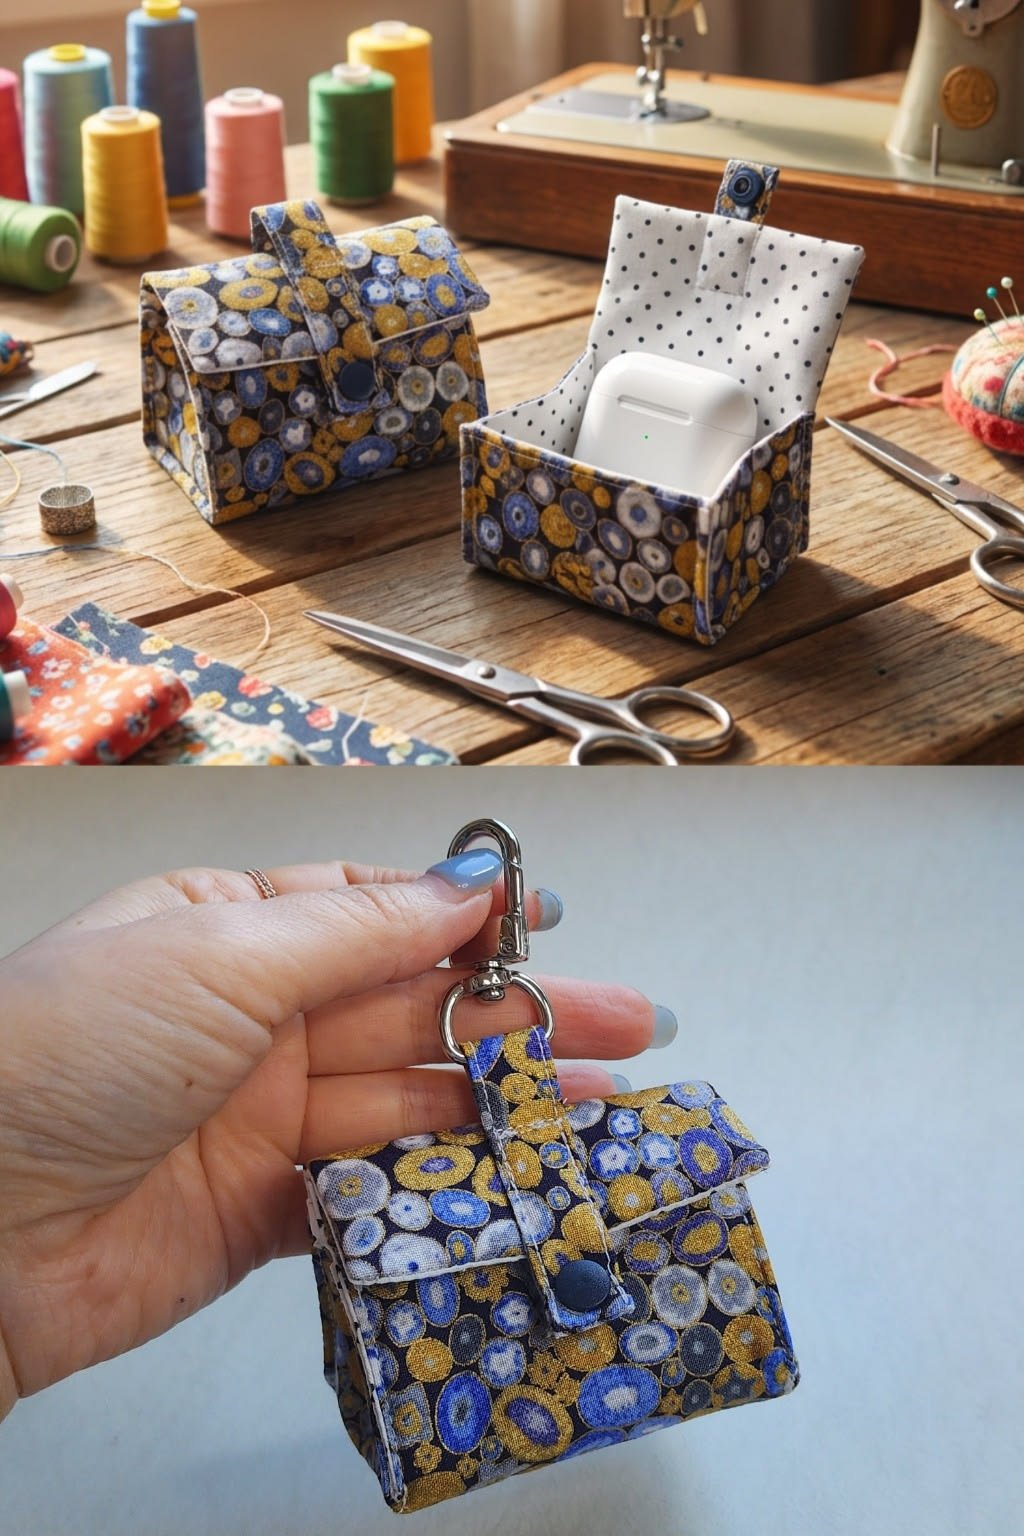
1. Choosing the Right Fabric for Your Keychain
When starting your mini fabric keychain for headphones project, selecting the ideal material is the crucial first step for both durability and aesthetics. Since this accessory will be bouncing around inside pockets and bags, you need a textile that can withstand daily wear and tear. Cotton canvas, heavy denim, or reinforced quilting cotton are excellent options because they offer structural integrity while remaining easy to sew.
The visual appeal of your headphone pouch relies heavily on the patterns and colors you choose to express your personal style. Vibrant prints, geometric patterns, or classic solids can turn a simple fabric earbud holder into a standout fashion statement on your keyring. If you choose lighter weight fabrics, remember that you can always reinforce them later with structural elements to ensure the pouch holds its shape over time.
Working with smaller pieces of material means this project is a fantastic opportunity for eco-friendly crafting and scrap busting. You do not need to buy yards of new material; instead, look through your leftover scraps from previous sewing adventures. Using up these smaller pieces reduces textile waste while allowing you to create a completely unique, one-of-a-kind DIY headphone case that no one else will have.
Texture also plays a significant role in how premium your finished mini fabric keychain for headphones feels in your hands. Soft linen blends offer a rustic, cozy aesthetic, while faux leather or oilcloth can provide a sleek, modern, and water-resistant finish. Consider who will be using the keychain and select a fabric texture that aligns with their daily lifestyle and aesthetic preferences.
Before cutting into your chosen material, it is always a best practice in sewing to pre-wash and iron your fabrics thoroughly. This step prevents any future shrinkage if the keychain pouch ever needs to be washed, and it ensures your cuts are perfectly precise. Crisp, flat fabric makes the measuring and alignment process much easier, setting you up for professional-looking results right from the beginning.
Ultimately, the best fabric is one that balances flexibility with sturdiness, allowing you to easily turn the project right-side out during construction. Avoid overly slippery or highly stretchy materials like spandex or silk, as they can be incredibly frustrating to sew at such a small scale. Stick to stable, woven fabrics to guarantee that your handmade tech accessory turns out beautifully and functions exactly as intended.
2. Essential Tools and Hardware Needed
To bring your mini fabric keychain for headphones to life, gathering the proper tools before you sit down to sew will save you time and frustration. You will need standard sewing notions, including sharp fabric shears, a reliable measuring tape or quilting ruler, and fine sewing pins or quilting clips. A sewing machine makes the process incredibly fast, but this project is small enough that it can easily be stitched by hand using a basic needle.
The structural secret behind a professional, crisp DIY fabric keychain lies in using high-quality fusible interfacing. This iron-on material is applied to the wrong side of your fabric pieces, giving thin cottons the extra body and stiffness they need to protect your electronics. Without interfacing, your pouch might feel flimsy and saggy, failing to offer the robust protection your earbuds require when shoved into a crowded pocket.
Securing your headphones safely inside the keychain requires a reliable closure mechanism, and you have a few excellent options depending on your skill level. A sturdy metal snap fastener or plastic resin snap is a popular choice because it provides a secure hold and is incredibly satisfying to open and close. Alternatively, you can use a small strip of hook-and-loop tape (Velcro) or even a small button with a stitched buttonhole for a vintage look.
To transform your fabric pouch into an actual, functional keychain, you must incorporate the right keyring hardware into your design. You will need a sturdy metal split ring, a lobster claw clasp, or a swivel snap hook attached to a small fabric loop on the side of the pouch. This hardware allows you to effortlessly clip your new headphone holder onto your car keys, purse straps, or gym bags for instant access.
Matching your thread color to your fabric is another small detail that makes a massive difference in the final appearance of your mini fabric keychain for headphones. You can choose a coordinating thread that blends seamlessly into the fabric for a clean look, or a contrasting thread for decorative topstitching that highlights the pouch’s clean lines. High-quality polyester thread is recommended for its strength and resistance to fraying under daily tension.
Lastly, having a good iron and ironing board nearby is non-negotiable for achieving a crisp, professional finish on your handmade audio pouch. Pressing your seams flat after every single step helps set the stitches and molds the fabric into its proper shape. A well-pressed project distinguishes an amateur craft from a high-end, boutique-quality accessory that you will be proud to show off to everyone.
3. Step-by-Step Cutting and Sewing Guide
Now that your materials are ready, it is time to begin the actual construction of your mini fabric keychain for headphones. Start by cutting two identical rectangles for the outer fabric, two for the inner lining, and two pieces of fusible interfacing, measuring roughly 4 by 5 inches each. Fuse the interfacing to the wrong side of your outer fabric pieces using a hot, dry iron according to the manufacturer’s specific instructions.
Next, prepare the small fabric tab that will hold your keyring hardware securely to the main body of the pouch. Cut a small fabric strip measuring 2 by 3 inches, fold it in half lengthwise, press it, open it back up, and fold the raw edges toward the center crease before topstitching down both sides. Slide your metal swivel hook or D-ring onto this prepared loop, fold it in half, and baste it to the side of one outer fabric piece.
To assemble the main body, place one outer fabric piece and one lining piece right sides together, sandwiching the top edge where your closure will eventually sit. Stitch along this top edge using a standard quarter-inch seam allowance, then repeat the exact same process for the remaining outer and lining pieces. Open the pieces up and press the freshly sewn seams flat with your iron to ensure the edges are perfectly crisp.
Now, realign your pieces so that the two outer fabric sections are right sides together, and the two lining sections are right sides together. Pin or clip all the way around the perimeter, making sure the center seams match up perfectly to avoid any awkward shifting. Sew around the entire outside edge, but remember to leave a 2-inch opening at the very bottom of the lining fabric so you can flip the project later.
Clip the corners of your rectangle carefully, making sure not to cut through your stitches, as this removes excess bulk and allows for sharp, clean corners. Reach through the opening you left in the lining and gently pull the entire mini fabric keychain for headphones right-side out. Use a blunt tool, like a chopstick or a turning tool, to carefully push out the corners until they are perfectly square and neat.
Tuck the raw edges of the lining opening inward, press it flat, and sew it closed using either a very neat machine edge-stitch or a hidden hand ladder stitch. Push the lining down inside the outer pouch body, press the top edges thoroughly, and run a beautiful topstitch around the upper rim for added durability. Install your chosen snap fastener to the opening flap, and your custom headphone organizer is officially complete and ready for action.
4. Maintenance and Creative Variations
To keep your mini fabric keychain for headphones looking fresh and vibrant for years to come, knowing how to clean and maintain it properly is essential. Because it lives on your keychain, it will inevitably gather dirt, dust, and oils from your hands over time. If you used washable cotton fabrics and metal snaps, you can easily hand wash the pouch in warm, soapy water, reshape it, and let it air dry completely.
If you enjoy customizing your belongings, there are endless creative ways to adapt this DIY keychain tutorial to better reflect your unique personality. You can add gorgeous hand embroidery, such as tiny flowers or initials, to the outer fabric before fusing the interfacing. Alternatively, you can use fabric paint, heat-transfer vinyl designs, or unique decorative buttons to give your earbud holder a distinct, personalized touch.
Size variations are another fantastic way to experiment with this versatile pattern to accommodate different styles of modern audio gear. If you use larger, wireless bluetooth earbuds that come inside a bulky charging case, simply expand the dimensions of your fabric cuts to create a custom-fitted sleeve. This ensures that no matter what type of headphones you prefer, they can still benefit from a secure, stylish, and padded fabric home.
For those looking to monetize their crafting skills, making these pouches is a brilliant and highly profitable option for a small handcraft business. They require very little raw material investment, making your profit margins exceptionally high when sold at local craft fairs or online shops like Etsy. Packaging them attractively as “stocking stuffers” or “tech organization gifts” can quickly turn your hobby into a successful, steady stream of extra income.
You can also experiment with alternative materials like repurposed leather jackets, vintage wool blankets, or upcycled denim jeans to create a rugged, masculine aesthetic. These heavier materials provide incredible natural protection for your electronics while giving your mini fabric keychain for headphones a rugged, artisanal charm. Just ensure your sewing machine can handle the thickness of these heavier fabrics before you begin stitching through multiple layers.
As you become more comfortable with the basic pattern, consider adding small functional additions like an exterior mesh pocket to hold extra earbud tips or a charging cable. This elevates your simple keychain into a mini tech organization pouch that keeps all your essential audio accessories neatly grouped together. The possibilities are truly limitless once you master the foundational sewing techniques outlined throughout this comprehensive guide.
Frequently Asked Questions (FAQ)
Can I make this keychain if I don’t own a sewing machine?
Yes, absolutely! Because the pieces for this mini fabric keychain for headphones are so small, you can easily sew the entire project by hand. Use a strong backstitch for the main seams to ensure the pouch remains durable, and a hidden ladder stitch to close the opening in the lining for a flawless, professional finish.
What is the best way to clean my fabric headphone keychain?
The cleaning method depends entirely on the materials you chose. For standard cotton fabrics with metal or plastic snaps, a gentle hand wash with mild detergent and warm water is best. Avoid putting it in a washing machine or dryer, as the intense agitation can distort the fusible interfacing and damage the metal keychain hardware.
Will this pouch fit wireless earbuds like AirPods?
The standard dimensions provided in this tutorial are optimized for traditional wired headphones or smaller, slim wireless cases. However, you can easily customize the pattern! Simply measure your wireless earbud charging case, add an extra inch to the width and depth for seam allowances and bulk, and cut your fabric pieces accordingly.
Why is using interfacing so important for this project?
Fusible interfacing acts as the supportive skeleton for your fabric pouch, giving it structure, thickness, and stability. Without it, standard cotton fabric will be too floppy, making it difficult to open and close the snap easily. It also adds a crucial extra layer of padding to protect your headphones from minor drops and bumps.
What can I use if I don’t have a metal snap fastener tool?
If you do not have a tool to install metal snaps, do not worry! You can easily sew a small strip of hook-and-loop tape (Velcro) inside the opening flap. Other great sew-in alternatives include traditional buttons with a hand-stitched buttonhole, magnetic snaps, or a simple metal sew-on snap that requires no special tools to install.
Conclusion
In conclusion, crafting a mini fabric keychain for headphones is a delightful, engaging, and practical DIY project that effortlessly solves the everyday problem of tangled cords and misplaced earbuds.
Throughout this tutorial, we have learned how to select the most durable fabrics, prepare them with fusible interfacing for added structure, and assemble them using straightforward sewing techniques. By adding high-quality keyring hardware and a secure closure, you create a beautiful, functional accessory that keeps your audio gear safe and organized wherever life takes you.