
Bags with Crochet Border – Tutorial is the ultimate guide you need to transform ordinary fabric bags into stunning, personalized fashion statements. Crafting your own accessories allows you to express your unique style while embracing the beautiful world of handmade art. Whether you are looking to upcycle an old tote or create a brand-new masterpiece from scratch, adding a hand-crocheted edging elevates the design instantly.
In this comprehensive guide, we will walk you through the entire process of combining fabric and yarn seamlessly. This project is incredibly versatile, making it perfect for beginners who want to practice basic stitches and experienced crafters looking for a relaxing, creative endeavor. By the end of this tutorial, you will have all the knowledge required to design custom crochet border bags that are bound to turn heads.
The fusion of textile textures and delicate yarn work creates a wonderful tactile contrast that is highly trendy right now. Beyond aesthetics, learning how to make bags with crochet border – tutorial projects is a fantastic way to dive into sustainable fashion. Let’s explore the essential materials, the step-by-step techniques, and the best practices to ensure your finished piece looks professional, durable, and absolutely gorgeous.
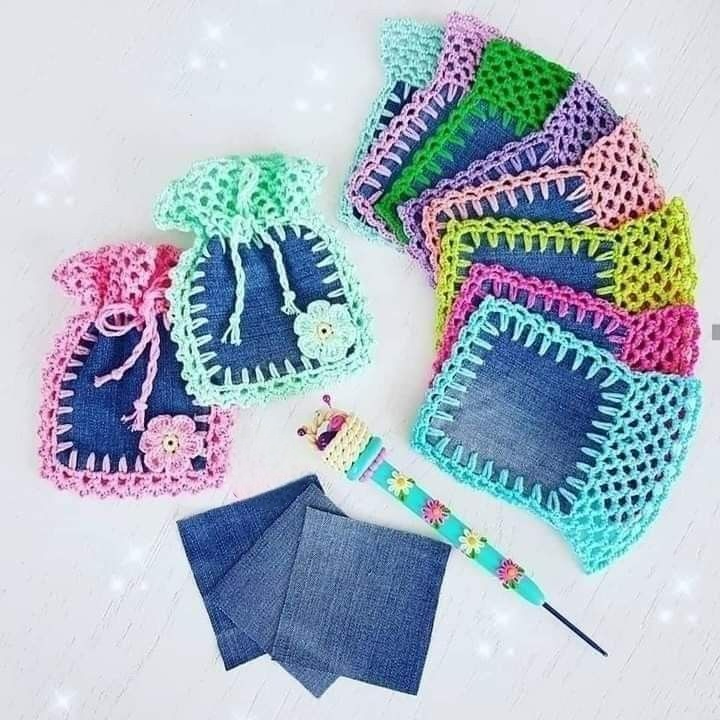
1. Essential Materials for Crafting Crochet Border Bags
Before diving into the creative process, gathering the right tools is crucial for achieving a flawless finish on your project. The foundation of your bag depends entirely on the type of fabric you choose to work with. For instance, heavyweight cotton canvas, sturdy linen, or even upcycled denim fabric work best because they provide the structural integrity needed to support the weight of the yarn.
Next, you need to select the perfect yarn to complement your chosen fabric base. 100% mercerized cotton yarn is highly recommended for this specific project due to its incredible durability, subtle sheen, and resistance to fraying. It holds its shape beautifully over time, ensuring that your delicate crochet lace border remains crisp and defined even after multiple trips through the washing machine.
In addition to your fabric and yarn, you will need a few specialized tools to bridge the gap between sewing and crocheting. A sharp steel crochet hook in a smaller size (such as 1.5mm to 2.5mm) is essential for piercing the fabric edges without causing large, unsightly tears. You will also need a standard-sized hook that matches your yarn gauge for the remainder of the decorative stitching.
Do not forget to keep a pair of sharp fabric scissors, a water-soluble fabric marker, and a ruler nearby. A rotary cutter with a skipping blade can also be an absolute game-changer for this project, as it punches perfectly spaced holes along the fabric edge automatically. Having these tools organized and ready will make your crafting experience smooth, enjoyable, and highly efficient.
Proper preparation of the fabric edge before you even touch your crochet hook will prevent future headaches regarding fraying. If you are using raw fabric, sealing the edges with a simple hem, pinking shears, or anti-fraying fabric glue is an excellent preventative step. Taking the time to prepare your materials correctly guarantees a professional-looking final product that you will be proud to wear.
Ultimately, the beauty of this project lies in the endless customization options available through your material choices. You can opt for high-contrast colors to make your boho crochet border pop dynamically against a neutral canvas bag, or choose monochromatic tones for a sophisticated, subtle look. The choice is entirely yours, so let your personal style guide your selection.
2. Preparing the Fabric Base and Creating Foundation Holes
The secret to a neat, symmetrical bags with crochet border – tutorial creation lies entirely within the preparation phase. You must start by preparing the clean border area where your yarn will eventually connect to the woven fabric. If you are working with an existing tote, ensure the top hem is clean, pressed with an iron, and free of any loose threads.
To ensure your stitches are evenly spaced, you will want to measure and mark the placement of your foundation holes carefully. Use your ruler and water-soluble marker to place small dots approximately one-quarter of an inch away from the top edge. Space these dots about one-quarter to one-half inch apart from one another, keeping the distance completely uniform all the way around.
If you are using the skipping blade method with a rotary cutter, simply roll the tool along your marked line to create instant, even perforations. If you are using a sharp steel hook or a heavy-duty leather awl, manually pierce each dot you marked previously. Be careful not to make the holes too large, as the fabric fibers should snugly grip the yarn you pull through.
Consistency during this step is what separates amateur DIY projects from high-end, boutique-quality boutique accessories. If your holes are spaced too far apart, your fabric will bunch up awkwardly once the crochet yarn is attached. Conversely, if the perforations are placed too close together, the fabric edge may weaken, rip, or ripple under the tension of the stitches.
Once all your foundation holes are successfully created, it is highly recommended to give the fabric one final press with the iron. This ensures the edges remain perfectly flat and crisp, providing an ideal working surface for the next phase. Now that your fabric base is fully prepared, you are officially ready to bring in your favorite yarn colors.
Remember to count your total number of holes if you plan on using a complex, repeating pattern for your decorative border. Many intricate crochet lace charts require a specific multiple of stitches (such as multiples of 4 or 6) to repeat correctly around the entire perimeter. Plan ahead during this stage to ensure your final corner stitches align beautifully without any awkward spacing.
3. Stitching the Blanket Stitch Foundation and First Crochet Row
With your fabric base properly prepared, it is time to create the crucial anchor row that connects the textile to the yarn. The most reliable and traditional method to achieve this is by sewing a blanket stitch foundation around the edge. Thread a sharp tapestry needle with a strand of your chosen yarn, securing it with a hidden knot on the inside of the bag.
Insert your needle through the first hole from the back to the front, looping the yarn under the needle tip before pulling it taut. This action creates a beautiful, flat horizontal strand of yarn that sits directly on top of the raw fabric edge. Repeat this exact process for every single hole, maintaining a consistent, gentle tension so the fabric doesn’t bunch.
Once you have completed the blanket stitch perimeter, fasten off the yarn securely or join it seamlessly to begin the crochet phase. Now, switch over to your standard crochet hook that matches your yarn size to begin the official first row. Attach your yarn to any horizontal loop of the blanket stitch foundation with a simple slip stitch.
For the first row, working a sequence of single crochet stitches into each blanket stitch loop is the best way to build a solid foundation. If your fabric holes were spaced a bit wider apart, you can easily work two single crochets into each loop to prevent pulling. This row acts as the steady transition zone between the rigid woven fabric and the flexible crochet work.
As you work your way around the bag, continuously check that the piece remains perfectly flat and does not begin to bowl inward. If you notice the edge curling tightly, it means your tension is too tight or you need to add more stitches. Keeping your stitches relaxed will ensure the opening of your tote bag remains wide, functional, and easily accessible.
When you reach the starting point of your single crochet row, join the round using a neat slip stitch into the very first chain. You have now successfully bridged the gap between fabric and yarn, creating a strong, beautiful base for your design. From this point forward, you can let your creativity run wild with various decorative stitch combinations.
4. Crafting the Decorative Border Styles and Finishing Touches
Now comes the most exciting part of the bags with crochet border – tutorial process: choosing and executing your decorative edging style. For a classic, minimalist look, you can never go wrong with a simple crochet shell stitch or a delicate picot border. These styles add a touch of elegance without overwhelming the original design of the fabric bag.
To create a gorgeous shell stitch border, work five double crochets into a single stitch, skip two stitches, and single crochet into the next. Repeating this simple rhythmic pattern around the rim creates a beautiful, undulating wave effect that frames the fabric beautifully. It is an incredibly popular technique because it looks intricate but is actually very easy to memorize.
If you prefer a vintage, bohemian aesthetic, you can experiment with a wider, more open crochet mesh pattern or hanging tassels. You can easily extend the border for several rows by alternating double crochets and chain spaces to build a gorgeous lace collar. This technique works exceptionally well on summer beach totes, market bags, and casual everyday festival purses.
As you finalize the height of your decorative border, it is important to plan your yarn tails carefully for a clean look. Cut your yarn, leaving a generous six-inch tail, and pull it completely through the final loop to secure the work. Thread this tail onto a yarn needle and meticulously weave it through the inside of your crochet stitches to hide it.
To ensure your handmade creation lasts for years to come, consider applying a tiny drop of fabric sealant to the hidden yarn knots. This extra step prevents the yarn from unraveling during daily use or when the bag is holding heavier items. Once the glue dries completely, use your sharp scissors to trim away any remaining yarn fragments closely.
The final step in this creative journey is to steam block your finished crochet border gently using a standard clothing iron. Avoid pressing the iron directly onto the yarn fibers; instead, hover it closely over the work while releasing bursts of steam. Use your fingers to shape the wet stitches neatly, allowing the border to lay perfectly flat, professional, and absolutely gorgeous.
Frequently Asked Questions (FAQ)
What is the best type of yarn to use for a crochet border on bags?
The absolute best choice is 100% mercerized cotton yarn because it offers incredible strength, a beautiful subtle sheen, and does not pill over time. Cotton yarn holds its shape remarkably well, ensuring that your decorative borders remain crisp, structured, and highly durable throughout daily use.
Can I add a crochet border to a bag without sewing a blanket stitch first?
Yes, you can skip the manual blanket stitch if you use a very sharp, thin steel crochet hook to pierce the fabric directly as you work. However, using a blanket stitch foundation first is highly recommended for beginners because it creates a much neater, more uniform baseline for your crochet hooks to slip into.
How do I clean and wash a fabric bag that has a handmade crochet border?
To preserve the delicate nature of the yarn work, it is best to hand wash your completed bag in cool water using a mild detergent. Avoid twisting or wringing the crochet section forcefully; instead, gently press the excess water out with a clean towel and lay the bag completely flat to air dry.
What should I do if the fabric begins to pucker while I am crocheting?
Fabric puckering usually happens when your crochet tension is too tight or your foundation holes are spaced too far apart. To fix this issue, try switching to a slightly larger crochet hook to loosen your stitches naturally, or increase the number of stitches you work into each fabric hole to relieve the pulling tension.
Can I apply this tutorial to heavy materials like thrifted denim or real leather?
Absolutely! This technique works beautifully on denim, canvas, and leather. When working with exceptionally tough materials like leather or heavy denim, you will simply need to use a heavy-duty awl, a rotary punch tool, or a leather stitching chisel to create your foundation holes before attempting to pass your yarn through.
Conclusion
Mastering the art of making bags with crochet border – tutorial projects is a truly rewarding way to blend the worlds of sewing and fiber arts into one cohesive craft.
Throughout this detailed guide, we have explored everything from selecting durable materials like mercerized cotton to preparing uniform foundation holes, stitching a clean anchor row, and executing gorgeous decorative edgings. This project allows you to breathe fresh, artistic life into simple fabric totes, turning them into customized fashion statements or deeply meaningful handmade gifts for loved ones.