
The Daisy Stitch in Crochet – Tutorial is exactly what you need if you are looking to elevate your next handmade project with a burst of texture and vintage charm. This beautiful floral pattern, often referred to as the star stitch or marguerite stitch, creates a dense, beautifully textured fabric that looks incredibly intricate but is surprisingly simple to master once you learn the basic rhythm. Whether you are aiming to create a cozy winter blanket, a stylish tote bag, or a unique garment, learning this technique will add a wonderful new skill to your crafting repertoire.
When you dive into this Daisy Stitch in Crochet – Tutorial, you will quickly realize how versatile this specific pattern can be for various types of yarn and hook sizes. It provides a thick, solid structure that lacks the large gaps found in traditional lace stitches, making it exceptionally perfect for projects that require a bit of warmth and durability. By mastering the coordination of loops and clusters, you will be able to transform standard yarn into a stunning field of stylized crochet flowers.
In this comprehensive guide, we will break down everything you need to master this beautiful design, ensuring your tension stays perfect and your rows remain perfectly even. From selecting the ideal materials to troubleshooting common mistakes, this step-by-step walk-through is designed to help crocheters of all skill levels succeed. Grab your favorite yarn, find a comfortable spot to sit, and let us explore how to bring this classic, elegant floral texture to life in your modern creations.
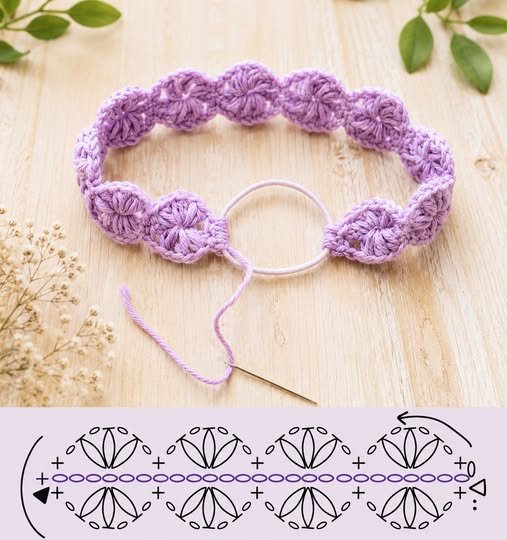
1. Choosing the Best Yarn and Hook for Your Crochet Project
Selecting the correct materials is the foundation of any successful crochet project, especially when dealing with highly textured patterns like this one. To make the details of your stitches pop, it is highly recommended to choose a smooth, multi-ply yarn rather than a fuzzy or textured one. A standard medium-weight yarn, such as a worsted weight acrylic or a soft cotton blend, is ideal for beginners practicing this specific floral pattern for the first time.
The color of your yarn also plays a significant role in how well the intricate details of the flower wheels show up in your finished work. Solid, lighter colors like cream, pastel pink, or soft mint green make it much easier to see your loops and check your stitch placement as you work. Avoid dark colors like black or deep navy, as well as highly variegated yarns, which can easily hide the beautiful definition of the pattern.
Matching your yarn with the correct crochet hook size is equally critical for achieving the perfect balance of drape and structure. For this specific technique, it is often beneficial to go up one full hook size from what the yarn label recommends. Because this pattern pulls multiple loops onto the hook at once, a slightly larger hook prevents your work from becoming too stiff or overly tight.
An ergonomic crochet hook can make a massive difference in your comfort levels, as this pattern requires a bit of repetitive wrist movement to gather loops. Aluminum or wooden hooks with smooth glides work exceptionally well, allowing the yarn to slide effortlessly without catching on the throat of the hook. Consistency in your tools will ultimately lead to a much more uniform and professional looking fabric.
If you decide to make a cozy blanket, a soft premium acrylic yarn will give you the durability and easy care instructions required for everyday use. For items like dishcloths, market bags, or summer accessories, a high-quality cotton yarn will offer the structural integrity and absorbency needed. Experimenting with different fibers during your practice swatches will help you discover the exact drape you prefer.
Always remember to create a small practice gauge swatch before launching into a massive project like a full-sized afghan. This allows you to test how your specific yarn choice behaves with your unique tension and chosen hook size. Taking the time to prepare your materials correctly guarantees that your crafting experience remains enjoyable and free of frustration from start to finish.
2. Step-by-Step Guide to Mastering the Foundation Row
To begin your Daisy Stitch in Crochet – Tutorial, you must first establish a solid foundation chain that accommodates the repeating pattern mathematics. This specific design relies on an odd number of chains, plus two additional chains for the turning height, allowing the clusters to align perfectly across the row. Ensure that your initial chain stitches are pulled loose and uniform, as a tight foundation will cause the bottom edge of your project to curl inward.
Once your foundation chain is ready, you will start the first row by inserting your hook into the second chain from your tool to begin gathering loops. You will draw up a loop in each of the next several chains until you have a specific number of loops resting on your hook. Keeping these gathered loops at a consistent height is the absolute secret to achieving uniform petals that look neat and professional.
After drawing up the required number of loops, you will wrap your yarn over the hook and carefully pull it through all the loops currently on your tool. This single movement closes the bottom half of your very first floral cluster, creating a beautiful fan shape. To secure this cluster and create the central “eye” of the flower, you will immediately chain one, completing the initial shape.
To create the next floral cluster along the row, you will insert your hook directly into the eye of the cluster you just completed and draw up a loop. You will then insert your hook into the space between the last two loops of the previous cluster to draw up another loop. Finally, you will pull up loops from the next consecutive chains across your foundation row to build the base of the next flower.
Repeat this rhythmic process of drawing up loops, yarn over, pulling through all loops, and securing with a chain one until you reach the very end of your row. Consistency is key during this phase, so try not to pull too tightly when closing each cluster, or you will find it difficult to insert your hook on the return row. Finish the row with a half double crochet in the very last chain to keep your edges straight.
Turn your work to prepare for the second row, which acts as the clearing and balancing row that completes the top half of your flowers. This return row usually consists of a series of simple stitches, like half double crochets, worked directly into the eyes of the clusters from the previous row. Once you finish this second row, you will immediately see the full, gorgeous floral wheels take shape right before your eyes.
3. Top Tips for Maintaining Perfect Tension and Straight Edges
One of the most common challenges crafters face when learning this textured technique is maintaining uniform tension throughout the entire piece. Because you are pulling up multiple loops simultaneously, it is very easy for some loops to become tighter than others, resulting in uneven petals. Focus on lifting your hook slightly upward after drawing up each loop to ensure they all share the exact same height on your tool shank.
If you notice that your work is starting to pull inward or shape itself like a triangle, your closing chain stitches are likely too tight. The chain one that secures each cluster needs to be relaxed enough to accommodate your hook easily on the subsequent rows. If your hands tend to naturally crochet tightly, consciously relax your grip or continue to increase your hook size until the fabric feels soft and pliable.
Keeping your edges perfectly straight is another crucial element that separates amateur projects from beautifully polished, professional results. Counting your floral clusters at the end of every single row is the most reliable way to ensure you have not accidentally dropped or added a stitch. It only takes one missed stitch at the beginning or end of a row to completely distort the straight borders of your blanket or scarf.
Using physical stitch markers is an excellent strategy for keeping track of your turning chains and the first and last stitches of your rows. Place a marker into the top of your initial turning chain as soon as you make it, so you know exactly where to insert your hook when you return. This simple habit saves an immense amount of time that would otherwise be spent ripping out rows to fix accidental mistakes.
Blocking your finished project is a fantastic post-crafting technique that can easily fix minor inconsistencies in your tension and edges. By gently wetting your finished item, pinning it to the correct dimensions on a foam board, and letting it air dry, you relax the fibers completely. This process allows the textured flowers to settle beautifully into place, giving your edges a crisp, straight, and professional finish.
Remember that patience is an essential part of the learning process when tackling highly textured geometric crochet patterns. It is completely normal for your first few rows to look a bit messy or uneven as your hands adjust to the new muscle memory required. Keep practicing on small swatches, focus on smooth movements, and you will soon be cruising through your rows with absolute confidence and ease.
4. Creative Ways to Use This Floral Stitch in Modern Projects
Now that you have built confidence with the mechanics of the stitch, it is time to think about all the amazing items you can create with it. This thick, cozy texture is absolutely perfect for designing luxurious winter cowls, infinity scarves, and ear warmers that offer both style and warmth. The dense structure ensures that cold wind cannot easily penetrate the fabric, keeping you exceptionally warm during chilly months.
Another wonderful application for this pattern is creating beautiful, heirloom-quality baby blankets and large throw afghans for your living space. The reverse side of this fabric is smooth and clean, while the front presents a gorgeous, raised floral landscape that feels wonderful to the touch. You can work the entire blanket in a solid classic neutral or introduce stunning stripes to highlight the different rows.
For modern home decor lovers, this textured design translates perfectly into gorgeous throw pillow covers, table runners, and durable kitchen hot pads. When crafted with sturdy cotton yarn, the thickness of the clusters provides natural heat resistance, making it both highly functional and visually appealing. A set of matching textured washcloths also makes for a thoughtful, elegant handmade housewarming gift for friends and family.
If you enjoy fashion accessories, you can easily adapt this technique to create trendy tote bags, clutch purses, and laptop sleeves. Because the fabric is so solid, you will not have to worry about small items slipping through the spaces between your stitches. Adding a simple fabric lining to the inside of your crochet bag will elevate its durability and give it a boutique-quality finish.
You can also experiment with color pooling and stripes by changing your yarn color at the end of every two rows. This technique allows you to create a field of flowers where the centers are one color and the surrounding petals are a contrasting shade. The design opportunities are truly endless once you understand how the row transitions interact with your yarn choices.
Do not be afraid to think outside the traditional box and combine this textured pattern with basic stitches like single or double crochet. You can use the floral clusters as a decorative border on a simple blanket, or feature it as a central accent panel on a sweater. Let your personal creativity guide you as you incorporate this elegant technique into your signature handmade style.
FAQ – Frequently Asked Questions
What is the ideal chain multiple for the Daisy Stitch in Crochet – Tutorial?
To set up this pattern correctly, you generally need to chain an odd number of stitches for your foundation, then add two more chains for the turning transition. This mathematical structure ensures that your clusters have the exact number of base chains required to form completely across the row without leaving awkward leftover spaces at the borders.
Why is my crochet fabric turning out extremely stiff and dense?
If your fabric feels stiff like a board, it is usually an indicator that your tension is too tight or your hook size is too small for the yarn weight. Because this technique packs multiple yarn loops into tight clusters, try switching to a hook that is one or two sizes larger than what your yarn label suggests to instantly restore drape.
Can a beginner successfully learn this specific floral crochet pattern?
Yes, absolutely! While it may look incredibly advanced, it only requires basic skills like pulling up loops and working chain stitches. Once you understand exactly where to insert your tool to collect the loops, the pattern becomes a highly repetitive, soothing two-row rhythm that beginners can master with a bit of focused practice.
How do I join a new ball of yarn without ruining the pattern appearance?
The best place to introduce a new ball of yarn or switch colors is during the very final pull-through of the half double crochet stitch at the end of a row. This ensures your transitions remain completely seamless and hidden within the edges, preventing loose knots from disrupting the clean look of your beautiful floral fields.
Is this particular crochet stitch a known yarn eater?
Yes, because you are pulling up five or six loops for every single cluster, this pattern consumes significantly more yarn than standard flat stitches like single or double crochet. Always make sure to purchase an extra skein or two of yarn for your larger projects to ensure you do not run out of the same dye lot halfway through.
Do I need to line a bag made with this textured floral pattern?
While this specific design produces a beautifully dense fabric with very minimal gaps, adding a fabric lining to totes or purses is always recommended. A fabric lining prevents the crochet stitches from stretching out over time under the weight of heavy items like keys, phones, or books, extending the life of your bag.
Conclusion
Mastering the Daisy Stitch in Crochet – Tutorial opens up a wonderful world of creative possibilities for your future handmade projects, allowing you to add gorgeous texture, warmth, and vintage elegance to your portfolio.
Throughout this guide, we explored how to select the absolute best yarn and hook combinations, how to construct your foundation rows accurately, and how to maintain perfect tension for pristine edges. We also highlighted several modern projects, from cozy winter blankets to trendy tote bags, where this versatile floral design can truly shine. With a little bit of patience and practice, this rewarding technique will quickly become one of your favorite go-to patterns for creating stunning, professional-grade crochet items.