
Pot Holder – Tutorial: Welcome to the ultimate guide for creating your own functional and stylish kitchen accessories. If you have ever wanted to protect your hands while adding a personal, handmade touch to your cooking space, learning how to make a pot holder is the perfect weekend project. In this comprehensive step-by-step walkthrough, we will cover everything from selecting the right materials to mastering the stitching techniques required for a beautiful and durable finished product.
Making your own kitchen textiles is not only an enjoyable creative outlet, but it also allows you to customize your decor to match your exact style. Whether you are an experienced sewist looking to use up leftover fabric scraps or a complete beginner eager to try a practical DIY project, this pot holder tutorial is designed to guide you through every single step with ease. By the end of this article, you will have the confidence and skills to create beautiful, heat-resistant hot pads that make fantastic gifts for friends and family.
To ensure your success, we will focus on using high-quality materials and smart assembly techniques that prioritize both safety and aesthetics. Cooking can get hectic, and having a reliable, thick pot holder nearby is essential for handling hot pans, baking sheets, and cast-iron skillets. Let us dive deep into the essential keywords, structural techniques, and creative variations that will make your handmade kitchen projects stand out in both function and design.
1. Choosing the Best Heat-Resistant Insulating Materials
When embarking on a pot holder tutorial, the absolute most critical factor to consider is safety, which directly depends on the materials you choose for the inner layers. Standard polyester batting will melt when exposed to high temperatures, making it entirely unsuitable for kitchen items meant to handle hot cookware. Instead, you must look for specialty heat-resistant batting specifically designed to reflect heat back toward the source and protect your skin from painful burns.
A highly recommended product for this specific application is Insul-Bright, a specialized needle-punched insulating material that contains hollow polyester fibers interspersed with a metallized polyester film. This unique combination allows the material to resist heat conduction beautifully, ensuring that your pot holder remains safe even when moving heavy, hot pots from the stove. When using this specific lining, it is common practice to layer it with standard cotton batting to absorb any condensation and add extra cushioning.
Another fantastic option for the core of your hot pad is thermal batting, which serves a similar protective purpose by creating a dense barrier against extreme temperatures. No matter which brand you select, always read the manufacturer instructions to ensure it provides adequate thermal defense for kitchen use. Investing in proper insulation ensures your finished project is fully functional and not just a pretty decorative piece for your countertop.
To maximize the heat resistance of your DIY hot pad, the best practice is to sandwich one layer of Insul-Bright or thermal batting between two layers of 100% natural cotton batting. This multi-layered approach guarantees that heat from heavy baking dishes cannot easily penetrate through to your hands. Safety should always come first in the kitchen, and using the correct internal materials is the foundation of any successful textile project.
In addition to the internal lining, you must also be mindful of the outer fabrics you select to cover your insulated core. Always opt for tightly woven natural fibers like cotton, linen, or canvas, as these materials handle high heat without melting or scorching easily. Avoid synthetic blends entirely for the exterior, as polyester, nylon, and acrylic threads can warp or liquefy when they accidentally touch a hot oven rack.
By combining premium thermal batting with sturdy outer cotton fabrics, you create a robust shield that makes cooking and baking a much safer experience. This careful material selection is the secret to producing a professional-grade pot holder that rivals any store-bought alternative in durability. Now that your internal and external materials are sorted, you can confidently move on to planning the design and layout of your project.
2. Fabric Selection and Cutting Guide for Beginners
Selecting the perfect patterns and colors for your outer fabric is undoubtedly one of the most exciting parts of any pot holder tutorial. Since these items are relatively small, they offer a brilliant opportunity to experiment with vibrant prints, bold geometric designs, or classic farmhouse aesthetics. You can choose a single cohesive fabric for both the front and back, or mix and match contrasting prints to create a playful, reversible look.
Before you begin cutting into your beautiful new fabrics, it is highly recommended to pre-wash all cotton materials to prevent future shrinkage. Because kitchen items require frequent washing due to inevitable food spills and grease stains, pre-shrinking ensures your finished pot holder maintains its original shape and flat structure after going through the laundry. Once washed, give your fabric a crisp press with a hot iron to remove any wrinkles or distortions.
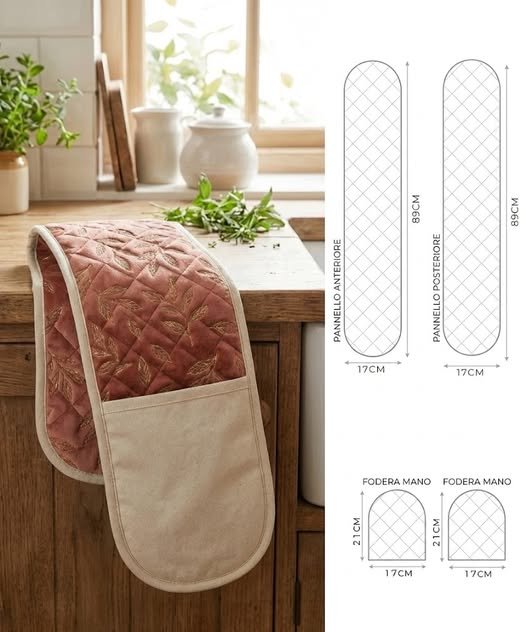
For a standard, user-friendly square project, a great universal dimension to aim for is an $8 \times 8 \text{ inch}$ square, which fits comfortably in most hands. To achieve this, you will need to cut two pieces of your outer decorative cotton fabric to these exact measurements. Additionally, you will cut two pieces of standard cotton batting and one piece of Insul-Bright or thermal batting to the same dimensions to form your thick, protective sandwich.
Precision during the cutting phase makes the actual assembly and sewing process incredibly smooth and stress-free for crafters of all skill levels. Using a rotary cutter, an acrylic quilting ruler, and a self-healing cutting mat will help you achieve perfectly straight edges and exact 90-degree corners. If you do not own a rotary cutter, drawing your lines carefully with fabric chalk and using sharp fabric shears works just as beautifully.
As you prepare your fabric pieces, you should also consider whether you want to incorporate a convenient hanging loop into your final design. A hanging loop allows you to display your beautiful handmade creations on wall hooks, keeping them within arm’s reach of your stove while adding a cozy charm to your kitchen walls. You can easily create a loop using a coordinated strip of fabric or a piece of ready-made cotton twill tape.
Once all your individual squares are neatly cut and stacked, you will immediately see how the layers come together to form a sturdy barrier. Take a moment to inspect your cuts and ensure that all the fabric edges align perfectly with the insulating layers. With your pieces accurately prepared, you are fully ready to move on to the sewing machine and begin the quilting process that binds everything together.
3. Step-by-Step Assembly and Quilting Techniques
Now that your fabric and insulation are prepared, it is time to assemble the layers and dive into the heart of our pot holder tutorial. Start by laying down your back outer fabric piece face down on your workspace, followed by your layers of cotton batting and your sheet of Insul-Bright. Finally, place your front outer fabric piece face up on top of the pile, creating a neat fabric sandwich where the beautiful prints face outward on both sides.
To keep these thick layers from shifting while you sew, secure them thoroughly using long quilting pins or handy fabric clips around all four edges. If you are new to sewing through thick layers, basting the edges with a long, loose stitch can provide extra stability and prevent the fabric from bunching up. Take your time during this step, ensuring that the sandwich remains flat, smooth, and free of accidental bubbles or folds.
Quilting the layers together is not just an aesthetic choice; it is structurally necessary to secure the internal thermal batting so it does not shift or clump during future wash cycles. A classic and simple cross-hatch quilting pattern works wonderfully for beginners and looks incredibly professional. To achieve this, use a washable fabric marker to draw diagonal lines across your square, spacing them roughly one or two inches apart.
When sewing through thick layers, it is highly advantageous to use a walking foot attachment on your sewing machine if you have one available. A walking foot feeds the top layer of fabric through the machine at the exact same speed as the feed dogs move the bottom layer, preventing shifting. Adjust your machine to a slightly longer stitch length, around $3.0\text{mm}$, to accommodate the overall thickness of your insulated sandwich.
Carefully stitch along your marked diagonal lines, starting from the center and working your way outward to ensure the fabric remains perfectly flat. Once you finish the first set of parallel diagonal lines, turn your square 90 degrees and stitch the intersecting lines to complete your beautiful diamond grid. Trim away any loose thread tails as you go to keep your workspace tidy and your project looking pristine.
After completing your quilting pattern, sew a quick stay-stitch around the entire perimeter of the square, about a quarter of an inch away from the raw edges. This final perimeter stitch locks all the layers tightly together and makes it significantly easier to apply the final outer binding. Your project is now securely quilted, structurally sound, and ready for the final framing step that completes the look.
4. Applying the Binding and Adding the Finishing Touches
The final step in our pot holder tutorial is enclosing those raw, quilted edges with a clean and professional fabric binding. Binding gives your project a polished frame and ensures that the raw edges of your cotton and thermal batting never fray over time. You can make your own binding strips from matching fabric or purchase pre-made double-fold bias tape from a local craft shop for a quick finish.
To make your own binding, cut a strip of cotton fabric that is $2.5 \text{ inches}$ wide and long enough to wrap completely around the perimeter of your square, adding an extra six inches for overlap. Fold the strip in half lengthwise with the wrong sides together and press it flat with your iron. If you wish to include a hanging loop, fold a small 5-inch piece of the same fabric strip, stitch down the open edge, and set it aside.
Align the raw edges of your folded binding strip with the raw edges of your quilted square on the front side, starting near the middle of one straight edge. Pin or clip the binding in place, leaving a 3-inch tail unsewn at the start so you can neatly join the ends later. Sew the binding to the square using a quarter-inch seam allowance, stopping exactly a quarter-inch before you reach the first corner to create a mitered corner.
To create a gorgeous mitered corner, fold the binding strip straight up away from the project, and then fold it back down along the adjacent edge, creating a neat diagonal fold at the corner. Resume sewing from the very edge of the new side, repeating this folding technique at all four corners of your square. Once you return to your starting side, join the two open ends of your binding strip smoothly, trim the excess, and finish sewing it down flat.
Next, flip the binding over the raw edges toward the back of the square, encasing the raw borders completely within the fabric strip. On the back side, pin the folded edge down so that it just covers the stitching line from your previous step. Before stitching it down, tuck your prepared hanging loop under the binding at your chosen corner so it gets securely anchored into the final seam.
You can finish the binding by hand-stitching it in place with an invisible blind stitch for a flawless look, or topstitch it by machine close to the inner edge for speed and durability. Give your completed project one final press with a warm iron to set the stitches and smooth out the edges. Congratulations, you have successfully completed your handmade project and created a beautiful, fully functional tool for your home.
Frequently Asked Questions (FAQ)
Can I use regular polyester batting inside a pot holder?
No, you should never use standard polyester batting for any kitchen item that comes into direct contact with hot pots and pans. Polyester is a synthetic plastic material that will melt quickly when exposed to high temperatures, which can lead to severe skin burns and ruined cookware. Always use 100% cotton batting combined with a specialized heat-resistant lining like Insul-Bright or heavy-duty thermal batting for proper safety.
How many layers of insulation do I really need for safety?
For optimal heat protection, the ideal setup is a three-layer core sandwich inside your fabric. This consists of one layer of specialized metallic thermal batting placed between two layers of 100% natural cotton batting. This specific combination successfully reflects radiant heat while providing enough physical thickness to prevent conductive heat from passing through to your hands.
What is the best size for a standard kitchen pot holder?
While you can customize your project to any size, the most popular and practical dimension for daily use is an $8 \times 8 \text{ inch}$ square. This size offers ample surface area to protect your hands and wrists while handling large baking sheets, yet remains small enough to offer a secure, flexible grip. Smaller sizes around $7 \times 7 \text{ inches}$ also work well for individuals with smaller hands or for use purely as table trivets.
Do I need a special sewing machine foot to sew thick layers?
While a standard presser foot can get the job done if you sew slowly, using a walking foot attachment makes the process significantly easier and prevents frustration. A walking foot feeds the top and bottom layers of fabric through the machine evenly at the exact same time. This stops the top layer from shifting, puckering, or bunching up while you are working on your diagonal quilting patterns.
How often should I wash my handmade kitchen pot holders?
You should wash them whenever they become visibly soiled with food splatters, grease, or liquids. Because kitchen textiles naturally gather bacteria over time, keeping them clean is essential for proper kitchen hygiene. Since this project uses high-quality cotton and quilted thermal batting, you can easily toss your finished items directly into the washing machine on a gentle cycle with warm water and tumble dry on low.
Conclusion
In this comprehensive pot holder tutorial, we have explored the entire rewarding process of creating your very own heat-resistant kitchen accessories from scratch. We covered the absolute importance of selecting safe internal linings like Insul-Bright and thermal batting, mapping out accurate fabric cuts, mastering the diamond quilting pattern, and applying a beautiful mitered binding to finish the edges.
By following these structured steps, you have learned how to turn basic fabric panels into an essential, durable piece of kitchen utility that blends safety with your personal style.