If you have ever been on a long road trip, you know exactly how irritating a harsh strap pressing against your neck can be, which is why learning how to make a seatbelt cushion – tutorial style is a complete game-changer. Standard vehicle restraints are designed primarily for safety, but they often lack the soft touch needed for true comfort, leaving adults and children alike with friction burns or red marks. By crafting your own personalized padding, you can instantly transform any tedious commute into a cozy, relaxing experience while ensuring that your safety belt remains fully functional and securely positioned.
Creating a custom seatbelt shoulder pad is not just about enhancing your personal comfort; it is also a fantastic, budget-friendly sewing project that allows you to express your unique style. Whether you are an experienced artisan or a complete beginner picking up a needle for the first time, this comprehensive guide will walk you through every step of the process with ease. We will explore the best materials to use, precise cutting dimensions, and simple assembly techniques so that you can achieve a professional-grade finish that looks great in any vehicle interior.
Beyond the immediate benefits of physical comfort, crafting a car seat belt cover makes for a thoughtful, practical gift for friends, family members, or new parents who want to protect their little ones from harsh strap chafing. This project is highly customizable, meaning you can select specific fabrics that match your car’s aesthetic or choose bright, fun patterns that encourage kids to keep their restraints on without complaining. In this ultimate seatbelt cushion – tutorial, we are going to dive deep into the exact methods required to sew a durable, washable, and incredibly plush accessory that you will enjoy using every single day.
1. Choosing the Best Fabric and Padding Materials for Your Project
When embarking on this seatbelt cushion – tutorial, selecting the right textile is paramount for achieving maximum comfort and longevity. You want a fabric that feels exceptionally soft against bare skin, especially during hot summer months when your neck might be more exposed. Excellent choices include breathable 100% cotton fabric, plush minky, smooth flannel, or even durable canvas if you prefer a more rugged and structured look for your vehicle.
The interior stuffing or padding is what truly dictates the performance of your seatbelt strap protector. A high-quality low-loft batting or a layer of firm foam padding works beautifully because it provides a cushioned barrier without becoming excessively bulky or cumbersome. You want to avoid over-stuffing the accessory, as an overly thick pad might interfere with the quick retraction mechanism of your vehicle’s safety system.
To secure the sleeve around the strap, you will also need to select a reliable fastening method. Hook and loop fasteners (commonly known as Velcro) are the most popular choice because they allow for effortless installation, removal, and adjustments on the fly. Alternatively, you can use heavy-duty plastic snaps if you prefer a sleeker aesthetic that will not accidentally catch on delicate clothing or knit sweaters.
Don’t forget to gather your basic sewing notions before you begin the assembly process. You will need a reliable pair of fabric shears, heavy-duty thread that matches your chosen textile, sewing pins or quilting clips, and a standard sewing machine. Having all your sewing supplies organized beforehand ensures a smooth, uninterrupted creative process that saves you valuable time and effort.
If you are designing this specific accessory for toddlers or young children, prioritize materials that are incredibly easy to clean. Kids are naturally prone to spilling drinks, dropping snacks, or leaving sticky fingerprints all over the car interior. Choosing a machine-washable cotton fabric means you can simply toss the soiled sleeve into the laundry machine whenever it starts looking a bit dingy.
Ultimately, combining the right aesthetics with functional durability is the secret to a successful DIY craft. Take some time to browse through your local craft store or utilize leftover fabric scraps from previous quilting projects to create a sustainable piece. By focusing heavily on material quality, your finished car seat belt cover will look incredibly professional and withstand years of constant, daily use.
2. Accurate Measurements and Cutting the Fabric Pieces Precisely
To ensure your homemade seatbelt cushion – tutorial results in a flawless fit, you must measure your vehicle’s standard equipment accurately. Most automotive straps measure approximately 2 inches in width, which serves as the baseline for our design blueprints. However, it is always a wise practice to double-check your specific vehicle make and model to ensure absolute precision before cutting into your gorgeous textiles.
A standard, comfortable length for an adult-sized seatbelt shoulder pad is typically between 10 to 12 inches long. For toddler car seats or infant strollers, you will want to scale down the length to roughly 6 or 7 inches so it fits comfortably across their smaller chests. Write down your desired final dimensions on a piece of scratch paper so you do not make any mistakes during the preparation phase.
Now, we must calculate the necessary seam allowances and wrap-around width to ensure the cover closes perfectly without bunching up. To wrap around a 2-inch wide strap and overlap securely with hook and loop fasteners, your fabric piece needs to be about 7.5 inches wide. Therefore, a standard cutting template for a single adult sleeve will measure exactly 11 inches in length by 7.5 inches in width.
Carefully press your chosen cotton fabric with a hot iron to eliminate any wrinkles or creases before you begin cutting your pattern. Lay the textile completely flat on a self-healing cutting mat and use a rotary cutter and a clear quilting ruler to slice your rectangles cleanly. You will need to cut two identical pieces of fabric (one for the exterior and one for the lining) and one piece of low-loft batting.
If you are using a directional pattern, such as a fabric featuring geometric stripes, cute animals, or specific text, pay close attention to the orientation. Ensure that the design runs vertically along the 11-inch length so that it appears upright once installed inside your automobile. Taking this extra moment to align your patterns properly elevates the overall visual appeal of your finished DIY sewing project.
Once all three individual layers are cut to the exact same dimensions, stack them systematically to prepare for the upcoming stitching phase. Place the batting down on your workspace first, followed by the exterior fabric facing right-side up, and finally the lining piece facing right-side down. Securing this fabric sandwich together with sewing clips prevents the slippery layers from shifting out of alignment while you work.
3. Step-by-Step Sewing Guide for Assembling Your Custom Cushion
With your pieces neatly stacked and pinned, it is time to bring this seatbelt cushion – tutorial to life at your sewing station. Set your machine to a standard straight stitch with a medium length, ensuring your needle is strong enough to pierce through multiple layers. We will begin by stitching around the perimeter, leaving a small opening so we can easily flip the fabric right-side out later.
Carefully guide the fabric sandwich under the presser foot, maintaining a consistent 1/4-inch seam allowance along all four sides of the rectangle. As you approach each corner, lift the presser foot with the needle down in the fabric, pivot the material 90 degrees, and continue sewing smoothly. Remember to leave a 3-inch gap unstitched along one of the long linear sides for turning purposes.
Before turning the project right-side out, use your sharp fabric shears to clip the excess material off all four corners diagonally. Be incredibly careful not to cut through your actual stitches, as this step simply removes bulk so your corners look crisp and sharp. Once clipped, reach inside the 3-inch opening and gently pull the fabric through, exposing the beautiful right sides of your seatbelt strap protector.
Use a dull tool like a chopstick or a turning tool to gently push out the corners until they form perfectly sharp angles. Take the project back to your ironing board and press the entire rectangle flat, making sure the raw edges of the opening fold inward neatly. Now, perform a clean topstitch roughly 1/8-inch away from the entire outer edge, which simultaneously closes the opening and creates a beautiful border.
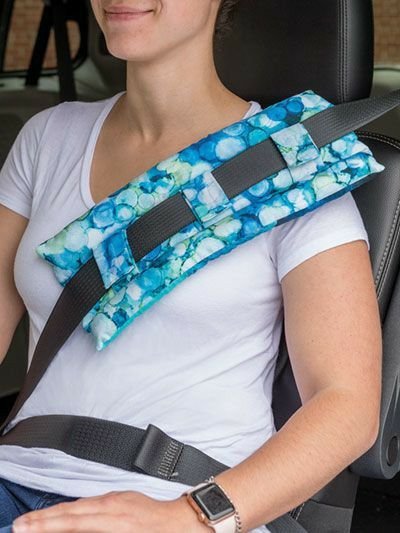
Next, we need to install the chosen hook and loop fasteners to allow the padded sleeve to wrap securely around the automotive webbing. Cut a strip of Velcro that measures approximately 9 inches long, separating the rough hook side from the soft loop side entirely. Position the hook strip vertically along the far-right edge of the lining side of your fabric panel and pin it down securely.
Take the corresponding soft loop strip and place it vertically along the far-left edge on the opposite exterior side of your panel. Sew around the perimeter of both fastener strips twice using a tight stitch to ensure they can withstand the constant pulling force of daily usage. Once completed, your custom car seat belt cover is officially ready to be wrapped around your vehicle’s harness for an instant comfort upgrade.
4. Maintenance, Safety Tips, and Creative Customization Ideas
Now that you have successfully completed this detailed seatbelt cushion – tutorial, it is vital to understand how to properly maintain and use it safely. Always ensure that the finished pad slides smoothly along the vehicle harness and does not physically block the retractor mechanism from snapping back during an emergency. The primary job of the sleeve is to prevent chafing, never to compromise the structural integrity of your vehicle’s built-in safety features.
When it comes to keeping your new driving accessory fresh, regular washing is highly recommended to eliminate sweat, body oils, and dust. Because we utilized durable cotton fabric and high-quality fasteners, you can simply close the Velcro strips together and toss the item into a standard laundry wash cycle. Air-drying the pad flat is the best method to preserve the fluffiness of the interior batting over an extended period.
For those looking to elevate their crafting game, there are endless ways to introduce creative flair and customization to this straightforward pattern. You can experiment with intricate free-motion quilting patterns across the fabric sandwich before assembly to create gorgeous textured diamonds or waves. Adding embroidered initials, decorative ribbon trims, or utilizing monogramming techniques can transform a basic sleeve into a luxurious personalized accessory.
If you happen to drive a sports car or prefer a highly sophisticated interior look, consider swapping out basic cotton for premium faux leather or soft suede. Working with these advanced materials requires a specialized leather needle and a walking foot on your machine, but the ultra-sleek results are completely worth the extra effort. Matching the material color perfectly to your car seats creates an incredibly seamless, high-end factory appearance.
Furthermore, you can easily adapt this versatile design to fit a wide variety of daily household items outside of the automotive world. This exact same layout works wonderfully as a padded sleeve for heavy laptop bag straps, guitar straps, backpack handles, or even duffel bag carriers. Mastering this simple pattern unlocks a world of practical DIY solutions that can make carrying heavy loads significantly more comfortable.
In conclusion, taking the time to sew your own custom accessories allows you to control the exact quality, thickness, and style of your driving environment. It is an incredibly rewarding experience to look at a functional item in your car and know that you created it with your own two hands. Keep experimenting with different fabrics, colors, and textures to create the perfect set of cushions for every single seat in your vehicle.
FAQ – Frequently Asked Questions
Can I use this seatbelt cushion for a newborn’s infant car seat safely?
It is generally recommended to avoid using aftermarket padded accessories on infant car seats unless they were specifically crash-tested and approved by the car seat manufacturer. Excessively thick padding can introduce dangerous slack into an infant harness, which might compromise safety during a sudden collision. For young babies, always prioritize the manufacturer’s official guidelines before adding DIY alterations.
What is the absolute best padding material to use if I want a super soft cushion?
For an incredibly plush experience, a layer of high-density foam padding or multiple layers of natural cotton batting work best. If you prefer an ultra-soft, cloud-like texture against your skin, you can combine a layer of low-loft batting with an exterior fabric made of premium minky or faux fur material.
How do I prevent the hook and loop fasteners from scratching my delicate clothing?
To ensure the rough hook side of the Velcro never touches your skin or clothing, always sew the soft loop strip on the side of the pad that faces inward toward your body. Additionally, make sure to cut the fastener strips slightly shorter than the actual fabric length so the soft fabric corners act as a protective barrier.
Can I make this specific project completely by hand without a sewing machine?
Yes, absolutely! While using a sewing machine saves a significant amount of time, you can easily sew this entire project by hand using a strong backstitch. Make sure to use high-quality polyester thread and take small, tight, consistent stitches to ensure the seams remain completely durable when the fasteners are pulled apart.
How long does it typically take a beginner to finish this entire tutorial?
For a complete beginner, this entire sewing project should take roughly 30 to 45 minutes from start to finish, including measuring and cutting the fabric. Once you master the basic steps and create a reusable cardboard template, you can easily mass-produce these comfortable sleeves in less than 15 minutes each.
Conclusion
In this comprehensive seatbelt cushion – tutorial, we have thoroughly explored how to select the absolute best breathable fabrics, calculate precise cutting dimensions, and execute flawless assembly techniques to create a premium car seat belt cover.
By learning how to properly incorporate low-loft batting and secure hook and loop fasteners, you now possess the practical skills necessary to craft highly durable, stylish, and comfortable accessories that elevate your daily driving experience while keeping your skin safe from irritation.