Apron made of denim and fabric – Tutorial is your ultimate guide to creating a stylish, durable, and eco-friendly kitchen essential from scratch. Whether you are an experienced sewist looking for your next creative challenge or a complete beginner eager to dive into the world of sewing, this comprehensive guide will walk you through every single step of the process. Transforming old materials into something beautiful and functional is not just a highly rewarding hobby, but it is also an incredible way to practice sustainable crafting while saving money on high-quality home goods.
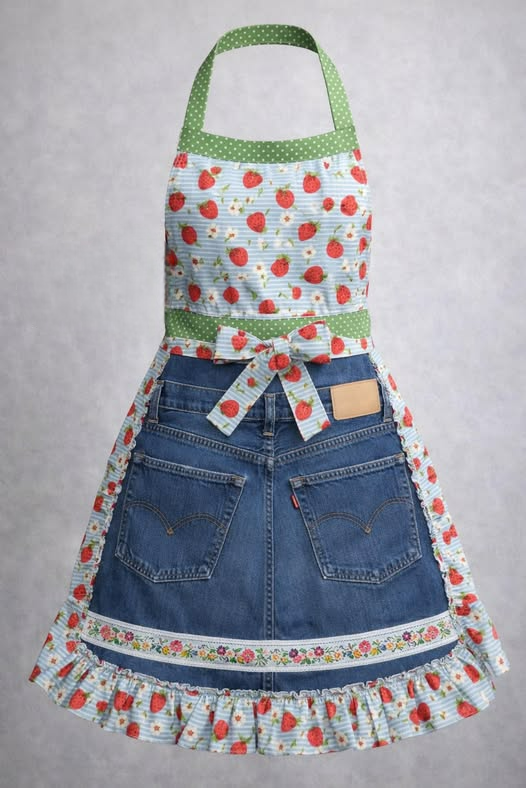
Choosing a homemade apron made of denim and fabric – Tutorial allows you to completely customize your design, pocket placement, and overall fit to suit your unique lifestyle needs. Upcycling old textiles has taken the crafting community by storm, and for a very good reason: it gives a second life to sturdy fabrics that would otherwise end up in a landfill. Denim is renowned for its incredible resilience, thick texture, and timeless aesthetic, making it the absolute perfect front shield for protection against kitchen spills, heavy stains, and workshop debris.
Throughout this detailed apron made of denim and fabric – Tutorial, you will discover the exact techniques required to handle thick seams, combine contrasting textures, and achieve a professional finish. By blending the rugged durability of discarded jeans with the vibrant patterns of lightweight cotton prints, you create an eye-catching contrast that is both highly practical and incredibly fashionable. Let us gather our materials, set up our sewing workspace, and explore the wonderful world of textile repurposing with this ultimate step-by-step guide.
1. Materials and Tools Needed for Your Denim Apron Project
Before you begin sewing your brand new apron made of denim and fabric – Tutorial, it is absolutely essential to gather all the necessary supplies to ensure a smooth and uninterrupted crafting experience. The star of the show is, of course, an old pair of jeans or a discarded denim jacket that you no longer wear but still possesses strong, intact areas of fabric. You will also need a coordinating piece of cotton fabric, preferably in a bright pattern, floral design, or geometric print, to create a beautiful visual contrast against the deep blue shades of your denim base.
In addition to your main fabrics, you must select the right sewing notions to handle the unique thickness and weight of heavy-duty materials without damaging your equipment. A specialized heavy-duty denim needle (size 90/14 or 100/16) is highly recommended for your sewing machine to prevent skipped stitches or needle breakage when crossing thick seams. High-quality polyester thread or specialized topstitching thread will ensure that your final apron made of denim and fabric – Tutorial remains structurally sound and holds up perfectly after dozens of trips through the washing machine.
Do not forget the essential cutting and measuring tools that every successful sewing project relies heavily upon for clean lines and precise alignment. A sharp rotary cutter paired with a self-healing cutting mat and a long acrylic quilting ruler will make harvesting straight panels from old pants significantly faster and more accurate. If you prefer traditional methods, high-quality fabric shears will work beautifully, provided they are sharp enough to slice through multiple layers of rugged canvas or denim effortlessly.
Finally, keep a generous supply of sturdy sewing pins or heavy-duty fabric clips nearby to hold your heavy layers firmly together before you head to the machine. A fabric marking pen or a simple piece of tailor’s chalk will be invaluable for tracing out your pattern dimensions directly onto the reverse side of your denim panels. Having all these tools organized and ready on your cutting table will save you an immense amount of time and keep your creative energy flowing smoothly.
Once your materials are fully prepared, take a quick moment to inspect your chosen jeans, making sure to avoid any areas that are excessively thinned out, stained, or torn, unless you specifically desire a distressed rustic look. Laundering your old denim and your new accent fabric prior to cutting is a critical step, as it pre-shrinks the cotton material and removes any residual manufacturing starch or dirt. This simple prep work ensures that your finished apron made of denim and fabric – Tutorial retains its perfect shape and structural integrity even after its first official wash.
With your pre-washed fabrics neatly pressed and your sewing machine freshly oiled and threaded, you are officially ready to embark on the exciting layout and cutting process. Creating an organized workspace not only boosts your productivity but also elevates the entire handcrafting experience, turning a simple weekend project into a deeply satisfying artistic endeavor. Let us move forward into preparing our unique pattern pieces and mapping out exactly how we will breathe brand new life into these reclaimed textiles.
2. Step-by-Step Cutting and Pattern Preparation Guide
To begin transforming your raw materials into a beautiful apron made of denim and fabric – Tutorial, you need to carefully deconstruct your old denim garments to maximize the usable fabric area. Lay your jeans completely flat on your cutting mat, and using your sharp fabric shears, carefully cut along the inner inseams and outer outseams to open up the pant legs into wide, flat sheets of durable fabric. You can choose to cut away the thick, original manufactured seams entirely, or save them to use later as unique decorative elements or rugged utility loops for hanging towels.
Next, you will want to measure and mark the main body panel of your future apron, which typically requires a rectangular shape roughly 28 inches long by 24 inches wide for a standard adult size. To create the classic curved bib look, measure down about 10 inches from the top corner on each side, and measure inward about 5 inches, then gently connect those two points with a curved or straight chalk line. Carefully cut along these marked lines on both the left and right sides, ensuring perfect symmetry so that your finished project drapes beautifully and balances evenly across your torso.
Now it is time to focus our creative attention on the beautiful accent pieces using your coordinating printed cotton fabric, which will provide a gorgeous pop of color against the dark blue denim background. Cut out a large rectangle measuring approximately 14 inches wide by 8 inches tall to serve as a spacious, accessible front utility pocket that will eventually be sewn onto the center front of your apron. You will also need to cut long strips of fabric for your adjustable neck straps and waist ties, with each waist tie measuring roughly 30 inches long for easy tying.
If your reclaimed denim fabric is not quite wide enough to cut a full, single-piece apron body due to the narrow nature of pant legs, do not worry at all. You can easily patch multiple smaller denim strips together using a strong 1/4-inch seam allowance, pressing the seams completely flat with a hot steam iron to create a beautiful, modern patchwork aesthetic. This patchwork technique is highly praised in the sustainable crafting community because it utilizes absolutely every single scrap of fabric, minimizing waste while adding immense visual character.
Before moving to the sewing machine, take your cut cotton fabric strips intended for the straps and ties, and press them using a classic double-fold bias tape method to hide all raw edges. Fold the long strips in half lengthwise with wrong sides together, press a sharp crease, then open it back up and fold the outer raw edges inward to meet that center crease line. Fold the entire strip in half once more, pressing firmly with your steam iron, which completely encloses all raw edges within a clean, professional, and fray-resistant four-layer fabric strap.
Take a moment to lay all your freshly cut denim body pieces, colorful accent pockets, and prepared fabric ties flat on your work table to visualize the final composition of your project. This is your absolute last chance to adjust the proportions, trim any uneven edges, or change the placement of your decorative elements before the permanent stitching begins. Ensuring that every single piece is accurately cut and perfectly pressed at this stage lays a flawless foundation for the remaining assembly steps of our project.
3. Assembling the Main Body and Attaching Fabric Accents
The assembly phase of our apron made of denim and fabric – Tutorial is where your flat pieces of fabric finally transform into a recognizable, beautiful three-dimensional utility garment. Begin by finishing the raw edges of your main denim apron body to prevent any future fraying during heavy use, which you can easily achieve with a simple double-fold hem or a neat zigzag stitch. Fold the sides and the bottom edges inward by 1/4 inch, press with a hot iron, fold inward another 1/2 inch, pin securely, and topstitch carefully using your heavy-duty needle.
Next, we will focus our attention on preparing and attaching the vibrant center pocket, which serves as both a beautiful design focal point and a highly functional storage space for tools. Take the cotton pocket rectangle you cut earlier, fold the top edge down twice to create a clean, durable hem, and sew across it with a beautiful, straight coordinating stitch line. Fold the remaining three raw edges of the pocket inward by 1/2 inch, press them flat with your iron to create clean guidelines, and center the pocket onto the front side of your denim body panel.
Pin the pocket securely in place onto the denim, ensuring it sits completely level and at a comfortable height for your hands to reach naturally while wearing the garment. Edgestitch around the left side, bottom, and right side of the pocket, making absolutely sure to leave the top edge open so it remains fully functional as an accessible pouch. For extra durability, sew a tiny, secure triangle or a tight bartack stitch at the top corners of the pocket, which prevents the heavy stress of daily use from ripping the pocket seams away over time.
Now, take the beautifully pressed cotton fabric neck straps and waist ties that you prepared earlier, and topstitch along their open folded edges to lock them permanently into place. For the adjustable neck strap, you can choose to sew it directly into the top corners of the apron bib, or you can attach a pair of durable metal D-rings to one side for an adjustable fit. Align the raw edges of your waist ties with the outer side corners of the apron body, pinning them securely so they extend straight outward from the sides.
Carefully stitch across the connection points where the straps and ties meet the heavy denim body, reinforcing these high-tension areas by sewing back and forth several times in a secure square box pattern. This box-stitching technique distributes the pulling weight evenly across the fabric fibers, ensuring that your customized ties will never snap or pull loose when you tie your apron tightly around your waist. Take your time during this process, allowing your sewing machine to glide smoothly over the dense, overlapping layers of denim and cotton without rushing the motor.
With the main body fully assembled, the pockets securely attached, and all straps firmly anchored into place, your custom utility garment is almost ready for action. Inspect the reverse side of your work to ensure that all raw edges are perfectly enclosed and that your tension settings remained balanced throughout the entire sewing process. This meticulous attention to detail during assembly differentiates a simple amateur DIY project from a highly professional, boutique-quality handmade item that you can proudly display or gift.
4. Expert Finishing Techniques and Sustainable Care Tips
To elevate your finished apron made of denim and fabric – Tutorial to a professional standard, you must dedication a few moments to proper finishing techniques and thread management. Grab a pair of small, sharp embroidery scissors and carefully trim away all loose thread tails, remaining basting stitches, and stray fibers from both the front and back of your garment. Look closely at the inside corners and the intersections where heavy denim meets cotton fabric, ensuring that no tangled thread nests or skipped stitches are left hidden from view.
Give your completed project a thorough, heavy press with a hot steam iron, focusing specifically on the thick outer hems, the pocket borders, and the long lengths of your fabric ties. Pressing sets the stitches permanently into the fabric fibers, smoothing out any minor puckering that may have occurred during sewing and giving your apron a crisp, retail-ready appearance. If you love a rugged, personalized look, you can also use this opportunity to hand-sew decorative embroidery accents, apply custom patches, or install metal rivets.
Caring for your new upcycled garment properly will ensure that it remains a faithful companion in your kitchen, garden, or crafting studio for many beautiful years to come. Because denim is a highly durable material, it thrives with regular washing, but it is best to wash your apron in cold water to preserve the vibrant colors of your cotton fabric accents. Avoid using harsh chemical bleaches or optical brighteners, as these can prematurely break down the sturdy cotton fibers and cause your beautiful contrasting fabrics to fade unevenly.
When drying your handmade utility item, tumbling dry on a gentle, low-heat setting or hanging it out on a traditional clothesline to air dry naturally is highly recommended. Air drying not only conserves energy and supports your sustainable lifestyle goals, but it also minimizes fabric shrinkage and keeps your long fabric ties from tangling inside the machine dryer. Once the garment is dry, a quick iron will easily restore its crisp shape and stiffness, making it ready to protect your clothes during your next big creative project.
Repurposing old textiles into functional everyday items is a beautiful way to reduce consumer waste and cultivate a deeper connection to the items we surround ourselves with daily. Every scratch, fade, and unique wash pattern on your upcycled denim tells a wonderful story of its past life, adding incredible depth and character to your new creation. By sharing your crafting journey and displaying your beautiful handmade items, you inspire others within your community to embrace eco-friendly habits and explore sustainable textile arts.
Now that you have mastered the essential skills required to build this gorgeous utility accessory, you can easily replicate this process to create personalized gifts for friends and family. Experiment with different pocket styles, contrast topstitching threads, or varied fabric prints to tailor each individual piece to the recipient’s personal tastes and hobbies. Enjoy the wonderful feeling of wearing an item that is entirely unique, highly functional, and crafted with your very own hands from reclaimed materials.
Frequently Asked Questions (FAQ)
What type of sewing machine needle is best for stitching thick denim?
It is highly recommended to use a specialized denim needle or jeans needle in size 90/14 for medium-weight denim, or size 100/16 for extra thick, heavy-duty denim fabrics. These needles are specifically engineered with a reinforced blade and a very sharp, slender point designed to pierce through dense, tightly woven fabrics without deflecting, bending, or breaking during your project.
Can I make this project if I only have lightweight apparel denim?
Absolutely, you can easily adapt this project to work beautifully with lightweight apparel denim, linen-denim blends, or even chambray shirts. If your chosen denim feels a bit too thin or floppy for a structured utility garment, simply apply a layer of medium-weight fusible interfacing to the reverse side of the fabric before cutting out your main panels to add extra stability.
How do I prevent my long apron ties from tangling and twisting in the washing machine?
To keep your long, beautiful fabric straps from turning into a tangled knot during the laundry cycle, simply loosely tie the waist straps together before placing the garment into the washing machine. Alternatively, you can place your handmade project inside a mesh delicate laundry bag, which completely protects the straps from wrapping around the washing machine agitator.
Is it necessary to pre-wash my fabrics before I begin cutting out my pattern pieces?
Yes, pre-washing both your old denim garments and your new cotton accent fabrics is a vital step that should never be skipped. Cotton prints can shrink significantly during their first hot wash, and denim often carries excess dye that could bleed onto your beautiful accent fabrics if they are not thoroughly laundered before assembly.
How can I make the neck strap adjustable if I do not want a fixed length loop?
You can easily make an adjustable neck strap by sewing two metal D-rings onto one top corner of your apron bib, allowing you to loop a longer fabric strap through them to adjust the height perfectly. Another fantastic option is to install heavy-duty metal snap fasteners or sew a series of classic buttonholes along your fabric strap for a customizable fit.
Can I use old denim jackets or denim skirts instead of just old pairs of jeans?
You can absolutely use any type of discarded denim garment you have on hand, including jackets, skirts, overalls, or even heavy canvas bags. Fabric harvested from denim skirts and jackets often provides larger, continuous flat surfaces than narrow pant legs, making the pattern layout and cutting process even easier for large projects.
Conclusion
In this comprehensive guide, we have thoroughly explored the rewarding process of crafting a beautiful, durable, and highly functional utility item from repurposed materials.
From selecting the perfect heavy-duty needles and deconstructing old denim pants to combining vibrant cotton accent prints and executing secure box-stitching techniques, you have learned all the essential skills required to build a professional-quality garment from scratch. This project beautifully demonstrates how sustainable crafting can breathe vibrant new life into old, forgotten textiles, turning potential waste into a stylish accessory that protects your clothing during your favorite creative tasks.