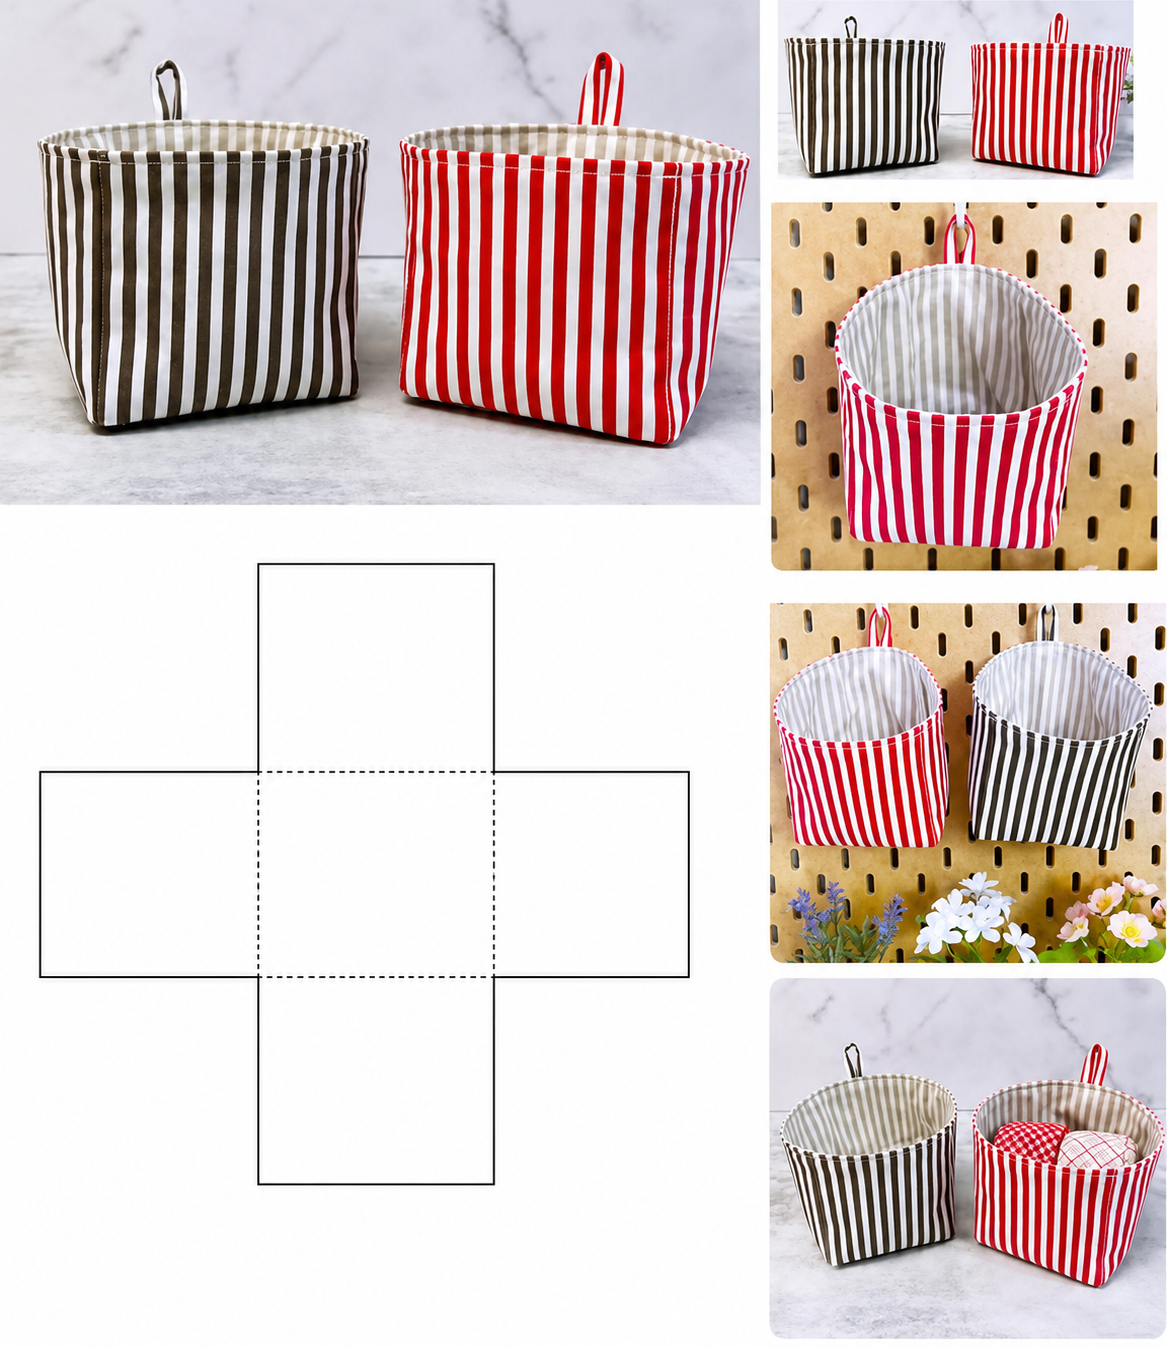
If you are looking for a fun, practical, and highly rewarding sewing project, learning how to make fabric organizer basket items is the perfect place to start. Keeping your home tidy can often feel like an endless battle, but a fabric organizer basket tutorial offers a beautiful, customizable solution to conquer the clutter. Whether you want to sort your sewing supplies, tidy up a kid’s playroom, or create a beautiful set of matching bins for your closet, this project allows you to combine functionality with your personal style.
Choosing to craft your own storage solutions is not just about organization; it is also a fantastic way to dive into sustainable crafting. Instead of purchasing mass-produced plastic bins, making a DIY fabric basket lets you choose high-quality materials, repurpose leftover textiles, and reduce waste. This step-by-step fabric basket guide is designed to walk you through the entire process, ensuring that even beginners can achieve a professional, sturdy finish that looks amazing on any shelf.
In this comprehensive how to make fabric organizer basket guide, we will explore everything you need to know to succeed on your first try. From selecting the right interfacing for fabric baskets to mastering the perfect boxed corners, we have covered all the essential details. Grab your sewing machine, choose your favorite coordinating fabrics, and let’s dive into this ultimate home organization sewing project that will elevate both your craft skills and your living space.
1. Choosing the Best Materials for a Sturdy Fabric Basket
When embarking on a fabric organizer basket tutorial, the choice of textile is the foundation of your entire project. To ensure your basket stands upright and holds its shape over time, you need to select a durable heavyweight fabric. Materials like canvas, duck cloth, denim, and upholstery fabric are excellent choices for the exterior because they offer natural rigidity and can withstand daily wear and tear.
For the interior lining, you can use a lighter quilting cotton to add a pop of color or a fun pattern. Combining a tough exterior with a vibrant lining gives your DIY fabric basket a professional aesthetic while keeping the construction process manageable for standard sewing machines. Mixing and matching different textures can also add a unique, high-end look to your finished project.
However, even the toughest canvas usually needs a little extra help to prevent it from collapsing when empty. This is where choosing the correct interfacing for fabric baskets becomes crucial for structural integrity. Fusible fleece, heavy craft interfacing, or stiff sew-in stabilizers are hidden secrets that transform a limp fabric bag into a crisp, structural storage masterpiece.
Don’t forget about the small details that make a huge difference in handmade storage bins. High-quality polyester thread, sharp denim needles, and sturdy fabric clips are essential tools for managing multiple thick layers of material. If you plan to store heavier items, consider adding reinforced webbing or fabric handles during the assembly phase.
Preparing your materials properly before cutting will save you a lot of frustration later on. Always pre-wash your cottons and canvas to prevent any future shrinkage or warping if the basket ever needs to be cleaned. Ironing your fabrics flat before laying out your pattern ensures precise cuts, which leads to perfectly aligned seams.
Ultimately, investing time into selecting the right combination of sturdy fabric and proper stabilization ensures your organizer will last for years. This thoughtful approach to choosing materials elevates your home organization sewing project from a simple weekend craft to a durable piece of functional home decor.
2. Cutting and Preparing Your Fabric and Interfacing Pieces
Precision is the key to success when following a step-by-step fabric basket layout. To begin, you will need to cut your exterior fabric, lining fabric, and chosen interfacing for fabric baskets into matching rectangular pieces. A standard medium-sized basket usually starts with rectangles measuring roughly 14 by 22 inches, but you can easily scale these dimensions up or down to fit your specific shelving needs.
Using a rotary cutter, an acrylic ruler, and a self-healing cutting mat will give you the cleanest, most accurate edges possible. Cut two identical pieces from your outer fabric, two from your lining, and two from your fusible stabilizer. Accurate cutting at this stage ensures that all your pieces align perfectly during the sewing process, avoiding uneven edges.
Once your pieces are cut, it is time to apply the magic ingredient: the fusible interfacing. Lay your exterior fabric pieces wrong-side up on your ironing board, and position the textured, glue-side of the interfacing directly against the fabric. Using a hot iron with plenty of steam, press firmly for several seconds without sliding the iron to activate the adhesive securely.
If you desire an extra-stiff DIY fabric basket, you can also apply a lighter layer of fusible stabilizer to the lining pieces. This double-interfacing technique creates a remarkably rigid structure that mimics commercial organizers while retaining the warmth of handmade textiles. Let the pieces cool completely on a flat surface so the glue bonds permanently.
Now is also the perfect time to prep your handles if you choose to include them in your fabric organizer basket tutorial. You can create simple handles using leftover strips of your exterior fabric, or use heavy-duty cotton webbing for a modern, utilitarian look. Cut two identical handle pieces, typically around 4 to 6 inches in length, depending on your preference.
Basting your handles onto the right side of the exterior fabric pieces before assembling the main body will keep them securely in place. Position them centrally along the shorter top edges, facing downwards, and secure them with a quick seam within the seam allowance. Your pieces are now fully prepared, stabilized, and ready for the exciting assembly phase.
3. Sewing the Main Body and Creating Boxed Corners
With your pieces prepared, we move into the heart of the how to make fabric organizer basket assembly. Place your two exterior fabric pieces right sides together, pinning or clipping securely along the two long sides and the bottom edge. Using a standard half-inch seam allowance, sew down the sides and across the bottom, making sure to backstitch at the beginning and end of each line.
Repeat this exact sewing process for the two lining pieces, with one critical modification for your handmade storage bins. Along the bottom edge of the lining, leave a generous 4-to-5-inch opening unsewn in the center. This open gap is essential for turning the entire basket right side out later on without ruining your neat stitches.
To give your basket a flat bottom so it can stand independently on tables or shelves, you must create boxed corners. While the pieces are still wrong side out, pinch one of the bottom corners flat, aligning the side seam directly on top of the bottom seam. This action creates a triangle shape at the corner of your project.
Using a fabric marker and a ruler, draw a straight line perpendicular to the seam line, exactly where the triangle measures your desired width. For a medium basket, a 3-inch or 4-inch line will create a beautifully balanced, roomy base. Pin the layers carefully to ensure the seams remain perfectly centered against each other.
Sew directly along the marked line, backstitching securely at both ends to handle the tension of a fully loaded basket. Trim away the excess corner fabric, leaving about a quarter-inch seam allowance past your stitches to reduce unnecessary bulk. Repeat this exact corner-boxing method on the other side of the exterior, and then on both corners of the lining.
You should now have two distinct box-shaped pouches: one sturdy exterior piece and one slightly softer lining piece. Take a moment to press the seams flat with your iron, as flat seams result in much sharper lines on your finished product. Your DIY fabric basket is quickly taking shape and is ready for the final integration.
4. Assembling and Finishing Your Fabric Storage Basket
The final steps of our fabric organizer basket tutorial bring all your hard work together into a beautiful finished product. Take your completed exterior basket and turn it right side out, pushing the corners out gently with your fingers. Keep your lining basket wrong side out, and drop the exterior basket completely inside the lining pouch.
This clever arrangement puts the right sides of your exterior and lining fabrics facing each other directly. Align the top raw edges precisely, ensuring that the side seams of both the exterior and lining match up perfectly. Use plenty of sewing clips to hold these thick, stabilized layers firmly in place all the way around the top perimeter.
Carefully sew around the entire top circular rim of the basket, maintaining an even half-inch seam allowance throughout. Because the layers are thick due to the interfacing for fabric baskets, sew slowly and use your machine’s handwheel if you encounter resistance. Double-check that your handles remain tucked safely inside and don’t get caught in the top seam incorrectly.
Locate the opening you left in the bottom of your lining fabric earlier, and gently pull the exterior fabric through that hole. This process, often called “birthing” the bag, will reveal the right sides of your beautiful fabrics. Gently push the corners of both the exterior and lining into place using a blunt turning tool or a chopstick.
Tuck the raw edges of the lining opening inward by a quarter of an inch, press with an iron, and edge-stitch it closed. You can do this quickly by machine close to the edge, or by hand using a blind stitch for an invisible finish. Push the completed lining down inside the exterior basket, smoothing out any interior wrinkles.
Give the top edge of your new DIY fabric basket a thorough press with your iron to create a crisp, professional fold. To complete the look, topstitch around the entire upper rim about an eighth of an inch below the edge. This final detail keeps the lining securely inside and adds a beautiful, high-quality finish to your home organization sewing project.
5. Frequently Asked Questions (FAQ)
What is the best fabric to use for a fabric organizer basket?
The best choice for the exterior is a heavyweight fabric like canvas, denim, duck cloth, or linen blend because they offer structural durability. For the lining, premium quilting cotton works beautifully because it introduces color and pattern without adding excessive bulk to the top seams.
Do I really need interfacing for fabric baskets?
Yes, using the right interfacing for fabric baskets is crucial if you want your container to stand upright independently. Without a stabilizer like fusible fleece or heavy craft interfacing, your basket will collapse under its own weight, especially when empty.
Can I wash my handmade fabric organizer basket?
If you pre-washed your fabrics before cutting and used a high-quality washable fusible interfacing, your basket can be gently spot-cleaned or hand-washed. Avoid harsh machine cycles or hot dryers, which can cause the fusible interfacing to delaminate from the fabric.
How do I scale this tutorial to make different basket sizes?
To change the size of your DIY fabric basket, simply adjust the dimensions of your initial fabric rectangles. Increasing the width adds length to the basket, increasing the height makes it deeper, and altering the size of your boxed corners changes the depth of the base.
What sewing machine needle should I use for this project?
Because you will be sewing through multiple layers of heavy canvas, lining, and interfacing, it is highly recommended to use a sharp denim needle or a heavy-duty size 90/14 or 100/16 needle. This prevents skipped stitches and broken needles during the thickest assembly steps.
Can I add dividers to the inside of my fabric storage basket?
Absolutely! You can create custom fabric dividers by stabilizing rectangles of cotton fabric, folding them, and sewing them directly into the side seams of your lining before assembling the main body of your handmade storage bins.
Conclusion
In conclusion, learning how to make fabric organizer basket systems is an empowering and delightful project that combines creative expression with practical home management.
Throughout this fabric organizer basket tutorial, we have covered the importance of selecting a sturdy fabric, applying the correct structural interfacing for fabric baskets, and mastering the essential sewing techniques needed to create beautiful boxed corners. By following these steps, you have transformed basic textile pieces into a durable, functional piece of home decor that helps keep your space neat and organized.