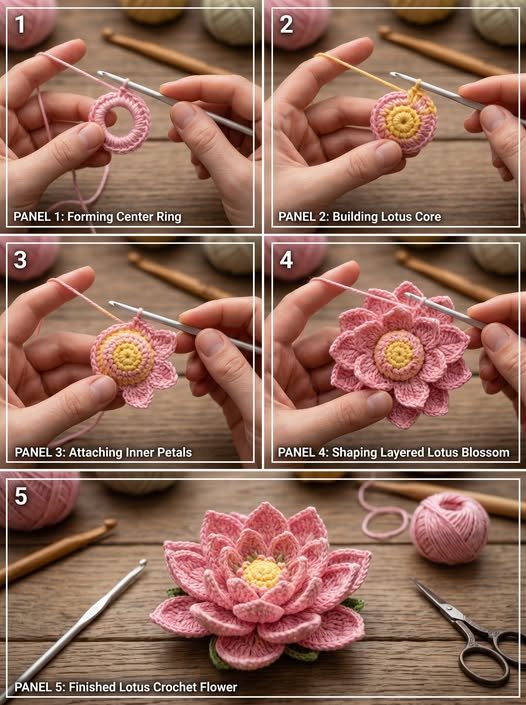
Learning how to make crochet lotus flower – tutorial guides is one of the most rewarding journeys for crafters looking to bring a touch of serene, natural beauty into their homes. The lotus flower, known across cultures as a symbol of purity, enlightenment, and self-regeneration, translates beautifully into yarn and thread work. Whether you want to create a stunning centerpiece, add a unique embellishment to a blanket, or design a peaceful meditation accessory, mastering this specific floral pattern will elevate your entire crochet repertoire.
In this comprehensive how to make crochet lotus flower – tutorial, we will break down the entire process from selecting your materials to weaving in your very last ends. Crocheting three-dimensional flowers can sometimes feel intimidating because of the layered petals, but with the right guidance, it becomes a deeply relaxing and meditative rhythm. By focusing on stitch placement and tension, you will watch a flat circle bloom into a gorgeous, textured masterpiece right in your hands.
To get the most out of this how to make crochet lotus flower – tutorial, you will want to familiarize yourself with a few essential techniques and terms that define the structure of the flower. We will explore how to work in specific loops, how to build sturdy foundational rings, and how to create the iconic pointed tips that make the lotus so recognizable. Grab your favorite hook, select some vibrant yarn, and let’s dive into the step-by-step techniques that will make your crochet projects stand out.
1. Understanding the Magic Ring Foundation
The secret to a perfect, gap-free center for your flower begins with mastering the magic ring. Often called a magic circle, this technique allows you to pull the yarn tail tightly, completely closing the central hole where your first round of stitches is placed. When learning how to make crochet lotus flower – tutorial patterns, avoiding a loose, messy center is crucial for the structural integrity of the heavy, layered petals that follow.
To start, loop the yarn around your fingers to create an “X” and insert your hook under the first strand to pull the second strand through. Secure it with a single chain stitch, and you are ready to work your initial round of stitches directly into the adjustable loop. For a lotus, you will typically work a base of six or eight single crochets into this ring to establish your symmetrical starting points.
Once your stitches are complete, gently but firmly pull the short tail of the yarn to close the circle. This create a solid, durable core that can support multiple layers of petals without stretching out over time. If you struggle with the magic ring, you can substitute it by chaining three, joining with a slip stitch, and working into that tiny circle, though the magic ring remains the gold standard for clean floral centers.
2. Master the Front Loop Only and Back Loop Only Techniques
To create the signature 3D layered look of a realistic lotus blossom, you must master working in the front loop only (FLO) and back loop only (BLO). Standard crochet stitches require you to insert your hook under both top loops of a stitch. However, splitting these loops opens up a whole new world of depth and texture, allowing you to grow petals on top of petals.
When you look at the top of a crochet stitch, you will see a “V” shape; the loop closest to you is the front loop, and the one furthest away is the back loop. In this how to make crochet lotus flower – tutorial, we use the back loop only to build the hidden foundational walls that move downward or outward. This leaves the front loops completely free and exposed on the surface of your work, ready for the next step.
By going back and anchoring your yarn into those preserved front loop only sections, you can crochet independent layers of petals that sit proudly on top of the base. This dual-layer approach mimics nature perfectly, giving your flower the volume it needs to cup upward gracefully. Mixing FLO and BLO techniques ensures your flower looks organic, voluminous, and professionally crafted rather than flat and lifeless.
3. Creating Definition with Slip Stitch and Chain Space
Building the delicate, airy structure of a lotus flower requires strategic use of the slip stitch and chain space. These two basic elements act as the architectural scaffolding for your petals, allowing you to travel across the rounds without adding unwanted bulk. A slip stitch is the shortest stitch in crochet, used primarily to join rounds or move your yarn to a new starting position.
A chain space is created when you chain a specific number of stitches and skip underlying stitches before anchoring your next stitch. In our how to make crochet lotus flower – tutorial, these little chain loops form the back-alley pathways where your future petals will be born. They provide a flexible, lightweight frame that keeps the flower from becoming too stiff or heavy.
By working a combination of slip stitches and chain spaces behind your initial rounds, you create a hidden grid system. When you work your larger decorative stitches into these open spaces, the petals naturally spread out and fan upward. This smart combination maximizes yarn efficiency while giving the flower its iconic, breathable, and beautifully fanned-out appearance.
4. Shaping Petals with Triple Crochet and Picot Stitches
The defining characteristic of a lotus flower is its elegant, pointed petals, which we achieve using the triple crochet and the picot stitch. The triple crochet (also known as the treble crochet) is a tall stitch created by wrapping the yarn around the hook twice before inserting it into the workspace. This height is essential for creating the long, sweeping dramatic slope of the outer lotus petals.
To get the perfect leaf-like gradient, you will gradually increase stitch height within a single chain space, moving from a single crochet, to a half double, to a double, and finally to the towering triple crochet. This graduation creates a smooth, sweeping curve that perfectly replicates real botanical structures. However, a tall stitch alone will leave the top of the petal looking rounded or flat.
To create that sharp, beautiful point at the peak of your petal, you will execute a picot stitch right at the top of your central triple crochet. A picot is made by chaining three and then working a slip stitch back into the first chain or the top of the base stitch. This creates a tiny, secure decorative bump that instantly transforms a basic curved shape into a distinct, pointed lotus petal.
Frequently Asked Questions
What is the best yarn weight for making a crochet lotus flower?
For crisp stitch definition and petals that hold their shape well, a mercerized 100% cotton yarn in DK (weight 3) or Sport (weight 2) is highly recommended. Cotton yarn has minimal stretch, which prevents the 3D petals from sagging over time. If you want a delicate, lace-like lotus for jewelry or bookmarks, a size 10 crochet thread works beautifully.
How do I prevent my lotus flower petals from curling incorrectly?
Petal curling is usually a result of improper stitch tension or mismatched hook sizes. If your petals are curling too tightly inward, try switching to a hook that is half a millimeter larger to loosen up the stitches. Additionally, make sure you are blocking your finished flower by misting it with water and pinning the petals into place to set their shape permanently.
Can a beginner complete this how to make crochet lotus flower – tutorial?
Yes, an ambitious beginner can absolutely tackle this project! While it uses advanced structural techniques like working in specific loops and creating picots, the stitches themselves are foundational. Taking your time, counting your stitches carefully at the end of each round, and practicing the individual stitches beforehand will ensure your success.
How do I join a new color for the center and the petals?
To give your lotus a realistic look with a yellow center and pink petals, change colors during the final slip stitch of your foundational round. Drop your old color, loop the new color over your hook, and pull it through the remaining loops to secure it. This creates a seamless, professional color transition without unsightly knots showing on the front of your flower.
What can I use these crochet lotus flowers for once they are finished?
The possibilities are endless for these versatile motifs! You can sew them onto hats, bags, and headbands, or glue them to hair clips and brooch backings. They also make wonderful home decor items, such as coasters, decorative table runners, bunting for a yoga studio, or even floating ornaments inside a decorative glass bowl.
Conclusion
Mastering how to make crochet lotus flower – tutorial patterns is a wonderful way to expand your crafting skills and create breathtaking, textured art.
Throughout this guide, we explored how the magic ring establishes a firm foundation, how front and back loop techniques build lifelike depth, and how combining triple crochets with picots creates those iconic pointed petals. With these core techniques in your crafting toolkit, you can confidently experiment with different color gradients, yarn sizes, and creative placements to make this timeless design uniquely your own.