If you have ever wanted to learn how to make a fabric wallet and coin purse – tutorial style, you have come to the right place. Creating your own daily accessories is not just a wonderful way to express your personal style, but it is also an incredibly rewarding DIY project that saves money. Whether you are looking to craft a unique gift for a loved one or want a custom organizer that fits perfectly into your favorite handbag, mastering this craft will open up a world of creative possibilities.
The beauty of a handmade fabric wallet and coin purse lies in its absolute versatility. You can choose from thousands of patterns, colors, and textures to match your personality, or even repurpose beloved old clothes to give them a second life. This comprehensive guide will take you through every single step of the process, ensuring that even beginners can achieve a professional-looking, durable result that stands the test of time.
In this detailed step-by-step sewing guide, we will explore everything from choosing the right materials to mastering the final stitches. You do not need an advanced sewing studio to get started; a basic sewing machine, some beautiful fabric scraps, and a bit of patience are all it takes. Let us dive into the wonderful world of textile crafting and discover how simple and enjoyable making your own wallet can truly be.
1. Selecting the Perfect Materials for Your Fabric Wallet
The foundation of any successful sewing project is choosing the right materials, especially when creating everyday items like a DIY fabric wallet. Since a wallet undergoes constant handling, opening, and closing, you need to select a durable cotton fabric or canvas that can withstand daily wear and tear. Quilting cotton is a favorite choice for beginners because it comes in endless prints and is incredibly easy to cut and sew.
In addition to your main fashion fabric, you will need a coordinating lining fabric to give the inside of your handmade coin purse a clean, professional finish. The contrast between the exterior and interior fabrics adds a beautiful design element every time you open your wallet. It is always best to wash and iron your fabrics before cutting to prevent any unwanted shrinkage later on.
To give your wallet structure and prevent it from feeling flimsy, using the correct interfacing for bags is absolutely essential. Fusible interfacing acts as a stabilizer, adding stiffness and body to lightweight cottons without making them too bulky to sew. For a sturdy yet flexible wallet, a medium-weight fusible craft interfacing works beautifully for the main body panels.
Apart from the textiles, you will need to gather your essential sewing notions before sitting down at your machine. This includes high-quality polyester thread, sharp fabric shears, a rotary cutter, a cutting mat, and plenty of sewing pins or quilting clips. Having these tools organized and ready will make your crafting experience much more fluid and enjoyable.
You also need to think about how your wallet and purse will close to keep your money secure. Options like magnetic snaps, metal zippers, hook-and-loop tape, or heavy-duty plastic snaps are all excellent choices for a secure wallet closure. For this specific tutorial, we will focus on using a smooth zipper for the coin compartment and a classic snap for the main wallet flap.
Lastly, do not forget the power of small details, such as choosing a coordinating zipper color that complements your fabric pattern. If you want to add an extra touch of sophistication, you can also look into decorative ribbons, labels, or even a small wristlet strap. Taking the time to plan your materials thoroughly ensures your final product looks like a high-end boutique find.
2. Preparing and Cutting Your Fabric Pieces Accurately
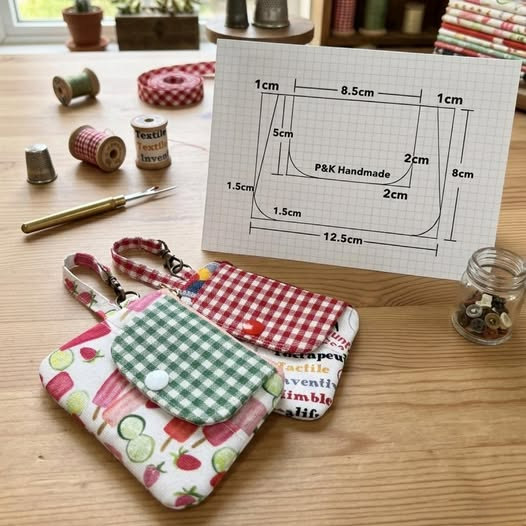
Accurate cutting is the secret weapon of professional sewists, as even a minor mistake can throw off the alignment of your wallet card slots later. To begin, you will want to create a paper pattern based on your desired dimensions or use a standard grid ruler. Make sure your fabric is completely smooth and free of wrinkles by giving it a quick press with a hot iron.
When you learn how to make a fabric wallet and coin purse – tutorial steps emphasize that you must cut pieces for the exterior, interior, and interfacing. For a standard tri-fold or bi-fold style, you will need to cut rectangles for the main body, the coin pocket, and the card dividers. Using a rotary cutter and a self-healing mat will give you the straightest, cleanest edges possible.
Once your fabric pieces are cut, it is time to cut the corresponding pieces of fusible interfacing. Cut the interfacing slightly smaller than your fabric pieces—about one-eighth of an inch less on all sides—to reduce bulk in your seams. This simple trick makes it much easier for your sewing machine to glide through multiple layers of fabric.
Now, take your fabric pieces to the ironing board to apply the iron-on stabilizer to the wrong side of the cloth. Follow the manufacturer’s instructions carefully, pressing firmly with a hot, dry iron rather than sliding it across the fabric. Ensure the bond is secure around all the edges so the interfacing does not peel away during assembly.
Organization is key during this stage, so it helps to stack your pieces in piles according to their function. Labeling your cut pieces with small sticky notes or painters tape can save you a lot of confusion, especially when managing multiple fabric card pockets. Taking an extra five minutes to organize your pieces now will save you time and frustration later.
Double-check all your measurements one last time against your pattern pieces before moving on to the sewing machine. Ensure that your fabric patterns are facing the correct direction if you are using a directional print, like stripes or animals. With all your pieces perfectly cut, stabilized, and sorted, you are fully prepared to start assembling your custom creation.
3. Assembling the Coin Purse and Card Slots Step by Step
We will begin the actual construction by building the internal elements, starting with the zippered coin pouch. Take your small zipper and place it face down along the top edge of your exterior pocket fabric piece, aligning the edges. Place the lining piece on top, sandwiching the zipper between the two layers of fabric, and pin securely.
Using a specialized zipper foot on your sewing machine, sew along the edge, keeping your stitches close to the zipper teeth. Flip the fabrics right sides out, press the seam away from the zipper with your iron, and topstitch for a clean finish. Repeat this exact process for the other side of the zipper to complete the basic pocket structure.
Next, let us focus on creating the organized card slots, which require a series of precise, accordion-style folds. Take your long strip of card pocket fabric and mark the folding lines using a water-soluble fabric pen. Fold the fabric back and forth along these lines, pressing each fold sharply with your iron to create distinct tiers.
To keep these pockets sturdy, it is highly recommended to sew a neat line of topstitching along the top edge of each individual slot. This not only looks highly professional but also reinforces the areas that will experience the most friction when inserting cards. Once pressed, sew a baste stitch down the sides to hold the folds permanently in place.
Now, align your completed card slot panel and your zippered coin pouch onto the main interior lining fabric. Pin them carefully to ensure nothing shifts out of place, and sew down the center divider line to create separate card sections. This step transforms your loose fabric pieces into a highly functional, organized multi-pocket wallet interior.
Take a moment to admire your progress, as the internal mechanism of your wallet is now fully formed and ready. Trim away any loose threads and give the entire interior assembly another good press with your iron to keep it flat. The flatter your pieces are at this stage, the easier it will be to sew the final outer seams.
4. Joining the Pieces and Finishing Your Handmade Wallet
Now comes the exciting moment where all your hard work comes together into a completed handmade fabric wallet. Place your completed interior assembly face up on your work surface, making sure all zippers are left halfway open. Leaving the zipper open is a crucial step, as it allows you to turn the wallet right side out later.
Place your exterior fabric piece face down on top of the interior piece, aligning all the outer edges perfectly. If you are adding a snap closure flap or a wristlet loop, sandwich it between these layers now, pointing inward. Use sturdy sewing clips to hold all these thick layers securely together without bending your pins.
Sew all the way around the perimeter of the wallet using a standard half-inch seam allowance, leaving a three-inch gap at the bottom. This turning opening is absolutely vital, as it is the only way you will be able to flip your wallet right side out. Be sure to backstitch securely at the beginning and end of your opening to prevent unravelling.
Before turning, clip the corners of your wallet diagonally, being very careful not to cut through your stitches. Clipping fabric corners removes excess bulk, allowing you to achieve sharp, crisp corners when the item is turned inside out. You can also trim down any excess seam allowance in areas that feel overly thick or bunched up.
Carefully reach through the opening and pull the entire wallet right side out through the gap you left in the bottom. Use a dull tool, like a chopstick or a turning tool, to gently push out the corners until they are perfectly sharp. Give the entire wallet a thorough pressing with your iron, tucking the raw edges of the opening neatly inside.
To finish your project, topstitch around the entire outer edge of the wallet, which will beautifully close the turning gap at the same time. This final edge topstitching gives your wallet a polished, commercial look while adding extra structural durability. Add your functional snap closure to the front flap, and your beautiful new accessory is officially ready to use.
Frequently Asked Questions
What is the best type of fabric to use for a DIY wallet?
The best fabric for a wallet is 100% quilting cotton, canvas, or denim because they are sturdy and easy to sew. You want a material that can handle daily wear while still allowing your sewing machine to pass through multiple layers easily.
Do I really need to use fusible interfacing?
Yes, fusible interfacing is absolutely essential for wallet making. Without it, your fabric wallet will be limp, loose, and will not hold its shape or protect your cards and coins properly.
How do I wash my handmade fabric wallet?
It is best to hand wash your fabric wallet in cold water with a mild detergent to preserve its shape and color. Avoid twisting or wringing it out; instead, reshape it while wet and lay it flat to air dry completely.
Can a beginner sew a zippered coin purse?
Absolutely, a beginner can definitely sew a zipper with a little patience. Using a specialized zipper foot on your machine and taking your time makes the process straightforward and highly manageable for any skill level.
What can I do if my sewing machine struggles with thick layers?
If your machine struggles, try using a heavier denim needle (size 90/14 or 100/16) and a longer stitch length. You can also use a hammer to gently tap thick fabric seams flatter before sewing over them.
How can I make my fabric wallet waterproof?
You can make your wallet water-resistant by applying a fabric protectant spray after sewing, or by using laminated cotton fabric for the exterior piece.
Conclusion
In this comprehensive how to make a fabric wallet and coin purse – tutorial, we have covered every single detail needed to create a gorgeous, functional accessory from scratch.
From selecting durable cotton fabrics and applying structural fusible interfacing to sewing zippers and mastering the final topstitching, you now possess the skills to create custom wallets that rival store-bought versions. Crafting your own accessories is a wonderful way to express your creativity while building practical, everyday sewing skills that you can use on countless future projects.