Learning how to make clip decorated with crochet butterfly – tutorial style is one of the most rewarding crafting projects you can undertake today. Hair accessories are experiencing a massive resurgence in the fashion world, and handmade touches add a layer of charm that store-bought items simply cannot replicate. Whether you want to create a beautiful gift, start a profitable side hustle, or just enjoy a relaxing weekend project, this comprehensive guide will walk you through every single step of the process.
This craft blends the precise, repetitive art of crochet with the practical utility of hair clip decoration, making it perfect for both seasoned crafters and eager beginners. By mastering this specific design, you open up a world of creative possibilities where you can play with colors, textures, and embellishments. The beauty of the crochet butterfly lies in its versatility, as it can transform a simple metal slide into a stunning piece of wearable art.
In this ultimate guide, we will break down the entire process from selecting your crochet supplies to the final assembly of your butterfly hair accessories. We will look at the best materials to ensure longevity, the exact stitches required for a flawless shape, and the secrets to gluing your work securely. Grab your crochet hook, choose your favorite yarn colors, and let’s dive deep into this wonderful crafting journey together.
1. Choosing the Best Materials for Your Crochet Butterfly Project
When learning how to make clip decorated with crochet butterfly – tutorial guides often emphasize that your final product is only as good as the raw materials you choose. For a hair accessory that will be handled frequently, selecting a high-quality, mercerized cotton yarn is highly recommended. Cotton yarn provides excellent stitch definition, which makes the intricate wings of your handmade butterfly stand out sharply, while also resisting fuzziness over time.
The weight of the yarn is equally important when working on delicate hair clip decoration projects. A lace-weight yarn or a size 10 crochet thread paired with a small steel hook will yield a dainty, elegant butterfly perfect for toddlers or minimal styles. If you prefer a bolder, more whimsical look, a lightweight sport or fingering weight yarn will create a slightly larger motif that catches the eye immediately.
Aside from the yarn, you need to select the right base for your butterfly hair accessories. Metal alligator clips, snap clips, or classic bobby pins all work beautifully, but alligator clips with teeth generally provide the most secure grip for attached yarn pieces. It is wise to purchase these clips in bulk, ensuring they are free from rust or sharp, unfinished edges that could snag the hair.
To join your crochet embellishment to the metal base, your choice of adhesive will dictate the durability of the finished item. A high-quality hot glue gun with specialized fabric-to-metal glue sticks is the industry favorite for quick bonding and strong hold. Alternatively, industrial-strength liquid glues like E6000 offer an incredibly permanent bond, though they require a much longer curing time before the clip can be worn safely.
Do not forget the small finishing tools that make a massive difference in your DIY crochet tutorial experience. A sharp pair of embroidery scissors will ensure clean cuts without fraying your yarn, and a sturdy yarn needle is essential for weaving in those loose ends neatly. You might also want to gather small faux pearls, rhinestones, or metallic threads to create the butterfly’s antennae and body later on.
Organizing your workspace before you begin will streamline your crochet patterns workflow and keep your creative energy flowing. Make sure you have adequate lighting, as working with smaller hooks and dark or vibrant yarn can strain your eyes during prolonged sessions. Once your table is set with yarn, hooks, clips, glue, and decorations, you are officially ready to start creating your masterpiece.
2. Step-by-Step Crochet Pattern for the Perfect Butterfly Motif
Before jumping into the loop, it is vital to understand the fundamental stitches that build this gorgeous crochet butterfly design. This pattern relies on a combination of chains, slip stitches, double crochets, and treble crochets to create the natural slope of upper and lower wings. If you are new to the craft, practicing these stitches on a scrap piece of yarn will build your confidence before starting the actual how to make clip decorated with crochet butterfly – tutorial process.
To begin your handmade butterfly, start by creating a slip knot and chaining four stitches, then join with a slip stitch to form a small ring. Alternatively, you can use the magic ring method, which allows you to pull the center completely closed, eliminating any visible hole in the middle of your butterfly. Inside this ring, you will work the foundational rounds that establish the symmetrical balance of the wings.
For the first official round of your crochet embellishment, chain three (which counts as your first double crochet) and work two more double crochets into the ring, followed by a chain of two. Repeat this sequence—three double crochets, chain two—seven more times until you have eight distinct clusters separated by chain spaces. Join the round with a slip stitch to the top of your initial chain-three, creating a wheel-like shape.
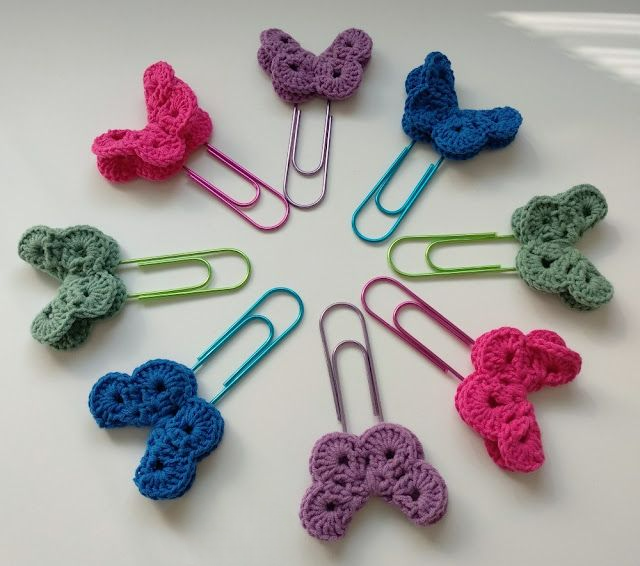
The second round is where the true magic happens, transforming the simple circle into distinct butterfly hair accessories components. Slip stitch your way into the first chain-two space, then chain three, work two double crochets, chain two, and work three more double crochets all within that same single space. Repeat this shell stitch pattern in every chain space around the circle, giving you a beautiful, wavy flower shape with eight petals.
To finish the wings, fold your completed flower shape exactly in half, which instantly reveals the unmistakable silhouette of a biological butterfly. Take your yarn needle and thread a contrasting color through the center fold, winding it around the middle tightly to compress the body and accentuate the flare of the wings. Knot this contrasting thread securely at the back, leaving two small ends pointing upward at the front to act as adorable, natural-looking antennae.
Secure all remaining yarn tails by weaving them deeply into the stitches on the back side of the wing structure, using your crochet supplies needle. Cut the excess thread as close to the fabric as possible without nicking your structural stitches to ensure a flawless presentation. Your textile butterfly is now fully formed, beautifully proportioned, and ready to be transitioned from a simple motif into a functional accessory.
3. Preparing and Covering the Metal Clips for Maximum Durability
Many crafters overlook the preparation of the metal base, but this step is vital when mastering how to make clip decorated with crochet butterfly – tutorial techniques. Metal is naturally slick, meaning raw glue applied directly to it can peel away easily under the stress of daily opening and closing. Preparing your hair clip decoration base properly ensures that your hard work will not separate from its anchor after just a few uses.
A fantastic way to elevate the professionalism of your butterfly hair accessories is to line the metal clip with a matching grosgrain ribbon. Select a ribbon width that matches your metal clip perfectly, usually around three-eighths of an inch for standard alligator clips. Lining the clip not only provides a superior, porous surface for the glue to bond with but also protects the wearer’s hair from metal scraping.
To apply the ribbon, heat your glue gun thoroughly and apply a thin, even bead of adhesive along the top surface of the metal clip. Carefully press the ribbon onto the glue, smoothing it out with your fingers from the hinge down to the prong tip to avoid any lumps or air bubbles. Wrap the ribbon around the tip and glue it slightly underneath the inside of the prong, sealing the metal completely.
If you choose not to use ribbon, you can create a unique crochet sleeve to slide directly over the metal clip. By chaining a sequence that matches the length of your clip and working a few rows of single crochet, you create a tiny jacket for the metal. Slide this yarn sleeve onto the prong and secure it with a few drops of adhesive, creating a fully textile base for your creation.
Another crucial tip for durability during this DIY crochet tutorial phase is to clean the bare metal clips with rubbing alcohol before applying any adhesive. Factory-made clips often carry a microscopic layer of industrial oil that prevents glue from adhering permanently. A quick wipe down removes these oils, ensuring your fabric-to-metal bonds are incredibly tough and built to withstand the test of time.
Allow your lined or covered clips to dry completely for a few minutes before moving on to the final assembly stage of construction. Check that the hinge mechanism still opens smoothly and that no stray glue has seeped into the spring area, locking the clip shut. With your base securely covered and reinforced, you have established the perfect foundation for your decorative wing element.
4. Assembling and Embellishing Your Custom Hair Accessories
Now comes the most exciting part of learning how to make clip decorated with crochet butterfly – tutorial steps: assembling your final creation. Hold your covered clip in your non-dominant hand and position your crochet butterfly over the top to decide on the exact placement. Some crafters prefer the butterfly centered perfectly on the clip, while others love an asymmetrical look where the wings tilt slightly toward the opening hinge.
Once you have determined the ideal position, apply a generous but controlled amount of hot glue to the center back of your crochet embellishment. Avoid placing glue too close to the outer edges of the wings, as the pressure of pressing it down will cause excess glue to squeeze out, ruining your clean lines. Press the butterfly firmly onto the prepared ribbon base, holding it steady for at least thirty seconds.
While holding the piece, ensure the wings are angled slightly upward to give the impression of a butterfly caught mid-flight, rather than lying completely flat. This 3D effect adds depth and high-end appeal to your handmade butterfly, making it look like an expensive boutique item. Check the alignment from all angles before the glue cools and sets permanently into place.
Once the main structure is securely bonded, you can unleash your creativity by adding unique, personalized details to the hair clip decoration. Fabric paint, tiny glitter drops, or miniature stick-on pearls can be attached down the center spine of the butterfly to simulate a sparkling body. If you want a more vintage aesthetic, sewing a small piece of lace underneath the wings adds a beautiful, layered texture.
To ensure your butterfly hair accessories hold up against humidity and daily wear, you can lightly spray the yarn wings with a fabric stiffener or a mix of water and PVA glue. This subtle treatment prevents the wings from drooping over time, maintaining that fresh, crisp, just-crocheted look even after months of use. Allow the stiffening spray to air dry completely in a dust-free environment before packaging or wearing.
Inspect your final piece for any stray hot glue strings, which can easily be plucked away using a pair of clean tweezers. Give the clip a gentle structural test by opening and closing it a few times to verify that the bond between yarn, ribbon, and metal is completely solid. Congratulations, you have successfully combined modern style with traditional needlework to create a stunning, functional piece of art!
FAQ – Frequently Asked Questions
What is the best type of yarn for a crochet butterfly hair clip?
The absolute best yarn for this project is 100% mercerized cotton, preferably in fingering weight, sport weight, or size 10 embroidery thread. Cotton offers excellent stitch definition, does not pill or fray easily, and provides the structural integrity needed for a small hair accessory.
Can I make these butterfly clips if I am an absolute beginner at crochet?
Yes, absolutely! The pattern utilizes basic stitches such as the chain, single crochet, double crochet, and treble crochet. Because the project is small, it serves as an excellent learning canvas for beginners to practice tension control and stitch placement without getting overwhelmed.
How do I prevent the crochet butterfly from detaching from the metal clip?
The secret lies in preparing your metal base. Instead of gluing the yarn directly to bare metal, line the clip first with a grosgrain ribbon or a crocheted sleeve using industrial-strength glue or hot glue. This creates a porous, fabric-to-fabric bond that is immensely durable.
Are these handmade clips safe for infants and toddlers with fine hair?
Yes, provided you choose the right clip base and secure all small parts. For infants, a ribbon-lined snap clip or a small alligator clip with an added silicone non-slip grip pad is ideal. Always ensure that embellishments like pearls or beads are sewn on incredibly tightly to prevent any choking hazards.
How do I clean my crochet butterfly hair clip if it gets dirty?
Because of the metal clip and glue, you should never submerge the accessory entirely in water or put it in a washing machine. Instead, spot clean the yarn gently using a damp cloth with a tiny drop of mild soap, then allow it to air dry completely away from direct sunlight.
Conclusion
In this tutorial, we explored the complete process of how to make clip decorated with crochet butterfly – tutorial style from scratch. We covered how to select structural cotton yarns, execute a beautiful symmetrical wing pattern, prepare your metal clips with ribbon for long-lasting durability, and apply gorgeous finishing embellishments.
This project is a wonderful way to recycle scrap yarn while crafting something genuinely beautiful and functional.