If you have ever wanted to learn how to make mini crochet sandals – tutorial style, you are in the perfect place to start your next creative project. Creating tiny, adorable footwear is one of the most rewarding ways to use your yarn stash while practicing your stitching skills. Whether you are preparing a heartwarming baby shower gift, stocking up your online handmade shop, or just looking for a delightful weekend project, making these miniature shoes brings immense joy.
The beauty of a detailed how to make mini crochet sandals – tutorial lies in its versatility and simplicity, making it accessible even for determined beginners. With just a few basic supplies and a little bit of patience, you can transform a simple skein of yarn into a cherished keepsake. These tiny projects are not only fast to complete, but they also allow you to experiment with vibrant color combinations and unique embellishments without a massive time investment.
In this comprehensive guide, we will walk you through every single step required to master this craft from scratch. We will cover the essential materials you need, the fundamental stitches involved, and the precise construction methods to ensure your finished project looks professional and neat. By the end of this read, you will have all the confidence and knowledge necessary to create beautiful, comfortable, and structurally sound miniature footwear.
1. Choosing the Best Yarn and Tools for Your Project
When diving into a how to make mini crochet sandals – tutorial, the very first step is selecting the right materials for the job. Because these tiny sandals are often meant for sensitive baby skin or delicate displays, the texture and weight of your yarn choice matter immensely. A 100% cotton yarn or a high-quality cotton-acrylic blend is generally the gold standard for this type of project. Cotton provides excellent stitch definition, which helps the tiny straps and soles hold their structural shape perfectly without sagging.
Weight is another critical factor to consider when learning how to make mini crochet sandals – tutorial methods successfully. Standard worsted weight yarn can sometimes result in a shoe that looks bulky or disproportionate for a newborn or infant. Instead, opt for a sport weight, fine weight, or DK weight yarn to achieve those crisp, clean, and dainty stitches. Using a lighter weight yarn ensures that the intricate details of the small straps and tiny sole contours remain highly visible and defined.
Along with your yarn, choosing the correct hook size is vital for regulating your tension throughout the crafting process. For sport or DK weight yarn, a hook size ranging from 2.00 mm to 3.00 mm is usually ideal to keep your stitches tight. Tight stitches are incredibly important here because they prevent the sole of the sandal from twisting, bending, or losing its shape over time. A tighter gauge guarantees that the finished footwear stays durable and maintains its boutique-quality aesthetic.
In addition to your primary hook and yarn, you will want to gather a few essential notions before starting. A pair of sharp embroidery scissors, a sturdy tapestry needle for weaving in loose ends, and a handful of stitch markers are indispensable. Stitch markers are especially helpful when working the sole of the shoe, as they keep track of your increases and decreases. Having these tools organized on your workspace beforehand saves time and keeps your creative momentum flowing smoothly.
Don’t forget about the small decorative elements that can truly elevate your finished project from simple to extraordinary. Tiny wooden buttons, plastic snap fasteners, or miniature hook-and-loop strips are excellent choices for securing the ankle straps safely. If you love a whimsical look, you can also consider small satin ribbons, fabric flowers, or embroidered details to add a touch of personality. Just ensure all attachments are sewn on with extreme security if the sandals are intended for actual infants.
Ultimately, taking the time to carefully select your materials sets a strong foundation for the entire making process. When you invest in high-quality, soft yarn and the proper tools, the actual stitching process becomes significantly smoother and more enjoyable. Your hands won’t tire as easily, and the final product will look remarkably polished and professional. Now that your workspace is fully prepped with the ultimate gear, you are ready to move on to the fundamental stitches.
2. Mastering the Basic Stitches and Gauge
Before jumping directly into the assembly of the footwear, it is essential to review the core stitches required for this specific pattern. This how to make mini crochet sandals – tutorial relies heavily on foundational movements like the chain stitch, slip stitch, single crochet, and half double crochet. Mastering these basics allows you to move seamlessly through the pattern without constantly stopping to look up stitch mechanics. Each stitch serves a specific structural purpose, from building a sturdy base to shaping flexible straps.
The sole of the sandal typically utilizes a combination of single crochet and half double crochet stitches to create a contoured, anatomical shape. The heel area usually demands shorter stitches for stability, while the toe area utilizes taller stitches to accommodate the natural wideness of a foot. Understanding how these stitches interact with each other allows you to maintain even edges and perfect symmetry between the left and right shoes. Consistency is absolutely key when you are working on a scale this small.
Achieving the correct gauge is another vital aspect that cannot be overlooked when practicing how to make mini crochet sandals – tutorial designs. Because baby feet vary greatly in size, a slight difference in your tension can inadvertently turn a newborn-sized shoe into a toddler-sized one. It is highly recommended to make a quick practice swatch or closely measure your first completed sole before moving forward. If your sole measures too large, consider dropping down a hook size; if it is too small, size up.
Tension control is something that naturally improves with practice, but staying mindful of it during small projects pays off immensely. Try to maintain a firm, even tug on your yarn as you pull through loops to keep the stitches uniform. If your stitches are too loose, the sandal will lack the structural integrity needed to stand up on its own or stay securely on a foot. Consistent tension ensures that both sandals turn out exactly identical in length, width, and overall shape.
Reading your stitches correctly is another skill that will save you from frustration and having to unravel your hard work. In miniature footwear design, working in the round is incredibly common, meaning you will often stitch continuously without joining each row. Using your stitch markers to identify the precise first stitch of every round prevents you from accidentally adding or losing stitches. It keeps your stitch count accurate, which is crucial for the strap alignment later on.
Once you feel completely comfortable with your tension and can identify your stitches easily, the entire process becomes a relaxing rhythm. You will find that these tiny shoes work up incredibly fast compared to larger garments like blankets or sweaters. This rapid progress makes the learning curve highly encouraging for crafters looking to expand their skill sets. With your stitches perfected and your gauge verified, you are fully prepared to begin constructing the actual sole.
3. Step-by-Step Construction of the Sandal Sole
The foundation of any great shoe is its sole, and that is exactly where our how to make mini crochet sandals – tutorial gets hands-on. To begin, you will create a foundation chain down the center, which acts as the spine of the entire sandal base. You will then work completely around both sides of this central chain in an oval shape, rather than turning your work. This technique of working in a continuous oval allows you to build a flat, sturdy bottom that mimics a real shoe.
During the first few rounds of the sole, you will implement precise increases at both the heel and toe ends of the oval. Increasing means placing multiple stitches into a single loop, which allows the piece to expand flatly without curling upward prematurely. Follow your count strictly during these rounds, as an incorrect increase can cause the sole to ripple or distort. Keep your stitches tight here to ensure the bottom of the shoe provides a flat, stable surface.
To make the footwear even more durable and comfortable, many crafters choose to make a double-layered sole for each individual sandal. This means you will crochet four identical soles in total, then join two pairs together using a simple round of single crochet or slip stitches. A double sole hides all your yarn tails cleanly between the layers and gives the shoe a premium, cushioned feel. It also adds a beautiful contrasting color border around the edge if you choose to use a different yarn shade.
As you finish up the final round of the sole, you will transition into creating the defined edge where the upper straps attach. This is often achieved by working into the back loops only of the previous round, creating a neat ridge that frames the bottom. This ridge clearly defines the boundary between the sole and the top of the foot, giving the sandal a realistic look. Take a moment to admire your work at this stage, ensuring the piece lays flat and even.
Weaving in your loose ends carefully at this point is highly recommended before you begin building upward with your straps. Use your tapestry needle to secure the yarn tails firmly inside the structure of the sole so they never unravel with use. A clean base makes the upcoming steps much easier to navigate and ensures a flawless interior for tiny feet. Double-check that your two completed bases match perfectly in size before moving on to the next step.
Building a solid sole is often considered the most technical part of learning how to make mini crochet sandals – tutorial methods, but it builds immense skill. Once you master this foundational oval, you can use it as a base for booties, loafers, and sneakers in the future. The hard part is officially behind you, and you are now ready to add the fun, customizable upper elements. Let’s move into the next phase and bring these adorable sandals to life with custom straps.
4. Designing Straps and Adding Gorgeous Embellishments
Now comes the most creative part of our how to make mini crochet sandals – tutorial: crafting the upper straps and adding personalized flair. To create a classic T-strap or an elegant cross-strap design, you will attach your yarn directly to the side ridges of the sole. Counting your stitches from the center of the heel or toe ensures that your straps are perfectly centered and balanced. A misplaced strap can cause the shoe to sit crookedly on the foot, so precision matters.
For a simple and timeless summer look, a classic front toe band combined with a secure ankle strap works beautifully every time. You can create the toe band by chaining across the front section and working a few rows of single crochet back and forth. Keep the tension firm so the band doesn’t stretch out too much over time when the sandal is worn. This simple structure provides excellent ventilation for warm weather while keeping the shoe securely attached to the wearer.
The ankle strap needs to be adjustable or stretchy enough to allow a foot to slip in and out easily without hassle. To achieve this, you can extend the strap with a short chain sequence to create a functional button loop at the very end. Alternatively, you can sew on a tiny snap fastener or a piece of soft fabric hook-and-loop tape underneath the strap overlay. Whichever closing method you choose, make sure it is comfortable and free of any rough edges that could irritate skin.
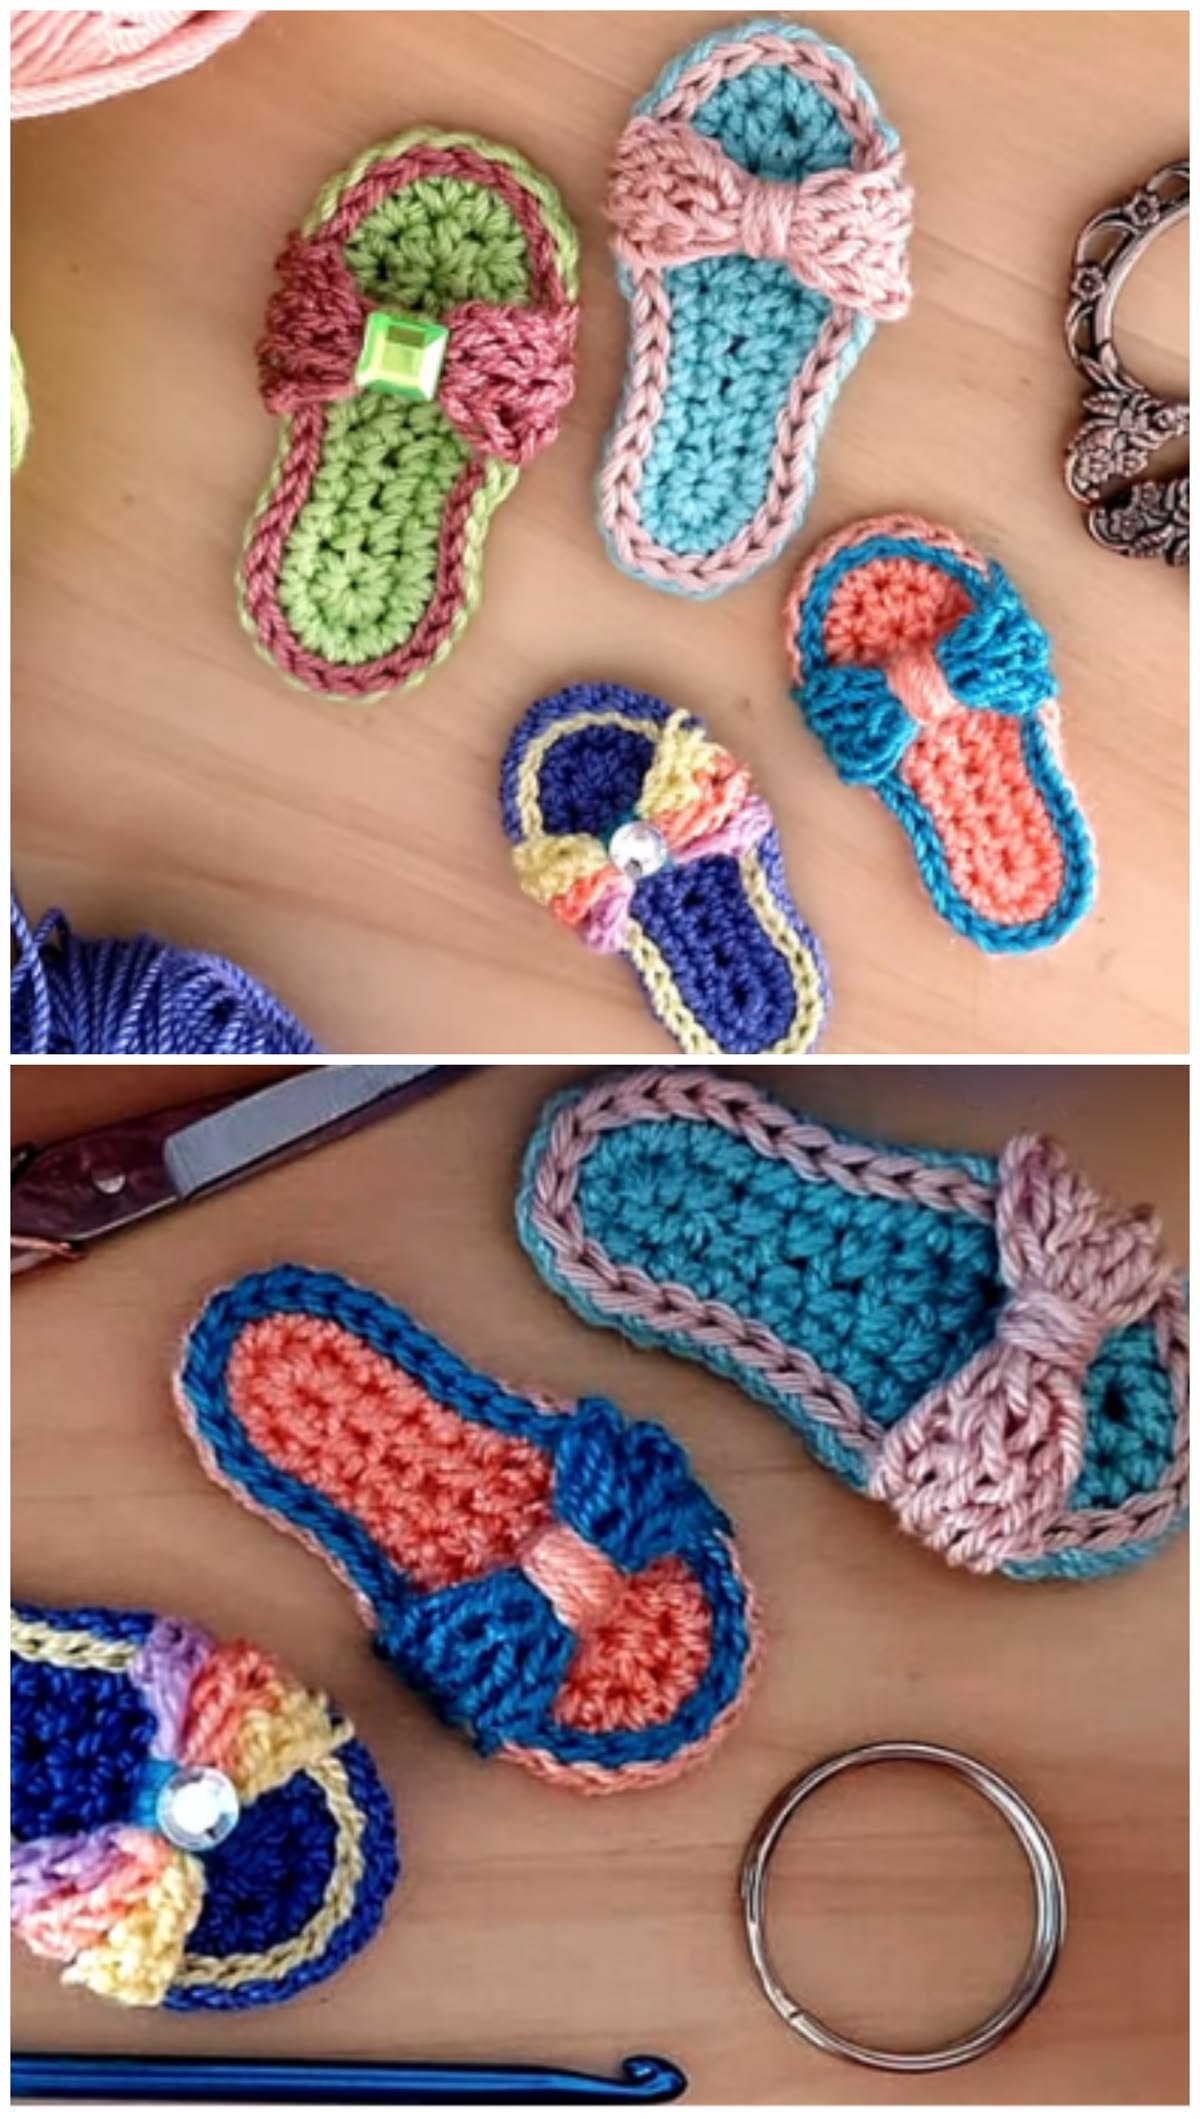
Once the primary structural straps are fully completed and fastened off, you can unleash your creativity with beautiful custom embellishments. Crocheting a tiny flower, a miniature bow, or a small star and sewing it onto the front toe band adds instant charm. You can play with contrasting yarn colors to make these decorative elements stand out vividly against the main body. These small details are what truly transform a basic pattern into a stunning, personalized masterpiece.
If you prefer a more minimalist or modern bohemian aesthetic, you can leave the sandals plain and let your stitch work shine. Choosing a speckled or self-striping variegated yarn can also add automated visual interest without requiring extra sewn-on pieces. Another wonderful idea is to use a metallic or shiny thread run alongside your main yarn for a touch of subtle sparkle. The design options are completely limitless, allowing you to tailor each pair to your specific style.
After completing all the stitching and assembly, give your finished mini sandals a gentle steam blocking if necessary to set their shape. This involves using a garment steamer or the steam setting on an iron held a few inches away to relax the fibers. Gently shape the straps with your fingers while they are warm and let them dry completely before gifting or photographing. Congratulations, you have successfully completed the tutorial and created a gorgeous piece of handmade art!
Frequently Asked Questions (FAQ)
What is the best yarn weight to use for mini crochet sandals?
The best yarn weight to use for miniature footwear is generally sport weight, fine weight, or DK (Double Knitting) weight yarn. These lighter weights allow you to create small, precise, and highly detailed stitches without making the shoe look bulky or stiff. Avoid using heavy worsted or bulky yarns unless you are intentionally modifying the pattern to create a much larger shoe size.
How do I make sure both sandals turn out the exact same size?
To ensure both sandals match perfectly, it is crucial to maintain identical tension throughout the entire making process for both pieces. It is highly recommended to crochet both soles first, one after the other, rather than completing one full sandal before starting the second. Count your stitches meticulously at the end of every single round to guarantee that your counts remain completely identical.
Can a beginner succeed with this mini sandal tutorial?
Yes, a determined beginner who is already familiar with foundational stitches like the chain, single crochet, and slip stitch can absolutely succeed. Because the project is very small, it allows you to practice stitch placement and tension control without getting overwhelmed by a massive amount of fabric. Take your time, use stitch markers to keep track of your rounds, and read through each step carefully before stitching.
How do I add a secure closure to the ankle straps?
You can add a secure closure by sewing a tiny lightweight button onto the side of the ankle strap and creating a corresponding chain loop. Other highly effective options include sewing on miniature plastic snap fasteners or attaching small pieces of soft hook-and-loop fabric tape. Always ensure that whatever fastening method you choose is sewn on incredibly securely to prevent any choking hazards for infants.
How long does it typically take to complete a pair of these miniature sandals?
Because of their small dimensions, a pair of miniature sandals can typically be completed in about one to two hours, depending on your experience. This rapid turnaround time makes them an incredibly satisfying project for quick gifts, last-minute market prep, or satisfying a sudden creative urge. They are also perfect for using up leftover scraps of yarn from your previous larger projects.
Is it necessary to make a double-layered sole for the footwear?
While a double-layered sole is not strictly mandatory, it is highly recommended because it adds excellent structural integrity, durability, and a clean finish. A double sole completely hides all your woven-in yarn tails between the two layers, creating a smooth interior for sensitive feet. It also helps the sandal lay flat and hold its shape beautifully when placed on display or worn.
Conclusion
In this comprehensive how to make mini crochet sandals – tutorial, we have thoroughly explored everything needed to craft beautiful, petite footwear from scratch. We began by selecting the perfect cotton yarn and matching hooks, ensuring a strong foundation for tight, neat stitches.
We then mastered the essential stitch techniques, constructed a durable oval sole, and designed adjustable straps complete with gorgeous custom embellishments. This project is a fantastic way to develop your fine motor skills while producing a truly heartwarming piece of handmade art.