How to Make Fabric Bookmark – Tutorial is the ultimate guide you need if you love reading and crafting, offering a fantastic way to dive into a rewarding, eco-friendly project. There is something incredibly special about using a handmade fabric bookmark to keep your place in your favorite novel, especially when compared to a flimsy piece of paper or a bent corner. Making your own bookmarks allows you to express your personal style, play with beautiful patterns, and create meaningful, customized gifts for the bookworms in your life.
If you have a growing stash of leftover scrap fabric from prior sewing adventures, this easy sewing project is the absolute perfect way to clear out your bins while making something genuinely useful. Scrap busting is a favorite pastime for creators because it turns potential waste into beautiful, functional art that you can use every single day. Beyond the personal satisfaction of making something with your own hands, learning how to make fabric bookmark items is a brilliant introduction to basic sewing techniques for beginners.
In this comprehensive step-by-step fabric bookmark tutorial, we are going to walk through the entire creative process from start to finish, ensuring your final product looks polished, crisp, and professional. We will cover the essential materials you need, the exact steps to cutting and assembling your pieces, how to add structure so it doesn’t flop around, and a few fun ways to personalize your final design. Gather your favorite textile remnants, warm up your iron, and let’s dive straight into this delightful crafting session.
1. Choosing the Best Materials for Your DIY Fabric Bookmark
When learning how to make fabric bookmark designs that last for years, selecting the right textiles is the most important first step. 100% cotton quilting fabric is the absolute best choice for beginners because it is incredibly easy to cut, doesn’t slip around while you are sewing, and presses beautifully with a standard iron. You can experiment with different patterns, mixing a bold floral print for the front side with a subtle geometric design or a solid color for the back side to create a gorgeous contrast.
Aside from your main fashion fabric, you will also need a secret ingredient to give your project some much-needed weight and sturdiness: fusible interfacing. Interfacing is a non-woven or woven material that bonds to the wrong side of your textile when you apply heat, preventing your DIY bookmark from bending, collapsing, or creasing inside your books. Medium-weight or heavy-duty fusible interfacing works perfectly for this specific craft, ensuring a crisp, bookstore-quality finish.
The beauty of this scrap fabric bookmark tutorial is that the tool list is wonderfully minimal, meaning you likely already have everything you need sitting in your craft room right now. You will want a reliable sewing machine, or simply a hand-sewing needle and some strong thread if you prefer a slower, more intentional crafting experience. A sharp pair of fabric shears or a rotary cutter paired with a self-healing mat will make your cuts incredibly precise and clean.
To make the process seamless, you should also gather a few everyday sewing notions like fine quilting pins or wonder clips to hold your layers perfectly securely before stitching. A clear quilting ruler is also highly recommended to help you measure out perfect rectangles so your finished product isn’t lopsided or uneven. Finally, ensure your iron is nearby, as frequent pressing is the real secret to achieving crisp edges and a flawless look.
If you want to elevate your project even further, consider looking around for fun embellishments to add to the top of your creation. Colorful embroidery floss, silk ribbons, cotton twine, or even miniature yarn tassels make wonderful additions that hang elegantly out of the top of a closed book. These tiny, thoughtful details are what transform a simple weekend craft into a truly high-end, boutique-style accessory.
By intentionally gathering high-quality scraps and the correct structural stabilizers before you begin sewing, you set yourself up for absolute success. Taking a few extra minutes to coordinate your thread colors and iron out any stubborn wrinkles in your scrap fabric will make the assembly process much smoother. Once your materials are neatly organized on your cutting mat, you are officially ready to move on to the next phase of our How to Make Fabric Bookmark – Tutorial.
2. Step-by-Step Cutting and Interfacing Preparation Guide
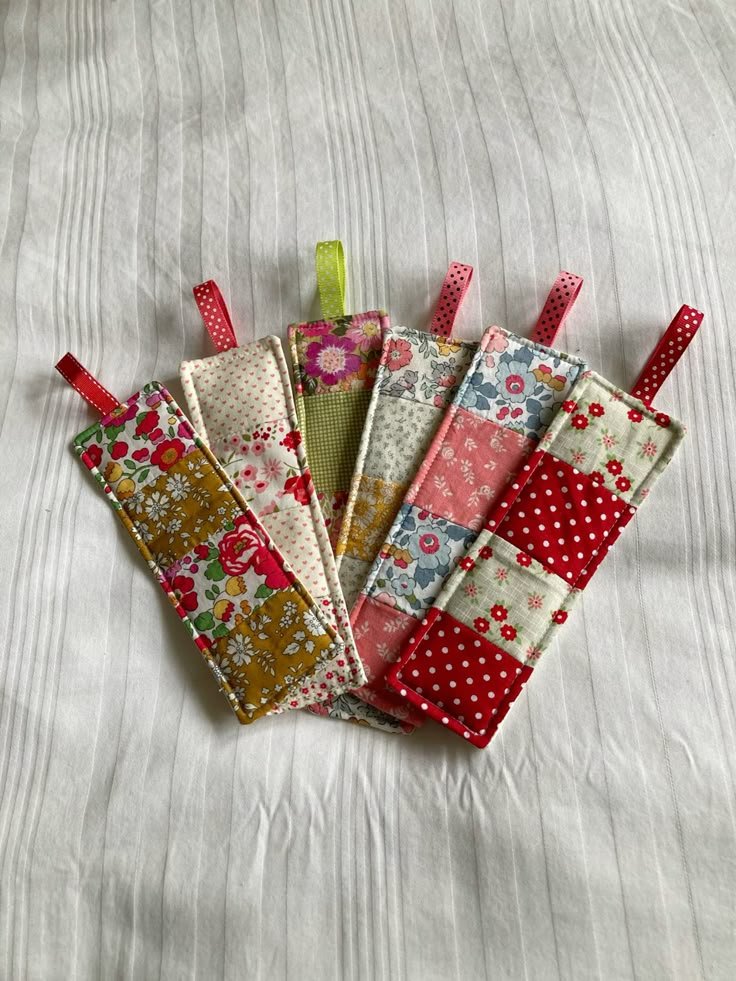
Now that your workspace is organized, it is time to precisely measure and cut your materials, which is the foundational backbone of a great fabric bookmark tutorial. For a standard, comfortable size that fits beautifully into both paperbacks and hardcovers, we recommend cutting two contrasting pieces of fabric measuring exactly 2.5 inches wide by 7 inches long. This specific dimension is highly versatile, but feel free to adjust the length or width to match your personal reading preferences.
Next, you will need to cut one piece of your fusible interfacing, making it slightly smaller than your textile rectangles, measuring roughly 2 inches wide by 6.5 inches long. Cutting the interfacing slightly smaller is a brilliant pro-tip because it completely eliminates bulk in your seam allowances, making it much easier to sew around the perimeter later. It also prevents any sticky adhesive from accidentally getting onto your expensive iron faceplate during application.
Once your pieces are cut, lay one of your fabric rectangles face down on your ironing board so the wrong side of the material is facing up toward you. Take your piece of fusible interfacing and center it carefully on top of the fabric, ensuring the bumpy, textured adhesive side is facing down against the textile. The smooth side of the interfacing should be facing up, ready to come into direct contact with your warm iron.
Gently press your hot iron directly onto the interfacing, holding it firmly in place for about 10 to 15 seconds without sliding it around. Sliding the iron can cause the layers to shift out of alignment, so a firm, stationary pressing motion is always best here. Allow the piece to cool completely for a minute so the heat-activated glue can fully bond and fuse the layers together into one sturdy unit.
After the fused piece has cooled down, you will immediately notice that the textile has a much more substantial, paper-like stiffness to it, which is exactly what we want. This newly reinforced piece will serve as the strong front panel of your homemade bookmark, while the second, un-interfaced rectangle will act as the clean backing. Run your fingers over the bond to ensure there are no air bubbles or loose, lifting edges before moving forward.
Proper preparation at this stage guarantees that your finished project will maintain its beautiful shape through months and years of heavy reading. Skipping the interfacing step or rushing through the cutting process can result in a finished product that frays easily or twists out of shape over time. With your pieces accurately cut and perfectly fused, you are now fully prepared to head over to your sewing machine for assembly.
3. Stitching the Pieces and Turning Your Bookmark Right Side Out
With your prepared fabric rectangles ready, place them together with right sides facing each other, meaning the beautiful, printed patterns are touching on the inside. Align all four edges as perfectly as possible, and use a couple of pins or clips to hold the layers firmly together so they do not slip. The fused interfacing side should be completely visible on the outside of your little fabric sandwich as you prepare to sew.
Take your pinned piece to the sewing machine and prepare to stitch around the perimeter using a standard 1/4-inch seam allowance for neatness. Start sewing along one of the long sides, making sure to leave a 2-inch opening unstitched right in the middle of that side. This unstitched gap is absolutely critical, as it creates the necessary opening that allows you to turn the project right side out later.
As you reach each corner of your rectangle, stop your machine with the needle down into the fabric, lift your presser foot, and pivot the project 90 degrees. Lower the presser foot and continue sewing down the next side, repeating this precise pivoting technique at all four corners to ensure sharp, clean geometric points. Remember to backstitch securely at both the beginning and the end of your stitching line to lock your threads.
Once the sewing is complete, use a sharp pair of scissors to carefully clip the excess fabric away from all four corners at a diagonal angle. Be extremely careful not to cut through your actual stitches as you trim down this bulky fabric. Snipping the corners reduces the internal bulk significantly, which is the secret trick to achieving perfectly sharp, square corners once the bookmark is turned inside out.
Gently insert your thumb and index finger through the 2-inch opening you left unstitched, grasp the far end of the fabric, and carefully pull it out through the gap. Take your time during this turning process to avoid putting too much stress on the seams and accidentally ripping your delicate stitches apart. It might feel a little tight, but the fabric will easily manipulate through the opening with patience.
Once the project is turned right side out, use a dull tool like a wooden chopstick, a turning tool, or a knitting needle to gently push out the corners from the inside. Avoid using sharp scissors or pins for this step, as they can easily punch a hole right through your beautiful cotton fabric. Now, give the entire bookmark a very thorough press with your iron, tucking the raw edges of the opening neatly inside so they align with the rest of the seam.
4. Final Topstitching and Creative Embellishment Techniques
The final major sewing step in our How to Make Fabric Bookmark – Tutorial is topstitching, which serves both a functional and an aesthetic purpose. Take your freshly pressed project back to the sewing machine and stitch a clean line entirely around the edge, roughly 1/8 of an inch from the border. This decorative topstitching beautifully seals the 2-inch turning gap closed permanently while giving the piece a highly professional, tailored appearance.
For a gorgeous contrast, you can use a thread color that stands out against your fabric, or choose a matching thread for a subtle, seamless look. If your sewing machine features decorative built-in utility stitches, like a leaf pattern or a classic zigzag, this is the perfect place to use them. Take your time sewing this final boundary line, ensuring your stitches are perfectly straight, as this is the most visible part of the project.
Now that the structural sewing is officially complete, you can choose to leave your bookmark minimal and sleek, or you can add a beautiful dangling tassel. To add a ribbon or tassel, you can use your machine to sew a small buttonhole near the top edge, or simply use an eyelet tool to punch a clean hole. If you don’t have an eyelet tool, hand-sewing a small loop of ribbon directly into the top seam works beautifully too.
If you chose to punch a hole, installing a small metal eyelet or grommet will protect the fabric from fraying over time while adding a modern touch. Thread a 6-inch piece of satin ribbon, leather cord, or handmade yarn tassel through the opening, securing it with a simple, elegant slipknot. The dangling element makes it incredibly easy to locate your page when the book is resting closed on your nightstand or bookshelf.
For those who love extra personalization, you can use fabric paint, heat-transfer vinyl, or hand embroidery to add a monogram, a favorite quote, or a tiny literary design. Customizing the exterior fabric allows you to tailor the gift perfectly to the recipient’s unique personality, making it a wonderful keepsake for teachers, friends, or club members. The creative possibilities are truly endless once you master the basic construction method.
Once your final embellishments are securely attached, give the entire project one final press with your iron to set everything beautifully in place. Inspect your handiwork, trim away any tiny loose threads with your embroidery scissors, and marvel at the gorgeous book accessory you have just created. You now possess the practical knowledge to manufacture dozens of these beautiful items whenever you need a quick, satisfying craft.
Frequently Asked Questions (FAQ)
What is the best type of fabric to use for a handmade bookmark?
The absolute best choice for a DIY fabric bookmark is 100% quilting cotton because it is sturdy, easy to sew, comes in thousands of vibrant prints, and presses beautifully. You can also experiment with linen, lightweight denim, canvas, or flannel for a different tactile experience, but beginners should avoid slippery materials like silk or polyester.
Do I absolutely need to use fusible interfacing for this project?
Yes, using a stabilizer like fusible interfacing is highly recommended if you want a professional finish. Without interfacing, your bookmark will be too soft and flimsy, causing it to bunch up, wrinkle, or slip entirely out of your book, whereas interfacing provides the necessary crisp structure.
How can I make these bookmarks if I do not own a sewing machine?
You can absolutely make this entire project by hand using a simple running stitch or a backstitch with a standard hand-sewing needle and heavy-duty thread. Alternatively, you can create a completely no-sew version by using double-sided fusible web (like HeatnBond) to glue all the fabric edges together using the heat of your iron.
What are the standard dimensions for a comfortable fabric bookmark?
The most common and comfortable size for a finished item is around 2 inches wide by 6 inches long. To achieve this finished size, we recommend cutting your raw fabric pieces to 2.5 inches by 7 inches, which allows for a standard 1/4-inch seam allowance all around the perimeter.
Can I wash my fabric bookmark if it gets dirty or stained?
If you used high-quality quilting cotton and washable fusible interfacing, you can gently hand wash your bookmark in warm, soapy water. Avoid machine washing and drying, as the intense agitation can distort the shape and damage any attached tassels; instead, reshape it by hand and lay it flat to air dry completely before pressing it with an iron.
Conclusion
In this How to Make Fabric Bookmark – Tutorial, we have covered every single detail required to turn simple textile scraps into a gorgeous, durable, and highly functional book accessory.
From selecting the perfect contrasting quilting cottons and fusing them with stabilizer for strength, to executing neat corner pivots and adding a professional topstitch, you now hold the keys to this wonderful craft. This project proves that you do not need a massive budget or a complex workshop to produce truly exceptional, retail-quality items that bring joy to daily life.