How to Make Patchwork Puzzle Ball – Tutorial: step-by-step guide to creating a beautiful, soft, and engaging fabric toy. If you love quilting, upcycling, or stitching unique gifts, learning how to make patchwork puzzle ball projects is an absolute game-changer for your crafting repertoire. This classic Amish-inspired design is not only visually striking but also serves as a wonderful sensory development tool for babies and toddlers, making it a highly rewarding endeavor for makers of all skill levels.
In this comprehensive tutorial, we will dive deep into the exact methods, materials, and clever assembly tricks required to bring this geometric wonder to life. Crafting a patchwork puzzle ball allows you to mix and match your favorite fabric scraps, turning leftover textiles into a prized family heirloom or a popular item for your online handmade shop. The beauty of this specific project lies in its clever mechanics, as the finished piece features interlocking sections that can be pulled apart and put back together by curious little hands.
Mastering the art of fabric manipulation is central to this patchwork puzzle ball tutorial, ensuring that your finished product is durable, perfectly round, and completely safe for playtime. Throughout this article, we will break down the entire process into easy-to-follow phases, ensuring your sewing journey is smooth, enjoyable, and successful. Grab your sewing machine, gather your colorful cotton remnants, and let us explore the delightful world of creating a patchwork puzzle ball from scratch.
1. Gathering Essential Materials for Your Patchwork Puzzle Ball
Before jumping straight into the sewing machine setup, the absolute first step in learning how to make patchwork puzzle ball designs is preparing the perfect material kit. You will need high-quality 100% cotton fabric scraps, strong polyester thread, a reliable fabric marker, sharp shears, and plenty of premium polyester fiberfill stuffing. Choosing contrasting colors or vibrant patterns is highly recommended for a patchwork puzzle ball, as the distinct segments need to visually pop to highlight the unique puzzle structure.
To ensure your tutorial experience goes smoothly, accuracy during the fabric selection phase is vital for the mechanical success of the final toy. Many crafters prefer utilizing sustainable upcycling techniques, incorporating durable materials like soft denim or linen alongside traditional quilting cottons to add diverse tactile textures. The fabric should have little to no stretch, which prevents the individual wedges from distorting when you pack them tightly with stuffing later on.
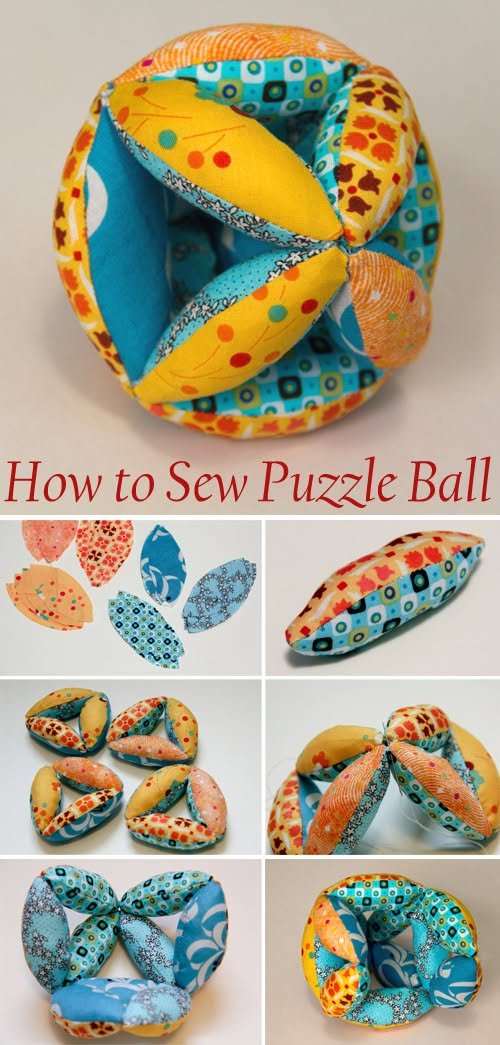
The templates for your patchwork puzzle ball consist of two main shapes: the crescent-shaped outer sections and the football-shaped inner wedges. You can easily draw these templates on thick cardboard or plastic template sheets to ensure they remain consistent across multiple tracing sessions. Precision cutting is the secret weapon here; even a slight deviation in size can cause the interlocking sections to fit too loosely or too tightly upon final assembly.
In addition to your primary fabrics, having high-quality sewing notions by your side will dramatically speed up the production process. Fine quilting pins, a point turner tool, and a sharp hand-sewing needle for the final hidden ladder stitches are absolutely non-negotiable tools for success. Keeping your workspace organized with these items ready to go ensures you can focus entirely on the creative and rhythmic flow of the stitching process.
When considering the internal component of the toy, the choice of stuffing will determine how well your project retains its signature geometric shape over time. Premium polyester fiberfill is the industry standard because it is lightweight, easily washable, and bounces back resiliently after being squeezed by enthusiastic children. Avoid using dense cotton batting or loose fabric scraps for the interior filling, as they tend to create clumpy, heavy, and uneven segments that ruin the balance.
Ultimately, preparing your materials thoroughly sets a solid foundation for the entire patchwork puzzle ball tutorial, saving you time and preventing frustration. By taking the extra time to cut your pieces precisely and organize your thread colors, you ensure a professional, polished finish that looks store-bought. Once your workspace is clean, your fabric pieces are neatly stacked, and your bobbin is fully wound, you are officially ready to begin the construction phase.
2. Cutting and Stitching the Geometric Fabric Segments
Now that your supplies are arranged, it is time to focus on the core mechanical elements of how to make patchwork puzzle ball toys: cutting and piecing. For a standard traditional design, you will need to cut a total of twelve crescent shapes and twenty-four smaller wedge pieces. Carefully trace your template outlines onto the wrong side of the fabric using your washable fabric marker, leaving a precise one-quarter-inch seam allowance around every single piece.
The magic of this patchwork puzzle ball tutorial truly begins to reveal itself during the sewing machine phase, where chain-piecing can save you hours of work. Pair one crescent piece with two inner wedge pieces, matching the right sides of the fabric together along the curved outer edges. Pin the pieces securely at the center and at both sharp tips before taking them to the needle, ensuring the fabric layers do not shift while sewing.
Stitch carefully along the curved lines, using a short stitch length on your machine to create strong, durable seams that can withstand intense stuffing pressure. Leave a small two-inch opening along one of the inner straight seams of the wedge pieces, which serves as the critical turning and stuffing portal. Repeat this precise stitching process for all twelve individual segments until you have a beautiful collection of hollow fabric wedges ready for the next step.
Once the machine sewing is complete, it is highly beneficial to gently clip the curved seam allowances using sharp embroidery scissors or pinking shears. Clipping the curves relieves fabric tension, allowing the seams to lay perfectly flat and smooth once the segments are turned right-side out. Take your time during this step, being extremely careful not to accidentally snip through the actual thread line you just stitched.
Next, gently pull the fabric through the designated opening using your fingers or a dull point turner tool to reveal the right side of the design. Push out the sharp corners gently from the inside to ensure the distinct crescent silhouette of the patchwork puzzle ball is perfectly defined. Give each individual fabric segment a crisp press with a hot iron to set the seams and make the subsequent stuffing process much easier.
By mastering this repetitive but deeply satisfying piecing process, you ensure that all twelve components of your toy are uniform in size and structural integrity. Consistency during this stage is what allows the final interlocking mechanism of the patchwork puzzle ball to work seamlessly without jamming or falling apart. With all twelve sections beautifully pressed and laid out, you are ready to breathe dimensional life into your colorful fabric creation.
3. Stuffing Techniques for Perfect Interlocking Shapes
The secret to a successful patchwork puzzle ball relies almost entirely on your physical stuffing technique, which requires patience and a gentle touch. Grab small, golf-ball-sized tufts of your polyester fiberfill and push them deeply into the very tips of each fabric wedge using a chopstick or a turning tool. Stuffing the tips first ensures that the points remain sharp, firm, and structurally sound when the ball is fully assembled.
As you follow along with this patchwork puzzle ball tutorial, remember that firm stuffing is always better than loose stuffing for this specific geometric design. Continue adding small amounts of fiberfill gradually, packing it tightly into the center of the wedge until the fabric is completely taut and wrinkle-free. The goal is to create distinct, solid cushions that hold their independent shape perfectly while still retaining a soft, squeezable texture.
If you stuff the pieces too loosely, the individual wedges will sag, causing the finished toy to lose its round shape and slide apart effortlessly during play. Conversely, over-stuffing to the point where the seams are visibly straining will make it incredibly difficult to interlock the completed rings together later on. Find that perfect middle ground where the segment feels dense, highly resilient, and holds a beautifully clean curved line on its own.
Once an individual segment is perfectly stuffed, tuck the raw edges of the opening inward by one-quarter of an inch to match the original seam line. Pin the opening shut with a fine quilting pin to hold the folded fabric edges perfectly parallel while you prepare for hand sewing. Repeat this exact filling and pinning process for all twelve segments, verifying that they all share the exact same weight and density.
Using a single strand of strong matching thread, close the openings using a neat, hidden ladder stitch or slipstitch for an invisible professional appearance. Pull the stitches firm as you move along the opening, ensuring the knot is securely buried inside the body of the fabric wedge. This hand-sewing step ensures that no raw edges or stray stuffing fibers escape, making the toy completely safe for young children.
With all twelve individual wedges firmly stuffed and immaculately sealed, you have successfully completed the hardest manual labor portion of the project. You will notice how satisfying these individual pieces feel in your hands, resembling colorful little slices of fabric fruit. Now, you are fully prepared to transition into the final assembly phase, where these separate segments transform into a cohesive puzzle.
4. Final Assembly and Interlocking the Rings Together
The ultimate milestone in learning how to make patchwork puzzle ball heirlooms is assembling the independent wedges into three distinct, interlocking rings. Take four stuffed segments and line them up tip-to-tip, forming a complete circle where the inner curves face inward toward a central point. Thread your hand-sewing needle with extra-strong thread, as these specific joining points will experience the highest amount of physical tension during play.
To make this step of the patchwork puzzle ball tutorial as easy as possible, we will join the tips securely using heavy-duty tacking stitches. Insert your needle through the tips of two adjacent wedges, pulling the thread tight to bring the points flush against one another without overlapping. Wrap the thread around the joined tips three to four times, making multiple secure knots before cutting the thread tail clean.
Continue this exact tacking process until all four wedges are joined together, creating a singular, flexible ring composed of four distinct segments. Repeat this entire procedure with the remaining eight segments until you have a total of three independent, identical fabric rings sitting on your desk. These three separate rings represent the primary architectural components of your finished three-dimensional geometric puzzle toy.
To assemble the final structure, take the first ring and lay it flat on your workspace to act as the base foundation. Take the second ring, orient it vertically, and gently stretch it over the first ring so that they cross each other at a perfect ninety-degree angle. At this stage, you will begin to see the classic, intricate sphere shape starting to form naturally right before your eyes.
Finally, take the third and last ring and carefully weave it through the open gaps remaining between the first two interlocked rings. This step requires a tiny bit of gentle maneuvering, stretching, and shifting, as the third ring locks the entire system securely into place. Once properly woven, the twelve individual segments will nestle against each other beautifully, forming a stunning, perfectly balanced sphere.
Congratulations, you have officially brought your handmade project to life using traditional, time-tested sewing methodologies. Give the ball a few gentle tosses, pull the rings apart to test the puzzle mechanism, and admire how the colors interact with one another. This beautiful creation is now ready to be gifted, displayed, or photographed for your digital crafting portfolio.
Frequently Asked Questions (FAQ)
What is the best fabric to use for a patchwork puzzle ball?
The absolute best fabric for this project is 100% premium quilting cotton because it offers excellent structural stability, does not stretch out of shape, and comes in thousands of vibrant patterns. You can also successfully incorporate non-stretch upcycled fabrics like lightweight denim, linen, or chambray to introduce unique tactile sensory elements for young children.
Can I wash a handmade patchwork puzzle ball after it gets dirty?
Yes, as long as you utilize high-quality cotton fabrics and premium polyester fiberfill stuffing, the entire ball can be safely washed. It is highly recommended to place the toy inside a mesh laundry bag and wash it on a delicate, cold-water cycle, followed by thorough air drying to preserve the shape.
Is this tutorial suitable for absolute beginners to sewing?
While this project requires basic sewing machine skills and simple hand-stitching knowledge, it is absolutely achievable for an adventurous beginner. The main challenge lies in maintaining consistent seam allowances and ensuring the pieces are stuffed firmly enough to hold their shape during final assembly.
How long does it typically take to complete a patchwork puzzle ball from start to finish?
For an intermediate crafter, the entire process from cutting the templates to the final ring assembly generally takes between three to five hours. Utilizing clever workflow strategies like chain-piecing on your machine can dramatically cut down your overall production time.
Why are the rings on my puzzle ball sliding apart too easily?
If the rings fail to stay interlocked, it is almost always a direct result of under-stuffing the individual fabric wedges during the construction phase. Adding more polyester fiberfill makes the segments plump and dense, creating the necessary friction required to hold the geometric puzzle shape together securely.
Conclusion
In this comprehensive guide, we have thoroughly explored how to make patchwork puzzle ball toys using classic quilting techniques, detailed construction steps, and expert stuffing methods.
From selecting the perfect contrasting fabric scraps to meticulously hand-tacking the individual rings together, you now possess all the core knowledge required to create these incredible sensory items. This project is a spectacular way to express your personal artistic creativity while simultaneously reducing your studio waste through intentional fabric upcycling.