The Cleopatra’s Fan – Tutorial is exactly what you need if you want to elevate your quilting skills and bring a timeless, mesmerizing design to life. This classic patchwork pattern captures the eye with its sweeping, elegant curves that mimic the graceful movement of an ancient Egyptian hand fan. While the geometric lines might look intimidating to a beginner, breaking the process down turns this seemingly complex project into an absolute joy to piece together.
If you have been looking for a project that challenges your precision while offering immense creative satisfaction, learning this design is the perfect next step. The Cleopatra’s Fan quilt block relies heavily on contrasting colors and smart fabric selection to make the secondary patterns pop. Once you master the basic construction, you will see how these blocks interlock to create gorgeous circular and wavy movements across your entire quilt top.
In this comprehensive Cleopatra’s Fan – Tutorial, we are going to walk through every single phase of production, from choosing your materials to stitching those famous curved seams. We will focus on practical, actionable advice that ensures your points match perfectly and your fabric stays flat. Grab your favorite fabrics, warm up your iron, and let us dive into the fascinating world of this historic quilting masterpiece.
1 The History and Appeal of the Cleopatra’s Fan Quilt Block
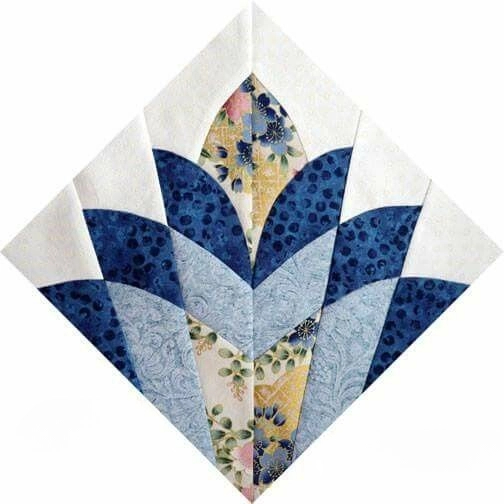
The rich history behind the Cleopatra’s Fan design adds a wonderful layer of depth to every single stitch you make. Originating in the traditional American quilting canon, this pattern was inspired by the glamorous exoticism associated with ancient Egyptian aesthetics. Quilters have long been drawn to its unique structure, which bridges the gap between sharp geometric wedges and fluid, organic curves.
Understanding the visual weight of this pattern helps you make better design choices before you even cut your first piece of fabric. The block is essentially built on a grid, but the clever use of curved piecing tricks the eye into seeing continuous, swirling motion. It is a stunning example of how early creators used limited resources to produce sophisticated optical illusions in home textiles.
For modern makers, the appeal lies in the balance between vintage nostalgia and contemporary styling opportunities. You can easily transform the look of a Cleopatra’s Fan quilt just by shifting your color palette from traditional reproduction prints to bold, modern solids. The versatility of the design ensures it remains a favorite among both traditional artists and modern abstract quilters alike.
Precision cutting is the true secret weapon when it comes to successfully executing this historical layout. Because you are working with bias edges—which stretch easily—having accurate quilting templates is absolutely vital to your success. Taking your time during the preparation phase saves you hours of frustration at your sewing machine later on.
As you plan your layout, consider how the individual blocks will interact with one another across the entire surface. When four of these blocks meet at a central point, they create a secondary circular motif that completely transforms the final composition. This interactive quality is exactly why the Cleopatra’s Fan layout continues to capture the imaginations of textile artists worldwide.
Ultimately, crafting this project connects you to generations of makers who found joy in turning simple scraps into intricate art. It forces you to slow down, practice mindful stitching, and appreciate the rhythm of careful construction. Let this historical perspective inspire you as we move into the actual preparation and execution of your project.
2 Essential Tools and Fabric Selection for Your Tutorial
Before starting your Cleopatra’s Fan – Tutorial build, gathering the correct tools will make the entire process significantly smoother. You will absolutely need a high-quality rotary cutter with a fresh, sharp blade to handle the intricate curved shapes. A dedicated cutting mat and a few sturdy acrylic rulers are also non-negotiable for achieving the crisp lines required.
Fabric selection is where you can truly let your personal creativity shine through the design. To make the fan blades stand out, choose a mix of high-contrast fabrics, alternating between dark, medium, and light tones. A solid or low-volume background fabric is highly recommended because it gives the busy patchwork fan blades a quiet place to rest.
Because this pattern involves sewing along biased curves, choosing high-quality, 100% quilting cotton is incredibly important. Cheap, loosely woven fabrics will warp and stretch out of shape under the iron, making it nearly impossible to get flat seams. Investing in premium cotton ensures your pieces hold their shape beautifully throughout the entire assembly process.
You will also want to have plenty of fine, sharp quilting pins on hand for the assembly stage. Curved seam sewing requires precise fabric alignment, and pinning helps manage the fullness of the fabric layers without stretching them. Some quilters also highly recommend using fabric glue sticks for temporary basting to keep tricky points from shifting.
An efficient iron and a clean ironing board are just as important as your sewing machine for this specific pattern. You will be pressing your seams frequently to ensure every single wedge lays perfectly flat against its neighbor. A tailor’s clapper can also be helpful to trap heat and steam, creating ultra-crisp, flat seams effortlessly.
Lastly, do not forget about your templates, whether you prefer using heavy cardstock, template plastic, or foundation paper piecing paper. If you are cutting fabric using traditional templates, make sure to mark your seam allowances accurately on every piece. With your workspace fully prepped and organized, you are officially ready to begin cutting your fabric shapes.
3 Step-by-Step Cutting and Piecing Guide
The actual construction of your Cleopatra’s Fan block begins with careful, deliberate fabric cutting. Lay out your templates on the fabric, paying close attention to the grainline to minimize stretching on the outer edges. Cut out your central fan blades, the inner accent arcs, and the larger background corner pieces according to your pattern map.
Once your pieces are cut, organize them into distinct piles representing each section of the fan block. It helps to do a dry run by laying the pieces out on a design wall or table to verify your color placement. This quick visual check ensures your high-contrast fabric choices are properly distributed before you start sewing.
Start by piecing the individual wedges of the fan together, working from one side of the arc to the other. Use a precise quarter-inch seam allowance, keeping your stitching slow and consistent along the straight edges of the blades. Press your seams open or to one side, alternating directions for each block to allow the seams to nestle together cleanly.
Now comes the exciting part: joining the curved background pieces to your newly assembled quilt fan blades. Fold both the fan arc and the background piece in half to find their exact center points, and mark them with a pin. Align those center marks together, then pin the outer edges, gently easing the fullness of the curves together.
Take the pinned pieces to your machine, keeping the background fabric on the bottom and the fan blades on top. Sew slowly, using your fingers to smooth out any tiny wrinkles right before they reach the needle. Do not pull or tug the fabric; let the machine’s feed dogs do the work of pulling the layers through evenly.
After stitching the curve, give the block a gentle press with your iron, using a lifting motion rather than a sliding motion. Check the total dimensions of your completed Cleopatra’s Fan quilt unit to ensure it matches your target block size. If necessary, use your square ruler to gently trim away any tiny stray fabric ears around the outer perimeter.
4 Master Tips for Perfect Curves and Flawless Points
Achieving perfectly flat blocks and crisp points in a Cleopatra’s Fan – Tutorial requires a few pro-level insider techniques. One of the best tricks is to use a generous amount of fabric starch before you even cut your fabric pieces. Starching makes the cotton crisp, acting almost like paper, which drastically reduces any bias stretching during assembly.
When pinning your curves, do not be afraid to use a lot of pins to secure the pieces safely. Pinning the centers, the ends, and then splitting the difference multiple times keeps the fabric stabilized throughout the entire arc. This meticulous prep work ensures you will not end up with annoying puckers or pleats at the end of your seam.
As you sew, try using a slightly shorter stitch length than your usual setting, around 2.0 millimeters. The shorter stitch length creates a stronger seam that holds up beautifully against the stress of the curved shape. It also prevents the stitches from pulling apart when you open and press the completed unit.
Always remember to press your iron straight down and lift it straight back up instead of pushing it back and forth. Pushing the iron along a curved seam can instantly distort the fabric, ruining all your hard work in a matter of seconds. Let the weight and heat of the iron do the flattening work naturally and gently.
If you find that your points are getting cut off at the intersections, check your quarter-inch seam accuracy. Even a tiny variance of a single thread’s width can compound across multiple wedges, throwing off the alignment of the entire block. Consistency is the real key to making sure those beautiful Cleopatra’s Fan layout points look razor-sharp.
Finally, give yourself grace and patience as you practice and refine your technique with this specific block style. Curved piecing is a physical skill that relies heavily on muscle memory, which only develops with consistent practice. Start by making a few test blocks with scrap fabric to find your personal rhythm before cutting into your favorite project fabrics.
FAQ – Frequently Asked Questions
Is the Cleopatra’s Fan pattern suitable for an absolute beginner?
While a brand-new quilter can technically attempt it, it is generally recommended for confident beginners or intermediate quilters. Because it combines curved seams and multiple bias edges, having some basic sewing machine control and experience with a precise quarter-inch seam will make the process much more enjoyable.
Can I use foundation paper piecing for a Cleopatra’s Fan block?
Yes, you absolutely can use foundation paper piecing (FPP) for the straight wedge sections of this pattern. FPP is a fantastic method for ensuring your fan blade points are flawlessly sharp and perfectly uniform every single time, though you will still need to sew the outer curved background pieces traditionally.
How do I prevent my fabric from stretching while sewing the curves?
The absolute best way to prevent stretching is to heavily starch your fabric before cutting out your templates. Additionally, avoid pulling, tugging, or stretching the fabric pieces as you guide them under your presser foot, and always use plenty of pins to support the shape naturally.
What is the best color strategy for a Cleopatra’s Fan quilt?
To make the intricate design stand out, use a color palette with strong value contrast between adjacent sections. Alternating dark and light values within the fan blades creates a striking, energetic rhythm, while a neutral background helps define the gorgeous circular secondary patterns that form when blocks are joined.
How should I press the seams for this block?
Many quilters prefer pressing the seams of the internal fan blades open to reduce bulk at the central intersection points. For the curved seams, press toward the background fabric or away from the pieced fan to help the block lay completely flat and smooth against your cutting mat.
Conclusion
Mastering the Cleopatra’s Fan – Tutorial is a rewarding milestone that will boost your confidence and add a stunning piece of history to your quilting portfolio.
Throughout this guide, we explored the fascinating history of this design, discussed the essential tools needed, walked through the cutting and piecing steps, and shared pro tips for handling those delicate curves. By taking your time, using plenty of starch, and embracing the pinning process, you can create a beautiful, flat block with incredibly sharp points.