
Bucket Hat – Tutorial: A complete guide to making your own stylish accessory is exactly what you need to elevate your wardrobe this season. The classic bucket hat has made a massive comeback in contemporary fashion, transitioning from a vintage staple to a modern street style essential. Crafting your own custom headwear allows you to express your personal style while engaging in a rewarding, sustainable DIY project.
In this comprehensive bucket hat tutorial, we will walk you through every single step required to create a beautiful, professional-looking piece from scratch. Whether you are an absolute beginner or an experienced sewist looking for a quick and fun weekend project, this guide is designed to be highly accessible, clear, and engaging. By making your own accessories, you can choose your favorite fabrics, ensure a perfect custom fit, and reduce textile waste.
Learning how to construct this versatile piece of headwear opens up endless creative possibilities for your future sewing endeavors. From picking out the perfect durable material to mastering the curved seams of the brim, this detailed bucket hat – tutorial covers all the essential techniques. Gather your sewing supplies, clear off your workspace, and let’s dive into the ultimate step-by-step process of creating your next favorite accessory.
1. Choosing the Best Fabrics and Preparing Your Materials
When starting your bucket hat – tutorial journey, selecting the right textile is paramount for achieving both comfort and structure. You want a fabric that has enough weight to keep the brim from flopping into your eyes, yet is breathable enough for warm-weather wear. Excellent choices for beginners and experts alike include heavy cotton canvas, denim, corduroy, or sturdy linen blends.
Before you cut into your chosen material, it is highly recommended to pre-wash and dry your fabric to prevent future shrinkage. Skipping this step might result in a beautifully sewn piece that shrinks significantly after its first wash, ruining the custom fit you worked hard to achieve. Once dried, give the fabric a thorough press with a hot iron to eliminate any stubborn wrinkles.
In addition to your main outer fabric, you will also need a lining material and some medium-weight fusible interfacing. The lining can be a lighter cotton fabric, which feels soft against the skin and adds a clean, professional finish to the interior. The interfacing is the secret weapon in this bucket hat tutorial, as it provides the necessary stiffness to the brim.
Beyond the textiles, you will need a few basic sewing notions to ensure your project goes smoothly from start to finish. Make sure you have high-quality matching thread, sharp fabric shears, sewing pins or fabric clips, and a reliable measuring tape. A fabric marker or tailor’s chalk is also essential for transferring pattern markings accurately onto your material.
If you are looking to create a truly sustainable piece, consider upcycling old clothing for this project instead of buying new yardage. Transforming a pair of old, worn-out denim jeans or an outdated canvas jacket is a fantastic way to give old textiles a second life. This eco-friendly approach adds unique character, natural distressing, and a cool vintage vibe to your finished creation.
Once all your supplies are gathered on your sewing table, take a moment to inspect your sewing machine needle. A fresh denim or heavy-duty needle (size 90/14) is ideal for sewing through multiple layers of sturdy canvas or denim without skipping stitches. Having everything prepped and organized beforehand makes the assembly process incredibly enjoyable and efficient.
2. Understanding and Cutting the Essential Pattern Pieces
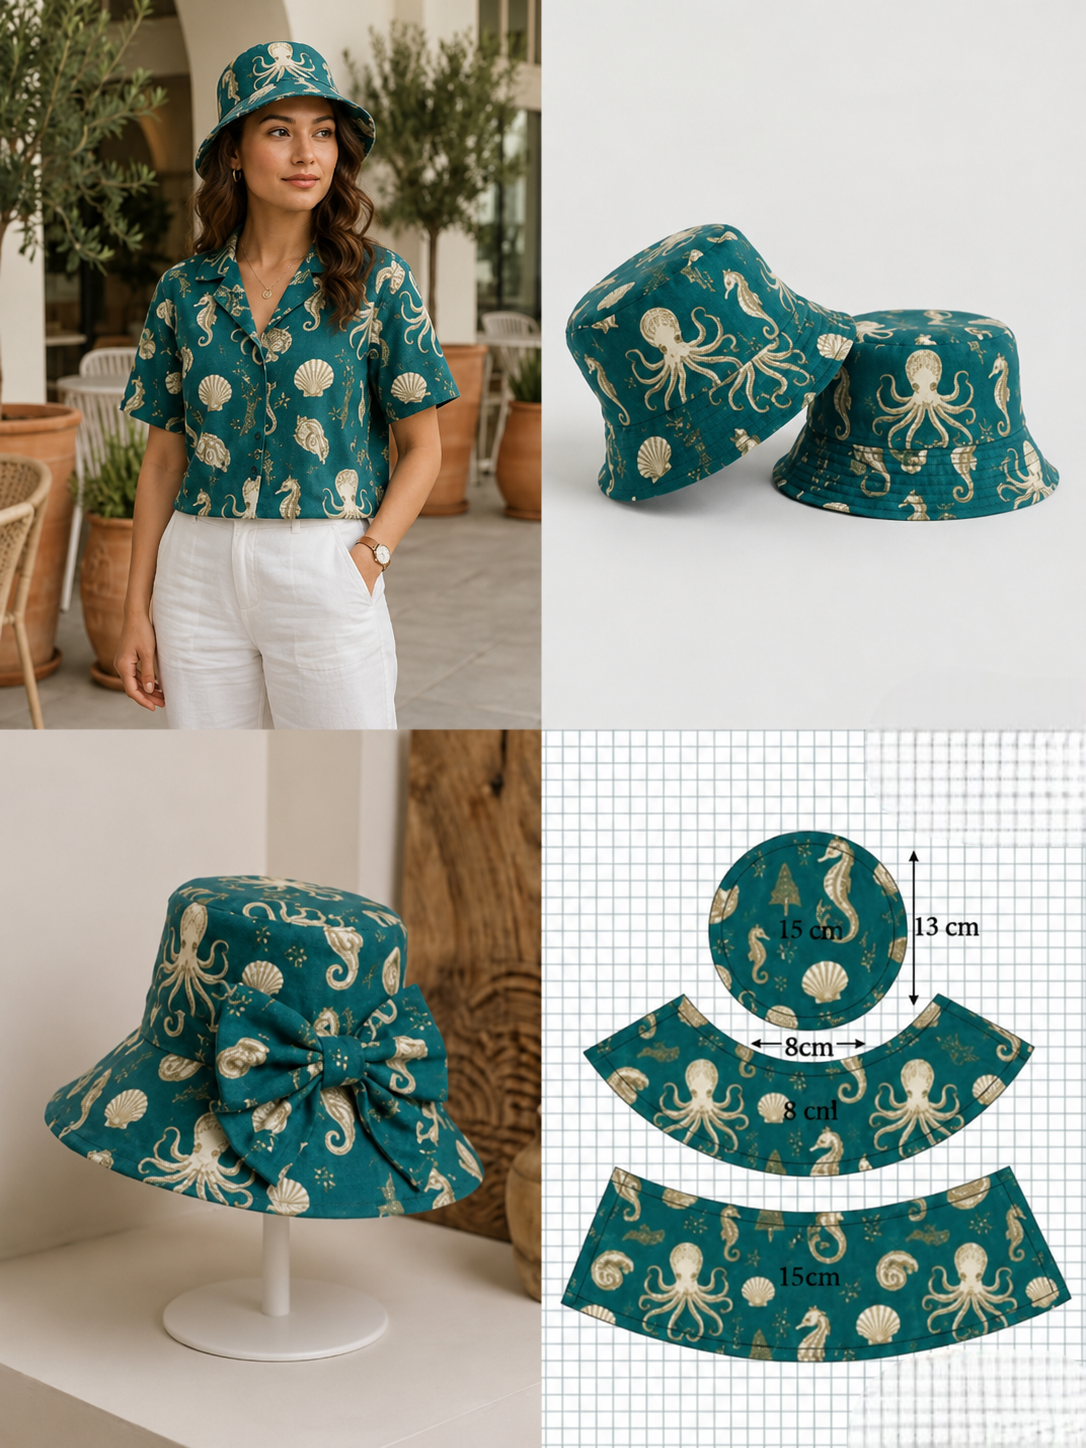
To successfully complete this bucket hat – tutorial, you need to understand the three distinct components that make up the structure. The construction consists of the top crown (a perfect circle), the side wall panel (a slightly curved rectangle), and the brim (a crescent or donut shape). Each component serves a specific purpose in creating the iconic silhouette.
You can easily find free printable patterns online, or you can draft your own by measuring the circumference of your head. To measure accurately, wrap a flexible measuring tape around your head exactly where you want the hat to sit, usually just above the ears. Add a small amount of ease and your standard seam allowance to this measurement before drawing your shapes.
When laying your pattern pieces onto the fabric, pay close attention to the grainline and any instructions to cut on the fold. The top crown is typically cut as one single piece from both the main fabric and the lining fabric. The side wall and the brim are usually cut as two separate pieces each for both layers to allow for proper shaping.
Carefully pin your paper pattern pieces to the fabric, ensuring everything lies perfectly flat without any shifting or bubbling. Use your sharp fabric shears to cut along the solid lines, taking your time around the tight curves of the circle and brim. You will end up with pieces for the outer shell, identical pieces for the lining, and interfacing pieces specifically for the brim.
Once the fabric is cut, use your hot iron to fuse the medium-weight interfacing to the wrong side of your outer brim pieces. This step is a crucial element of our bucket hat tutorial because it guarantees the brim maintains its classic structured shape. Press firmly with the iron for several seconds, allowing the adhesive to bond completely with the textile fibers.
The final step in the preparation stage is to mark the quarter points on your circular crown and the top edge of your side walls. Fold the pieces in half, then in half again, making small marks or tiny snips within the seam allowance at the folds. These reference points will act as guidelines, making it much easier to align the curved pieces perfectly during assembly.
3. Stitching the Outer Shell and Lining Components
Now that preparation is complete, it is time to heat up your sewing machine and begin the actual assembly of your custom creation. Start by taking your two outer side wall pieces, placing them right sides together, and pinning the short ends. Stitch down these short edges using your designated seam allowance, creating a continuous fabric loop or cylinder.
Press the seams open with your iron to reduce bulk, which will make the subsequent steps much easier to manage. Next, grab your circular top crown piece and align its quarter marks with the quarter marks of your newly formed side wall loop. Pin the pieces together generously, gently easing the straight edge of the wall around the curves of the circle.
Slowly stitch around the circular seam, maintaining a consistent allowance and removing the pins just before your needle reaches them. Take your time during this step of the bucket hat – tutorial, lifting the presser foot occasionally with the needle down to smooth out any fabric puckers. Once stitched, press the seam toward the side wall to create a crisp, clean top edge.
Repeat this exact same process using your lining fabric pieces to create an identical inner version of the structured shell. The only difference is that you should leave a three-inch opening in one of the side wall seams of the lining. This unstitched opening is absolutely vital, as it will allow you to turn the entire project right side out later on.
Now, turn your attention to the structured brim pieces that you previously reinforced with the fusible interfacing. Place the two outer brim pieces right sides together, stitch the short flat ends, and press those side seams open to minimize bulk. You will now have a sturdy, flat fabric ring that matches the bottom circumference of your main body.
Do the exact same thing for the lining brim pieces so that you have two complete fabric rings ready for action. Pin the outer brim ring to the bottom edge of the outer fabric shell, matching the side seams carefully. Stitch all the way around this circular edge, then repeat the process by attaching the lining brim ring to the lining shell.
4. Final Assembly, Understitching, and Topstitching Details
With your outer shell and lining shell fully assembled, you are ready for the exciting final steps of this bucket hat tutorial. Place the outer shell and the lining shell right sides together, nesting one inside the other so the raw edges of the brims align perfectly. Pin or clip securely around the entire outer circumference of the brim, matching the side seams.
Stitch around the entire outer edge of the brim, ensuring your seam allowance remains perfectly uniform for a professional look. Once stitched, trim the seam allowance slightly or clip small V-shapes into the curve to help the edge lay flat. Now, reach through the opening you left in the lining fabric and carefully pull the entire piece right side out.
Tuck the lining neatly inside the outer shell, and use a wooden turning tool or your fingers to push out the edge of the brim. Press the outer perimeter thoroughly with your iron, rolling the seam slightly toward the inside so the lining is completely hidden. Pin the pressed edge in place to prepare for the final decorative topstitching.
Topstitching the brim is what gives this specific accessory its iconic, classic streetwear aesthetic and added structural integrity. Starting near the edge, sew a series of concentric circular rows of stitching around the entire brim, spacing them about a quarter-inch apart. You can use the edge of your presser foot as a guide to keep your rows beautifully parallel and neat.
Once the brim is fully topstitched, close up the turning hole in the lining by folding the raw edges inward by a quarter-inch. You can either topstitch this opening closed close to the edge with your machine or hand-stitch it with a blind stitch for an invisible finish. Push the lining back down inside, giving the entire piece one final, thorough press with your iron.
Congratulations, you have officially completed the construction process outlined in this comprehensive DIY guide! Take a step back and admire your handiwork, checking for any loose threads that need trimming. Your brand-new, custom-made fashion statement is now completely finished, styled beautifully, and ready to be worn proudly out in the sun.
Frequently Asked Questions (FAQ)
What is the best type of fabric to use for a bucket hat?
The best fabrics are medium to heavyweight woven materials that provide structure, such as cotton canvas, denim, corduroy, twill, or heavy linen. You can use lighter cottons for the lining to keep the interior comfortable and breathable.
How do I know what size pattern to cut out?
You should measure the circumference of your head using a flexible measuring tape wrapped just above your ears. Add about a half-inch of ease to that measurement for comfort, plus your standard seam allowance, to determine your target size.
Is it necessary to use interfacing on the brim?
Yes, using fusible interfacing is highly recommended if you want a classic look. Interfacing adds necessary stiffness to the brim, preventing it from drooping heavily or losing its shape over time and after washing.
Can a total beginner complete this sewing project?
Absolutely! This bucket hat – tutorial is designed to guide sewists of all skill levels. While sewing curved seams can be slightly tricky at first, taking your time, using plenty of pins, and sewing slowly makes it very manageable.
How many rows of topstitching should I add to the brim?
Typically, adding anywhere from 4 to 6 rows of concentric topstitching spaced a quarter-inch apart looks fantastic. This detail is not just decorative; it actively helps stiffen the brim and helps it hold its shape.
Can I wash my custom DIY hat in a washing machine?
If you pre-washed your fabrics before cutting, your finished item should be machine washable on a gentle cycle. It is usually best to reshape it with your hands while damp and let it air dry to preserve the brim structure.
Conclusion
In this comprehensive bucket hat – tutorial, we have explored every essential step required to design, cut, and sew a stylish, custom-fitted accessory from scratch.
From selecting durable fabrics like denim or canvas to fusing interfacing for structure and mastering concentric brim topstitching, you now possess the knowledge to create a professional-grade piece. This project is a fantastic, sustainable way to refresh your wardrobe, practice sewing curves, and express your unique creative flair through functional fashion.