
Get ready to dive into the ultimate summer-to-autumn transition accessory with this comprehensive Skull Bucket Hat Crochet – Tutorial. If you love alternative fashion, spooky vibes, or just want to add a unique, handmade touch to your wardrobe, crafting a skull bucket hat is the perfect weekend project. This trendy accessory combines the classic, laid-back utility of a traditional sun hat with the edgy, gothic aesthetic of crochet skull motifs. Whether you are prepping for festival season, getting ahead on your Halloween wardrobe, or making a bold streetwear statement, mastering this specific design will elevate your crochet skills and your style.
In this detailed Skull Bucket Hat Crochet – Tutorial, we will walk you through every single step necessary to create your own wearable art piece. From choosing the correct yarn weights to mastering the intricate granny square techniques required for the skull details, we have got you covered. Crochet hats have taken the fashion world by storm, but the skull bucket hat stands out as a unique sub-culture favorite that merges cozy textures with a rebellious spirit. It is highly customizable, meaning you can go for a classic monochromatic look or inject vibrant neon colors to make the skeletal details pop.
By the end of this Skull Bucket Hat Crochet – Tutorial, you will not only understand the structural mechanics of shaping a hat but also how to seamlessly join complex motifs together. Working on a project like this allows you to practice stitch precision, tension control, and spatial assembly. We have designed this guide to be highly readable, fully optimized for modern creators, and packed with practical tips to ensure your finished piece looks polished and professional. Grab your favorite hook, select your yarn, and let us break down exactly how to bring this stunning project to life.
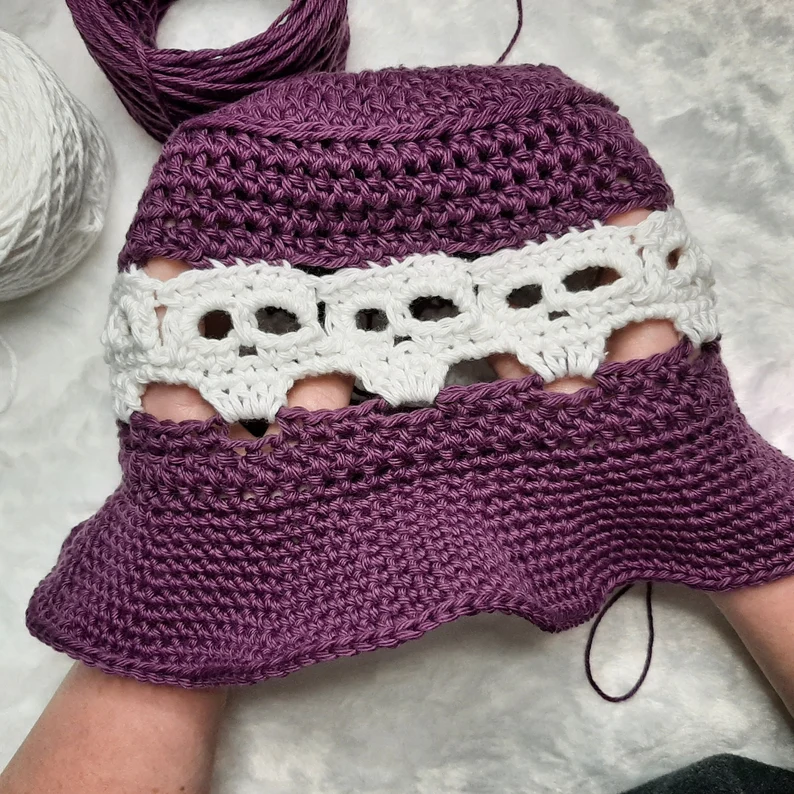
1. Choosing the Right Materials for Your Skull Bucket Hat Crochet – Tutorial
The foundation of any successful crochet project lies in the materials you select before making your first slip knot. For a structure like a skull bucket hat, you need a yarn that offers both durability and crisp stitch definition so the skull motifs remain clearly visible.
We highly recommend using a 100% cotton yarn or a high-quality acrylic blend in a medium worsted weight (4). Cotton provides excellent structural integrity, ensuring that the brim of your hat holds its shape instead of flopping over your eyes.
Acrylic yarn, on the other hand, offers a bit more flexibility, softness, and an extensive range of vibrant colorways to choose from. For this specific project, you will need at least two contrasting colors to make the skull motifs stand out clearly against the background.
In addition to your yarn, you will want to match it with the correct crochet hook size, typically ranging from a 4.0mm (G/6) to a 5.0mm (H/8). A slightly smaller hook than what the yarn label suggests can actually help keep your stitches tight and your hat nicely structured.
Do not forget to gather your essential notions, including a sharp pair of scissors, a sturdy yarn needle for weaving in your loose ends, and a few stitch markers. Having these tools organized and ready by your side will make the crafting process much more enjoyable and efficient.
Taking the time to check your tension gauge before jumping into the main pattern ensures that your final hat fits comfortably without being too tight or too loose. Once your workspace is set up with these premium materials, you are officially ready to begin the construction phase.
2. Master the Skull Motif Granny Square Technique
The true heart of this Skull Bucket Hat Crochet – Tutorial revolves around creating the individual panels that form the center band of your hat. These panels are typically constructed using modified granny squares that feature a skull silhouette right in the center.
To begin the skull, you will start by creating a small ring and working a series of double crochet stitches to form the top of the cranium. The key to making the skull recognizable lies in creating open spaces for the eyes using strategic chain stitches.
As you move down to the jawline, you will utilize smaller stitches like single crochet and half double crochet to taper the shape. This variation in stitch height gives the skull its distinct anatomical structure before you transition into the square border.
Once the central skull shape is complete, you will switch to your background color to turn the organic skull shape into a perfect four-sided granny square. This is achieved by placing clusters of stitches and chain spaces specifically in the corners of the motif.
You will typically need to crochet between four to six of these skull squares, depending on your specific head measurement and tension. It is highly recommended to block your finished squares using a blocking board to ensure they are all exactly the same size before assembly.
Consistent stitch counts during this phase are absolutely vital for a seamless look later on. Take your time with each square, admire the spooky details coming to life, and prepare yourself to join them together into a wearable band.
3. Assembling the Crown and Crown Band Seams
Now that your individual skull motifs are complete and blocked, it is time to assemble them into a continuous loop that fits around the circumference of your head. This loop forms the main body and the central visual focus of your custom skull bucket hat.
You can join your squares together using a variety of techniques, such as the whip stitch with a tapestry needle or a slip stitch join using your crochet hook. The slip stitch method creates a slightly raised, decorative ridge, while the whip stitch offers a flatter, more seamless finish.
Once your squares are securely connected into a crown band, you will attach your yarn to the top edge to begin building the crown. The crown is the flat, circular top section of the hat that sits comfortably on the very top of your head.
To crochet the crown, you will work in continuous or joined rounds of double crochet stitches, applying a mathematically even distribution of increases. Starting with a small magic ring, each subsequent round will expand gradually until the diameter matches the width of your skull band.
Carefully align the flat circle of the crown with the top opening of your joined skull squares band to prepare for attachment. You can use your stitch markers to pin the pieces together at equal intervals, ensuring that the fabric does not bunch up as you work.
Join the crown to the band using a clean row of single crochets, checking constantly to make sure the tension remains uniform all the way around. With the top and sides successfully connected, your project is finally starting to look like a real, structured bucket hat.
4. Crafting the Perfect Bucket Hat Brim and Finishing Touches
The final structural step in our Skull Bucket Hat Crochet – Tutorial is creating the iconic, flared brim that defines the classic bucket hat silhouette. The brim is worked directly into the bottom edge of your assembled skull motifs band.
To achieve that perfect, face-framing flare, you will implement a specific sequence of stitch increases over the next several rounds. A common formula is to increase in every fifth or sixth stitch during the first couple of rounds, followed by rounds of even stitching.
If you prefer a dramatic, wide brim to shield yourself from the sun, you can continue adding rounds with gradual increases. For a more subtle, modern streetwear look, keep the brim short and punchy by working fewer rounds overall.
To give your brim extra stability and prevent it from becoming floppy over time, consider working the final round in the crab stitch (reverse single crochet). This specialized stitch creates a beautiful, corded edge that locks the shape of the brim in place perfectly.
With the crochet work complete, fasten off your yarn, leaving a short tail, and use your yarn needle to meticulously weave in all remaining loose ends. Hide the tails securely inside the bulkier stitches on the inside of the hat so they never unravel during wash or wear.
Give your finished skull bucket hat a final gentle steam block to relax the fibers and smooth out any minor imperfections in the stitches. Your stylish, alternative masterpiece is now ready to be styled, photographed, and worn proudly out in the world.
FAQ – Frequently Asked Questions
What is the best yarn type for a skull bucket hat?
The absolute best yarn for this project is a 100% cotton yarn in a worsted weight. Cotton provides the ideal structural firmness required to keep the brim from drooping and ensures that the skull motifs maintain their crisp definition over long periods of wear.
How many skull squares do I need to make for a standard adult size?
For an average adult head circumference of 22 to 23 inches, you will generally need to crochet 5 standard-sized granny squares. If you have a smaller head or tighter tension, 4 squares might suffice, whereas larger sizes or looser tension might require 6 squares.
Is this project suitable for absolute crochet beginners?
This project is best suited for advanced beginners or intermediate crocheters. While it utilizes foundational stitches like the double crochet and chain stitch, creating the open spaces for the skull eyes and joining the panels requires some basic pattern-reading experience.
How do I wash and care for my handmade crochet hat?
To preserve the shape and longevity of your hat, it is highly recommended to hand wash it in cool water with a mild detergent. Reshape the hat while it is damp and lay it flat on a clean towel to air dry, avoiding any machine drying which could cause shrinkage.
Can I use a smaller hook size to make a child-sized hat?
Yes, dropping down a hook size (for example, using a 3.5mm hook instead of a 5.0mm hook) and using a lighter weight yarn is an excellent, simple way to scale down the size of the motifs for a child-sized version without altering the stitch pattern.
Conclusion
In this Skull Bucket Hat Crochet – Tutorial, we have covered every essential stage of creating a gorgeous, alternative fashion staple from scratch.
We explored the vital importance of selecting robust materials like cotton yarn, mastering the precise stitch anatomy of the skull motifs, joining your individual panels seamlessly, and executing a beautifully flared brim for that perfect fit. Crafting this hat is a wonderful way to challenge your skills while creating something genuinely unique that reflects your personal style.