
Crochet Sun Hat Pattern is one of the most enjoyable projects for crocheters who want to combine style, comfort, and practicality in a single handmade accessory. Whether you are creating a lightweight hat for yourself, as a thoughtful gift, or to sell at local craft fairs, this timeless design offers endless possibilities. A handcrafted sun hat not only protects from the sun but also adds a fashionable touch to any summer outfit.
One of the greatest advantages of making a Crochet Sun Hat Pattern is that it can easily be customized. You can adjust the crown depth, brim width, stitch texture, and colors to create a truly unique accessory. Beginners can follow simple stitches, while experienced crocheters can experiment with decorative stitch combinations to add extra elegance and personality.
In this detailed guide, you will learn how to create a beautiful Crochet Sun Hat Pattern from the center of the crown all the way to the finished brim. You’ll also discover useful crochet techniques, helpful finishing tips, and answers to the most common questions about making crochet hats. By the end of this tutorial, you’ll have all the knowledge needed to confidently complete a professional-looking summer hat.
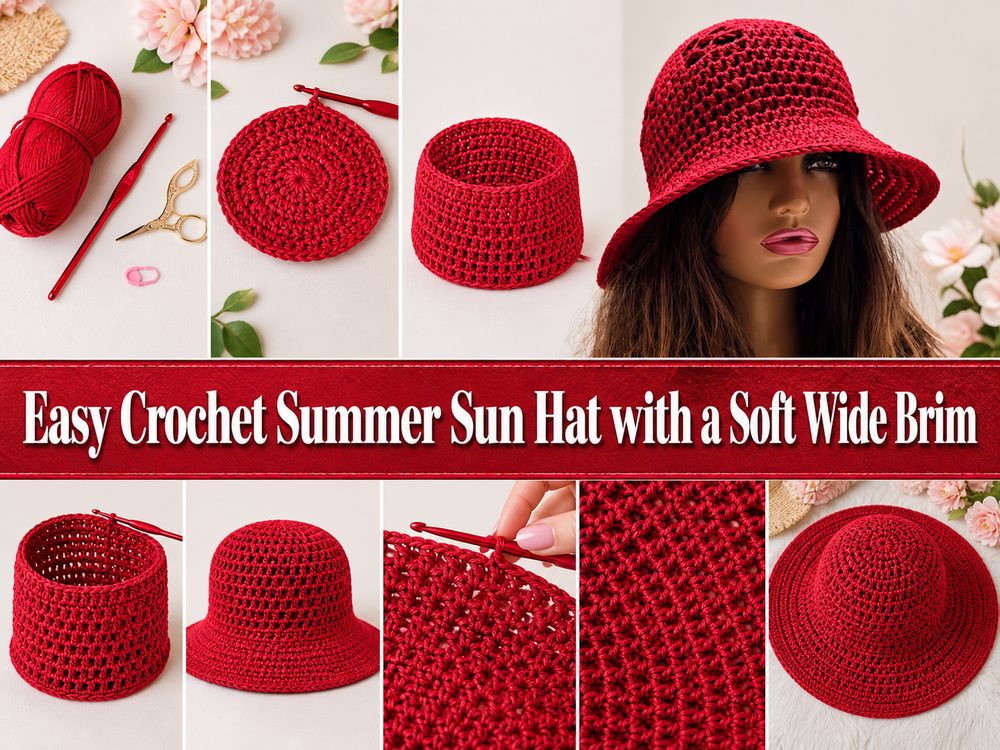
Choosing Materials and Preparing Your Crochet Sun Hat Pattern
The success of your Crochet Sun Hat Pattern begins with selecting the right materials. Cotton yarn is one of the best choices because it is breathable, lightweight, durable, and comfortable to wear during warm weather.
A medium-weight cotton yarn (Category 4) provides excellent structure while remaining soft enough for everyday use. Mercerized cotton also gives the hat a slightly glossy and elegant appearance.
A crochet hook between 4.0 mm and 5.0 mm generally works well with medium cotton yarn. Always check your yarn label and make a small gauge swatch before beginning.
Other helpful supplies include stitch markers, scissors, a tapestry needle for weaving in ends, and a measuring tape for checking the size throughout the project.
Before starting, determine the head circumference. Adult sizes usually range between 21 and 23 inches (53–58 cm), but the pattern can easily be adjusted.
Planning your color before starting allows you to coordinate the hat with summer clothing. Bright colors, neutrals, and natural shades all work beautifully.
Crocheting the Crown Step by Step
Begin your Crochet Sun Hat Pattern by making a magic ring. This creates a tightly closed center without leaving a visible hole at the top of the hat.
Round 1: Chain 2 (does not count as a stitch). Work 12 Double Crochet (DC) into the magic ring. Join with a Slip Stitch (SL ST).
Round 2: Chain 2. Work 2 DC into every stitch around, ending with 24 stitches. Join with a Slip Stitch.
Round 3: Chain 2. 1 DC in the first stitch, 2 DC in the next stitch. Repeat around until reaching 36 stitches.
Continue increasing evenly in every round by adding one additional DC between each increase section. This creates a perfectly flat circular crown.
Keep measuring after each increase round. Stop increasing once the crown reaches approximately 6.5 to 7 inches (16.5–18 cm) across for an average adult hat.
Building the Hat Body and Soft Wide Brim
Once the crown reaches the desired diameter, stop making increases. Work one Double Crochet into each stitch around for several rounds to create the sides of the hat.
Continue crocheting evenly until the body reaches the desired depth. Most adult hats measure approximately 3.5 to 4.5 inches (9–11 cm) from the crown.
If you’d like extra texture, alternate rounds of Half Double Crochet (HDC) with Double Crochet (DC). This creates subtle visual interest while maintaining flexibility.
To begin the brim, increase gradually. For example, work 9 DC, 2 DC in the next stitch around the first brim round.
Continue working several rounds while increasing only occasionally. Gradual increases help the brim flare outward naturally without becoming ruffled.
Finish the final two rounds using Single Crochet (SC). This creates a cleaner edge and gives additional stability to the brim.
Finishing Techniques and Professional Tips
After completing the final round of your Crochet Sun Hat Pattern, cut the yarn leaving a long tail for weaving in securely.
Use a tapestry needle to weave all loose yarn ends through the stitches several times. This prevents unraveling during wear and washing.
Light blocking can improve the overall appearance of the hat. Slightly dampen the project, shape the brim evenly, and allow it to dry naturally.
If additional stiffness is desired, insert thin millinery wire inside the final brim round or use fabric stiffener designed for crochet projects.
Decorate your finished hat with a crocheted flower, ribbon, decorative band, wooden buttons, or a simple bow. Personal touches make every project unique.
Most importantly, enjoy your handmade creation. Every finished Crochet Sun Hat Pattern represents patience, creativity, and growing crochet skills that improve with every project.
Frequently Asked Questions
Is this Crochet Sun Hat Pattern suitable for beginners?
Yes. Beginners who already know basic crochet stitches such as Chain (CH), Single Crochet (SC), Half Double Crochet (HDC), Double Crochet (DC), Slip Stitch (SL ST), and Magic Ring can successfully complete this project.
What yarn works best?
100% cotton yarn is highly recommended because it is breathable, durable, washable, and holds its shape better than acrylic for summer hats.
Which crochet hook should I use?
Most medium-weight cotton yarn works well with a 4.0 mm to 5.0 mm crochet hook. Always check your gauge before beginning.
How do I make the brim wider?
Simply continue adding increase rounds while spacing the increases evenly. More rounds create a larger, more dramatic brim.
Can I make this pattern for children?
Absolutely. Simply reduce the crown diameter and work fewer body rounds before starting the brim.
How can I make the hat stiffer?
You can use mercerized cotton, add millinery wire to the brim, or apply a washable fabric stiffener after finishing.
Is blocking necessary?
Blocking is optional but highly recommended because it smooths the stitches and helps the brim maintain its intended shape.
Can I sell hats made from this pattern?
Yes. Handmade crochet hats are popular at craft fairs, online shops, and local markets. Adding your own creative details makes each hat even more unique.
Conclusion
Throughout this guide, you learned how to create a beautiful Crochet Sun Hat Pattern from start to finish using simple crochet techniques. We covered selecting the best materials, making the crown with evenly spaced increases, building the hat body, shaping a soft and elegant brim, and applying professional finishing methods to achieve a polished result. You also discovered practical customization ideas and solutions to common questions that many crocheters encounter during the process.
With patience and practice, this Crochet Sun Hat Pattern can become one of your favorite handmade accessories, suitable for everyday summer wear, thoughtful gifts, or even a successful craft business. Every completed hat helps improve your crochet skills while allowing you to create something both functional and beautiful.