
The Bucket Hat Pattern is one of the most enjoyable crochet projects for beginners and experienced makers alike. A beautifully designed Bucket Hat Pattern combines comfort, style, and practicality, making it a favorite accessory throughout every season. Whether you are creating a fashionable summer hat, a colorful gift, or simply expanding your crochet skills, this project offers endless creative possibilities while allowing you to practice fundamental crochet techniques.
Crocheting a bucket hat is much more than simply following a chart. Every round gradually transforms a flat circle into a perfectly shaped crown, followed by smooth sides and a well-balanced brim. Understanding how increases work, how stitch placement affects shaping, and how color changes create visual interest allows you to customize every hat according to your own style. With patience and consistency, you’ll discover that a Bucket Hat Pattern is one of the most rewarding wearable crochet projects.
This tutorial explains the complete process using standard U.S. crochet terminology while maintaining a beginner-friendly approach. Throughout the article, you’ll learn how to interpret the crochet chart, choose the best materials, shape each section of the hat, avoid common mistakes, and confidently finish a professional-quality project. Whether you prefer classic neutral colors or bold modern combinations, this guide will help you crochet a beautiful hat you’ll proudly wear for years.
Choosing Materials and Understanding the Bucket Hat Pattern
The first step toward a successful Bucket Hat Pattern is selecting suitable materials. Cotton yarn is usually the preferred choice because it provides structure while remaining breathable and comfortable. Mercerized cotton creates excellent stitch definition, while standard cotton offers a softer, more casual appearance.
A medium-weight (#4 Worsted) cotton yarn works especially well for beginners because the stitches remain visible and easy to count. Lighter yarns produce delicate hats, while heavier yarns create thicker, more structured accessories suitable for cooler weather.
Most crocheters use a 4.0 mm to 5.0 mm crochet hook, depending on the yarn and the desired firmness. A smaller hook generally creates a tighter fabric, helping the bucket hat maintain its shape after repeated wear.
Besides yarn and hook, prepare scissors, stitch markers, a yarn needle for weaving in ends, and a measuring tape. These simple tools help maintain accuracy throughout the project.
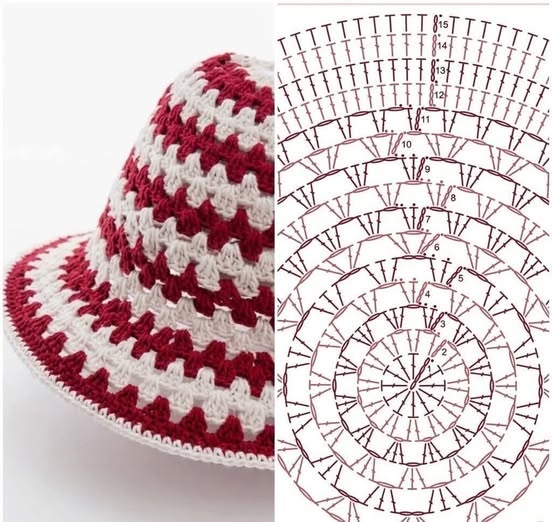
Before beginning, study the crochet chart carefully. The diagram illustrates each round, showing where increases occur and how the crown gradually expands before transitioning into the sides of the hat.
Understanding standard U.S. crochet abbreviations such as CH (chain), SC (single crochet), HDC (half double crochet), DC (double crochet), SL ST (slip stitch), and INC (increase) makes following any Bucket Hat Pattern much easier.
Crocheting the Crown Step by Step
Every Bucket Hat Pattern begins with a magic ring, creating a tightly closed center that prevents holes at the top of the hat. If you are unfamiliar with the magic ring, you may substitute a small chain circle, although the magic ring provides a cleaner finish.
Round one typically consists of several double crochet stitches worked directly into the magic ring. After completing the first round, gently pull the yarn tail to close the center securely before joining with a slip stitch.
The following rounds gradually increase stitch counts. These increases are evenly distributed around the circle to keep the crown perfectly flat without curling or ruffling.
Continue working in joined or continuous rounds, depending on the pattern instructions. Carefully count stitches after every round since small counting mistakes become much more noticeable later.
As the crown grows larger, compare its diameter with the intended hat size. Adult hats generally require a crown measuring approximately 6.5 to 7 inches (16.5 to 18 cm) before the sides begin.
Once the desired diameter has been reached, stop making increases. The next rounds are worked evenly, allowing the fabric to naturally curve downward and form the sides of the bucket hat.
Building the Sides and Creating the Perfect Shape
After completing the crown, the Bucket Hat Pattern begins forming the body of the hat. Working one stitch into every stitch from the previous round causes the fabric to bend downward naturally without additional shaping.
Maintain consistent stitch tension during these rounds. Uneven tension may produce waves or unwanted stretching, making the finished hat appear asymmetrical.
Continue crocheting until the sides reach the desired depth. Most adult bucket hats measure approximately 3.5 to 4.5 inches (9 to 11 cm) from the top of the crown to the beginning of the brim.
Many crocheters enjoy incorporating striped color changes at this stage. Alternating two complementary shades creates a timeless design similar to the sample shown in the chart while maintaining an elegant handmade appearance.
Invisible color changes help produce smooth transitions between rounds. Instead of completing the final yarn-over with the current color, finish the stitch using the new color before continuing.
Always try the hat on during construction whenever possible. Small adjustments in side height ensure a comfortable fit while allowing for different hairstyles and personal preferences.
Crocheting the Brim and Professional Finishing Techniques
The brim is one of the defining characteristics of every Bucket Hat Pattern. It provides both style and sun protection while completing the recognizable bucket hat silhouette.
To begin shaping the brim, evenly spaced increases are introduced once again. These increases gently flare the fabric outward without creating excessive waves or stiffness.
Continue adding rounds according to the chart until reaching the preferred brim width. Some crocheters enjoy narrow brims for a modern appearance, while others prefer wider brims for additional shade.
If additional structure is desired, consider using a slightly smaller hook during the final round or working a decorative edging with single crochet stitches. This helps the brim remain crisp and well defined.
Carefully weave in every yarn end using a yarn needle, hiding tails inside nearby stitches. Proper finishing significantly improves durability while giving the hat a polished, professional look.
Finally, lightly block the completed hat if necessary. Gentle steam blocking or damp blocking helps smooth stitches, refine shaping, and showcase the beautiful texture created throughout the Bucket Hat Pattern.
Frequently Asked Questions
Is the Bucket Hat Pattern suitable for beginners?
Yes. Beginners who already know basic stitches like chain, single crochet, half double crochet, and double crochet can successfully complete this project by carefully following the stitch counts and chart.
Which yarn works best for a Bucket Hat Pattern?
Cotton yarn is generally considered the best choice because it provides excellent stitch definition, breathability, durability, and enough structure to help the hat maintain its shape.
How can I make the hat larger or smaller?
Adjust the size by increasing or decreasing the diameter of the crown before beginning the sides. A larger crown creates a larger hat, while a smaller crown produces a tighter fit.
Can I use acrylic yarn instead of cotton?
Yes. Acrylic yarn creates a softer, warmer hat, although it may not hold its structure as well as cotton. Choosing a tighter stitch tension can improve stability.
Why does my crown curl upward?
Curling usually indicates too few increases or overly tight tension. Carefully compare your stitch counts with the chart and consider using a slightly larger crochet hook.
Why is my hat becoming wavy?
Excessive increases often cause rippling. Count stitches carefully and ensure increases are placed only where indicated in the Bucket Hat Pattern.
Can I add decorative elements?
Absolutely. Flowers, appliqués, embroidery, decorative buttons, textured stitches, and colorwork all personalize the finished bucket hat beautifully.
How should I wash my crochet bucket hat?
Hand washing with mild detergent followed by flat drying helps preserve the shape, stitch definition, and longevity of your handmade hat.
Conclusion
The Bucket Hat Pattern is an enjoyable crochet project that combines creativity, practical skills, and timeless fashion into one rewarding handmade accessory. Throughout this guide, you learned how to choose the best materials, interpret the crochet chart, crochet the crown with balanced increases, shape the sides, create a perfectly structured brim, and finish your project using professional techniques. By mastering these steps, you’ll be able to confidently customize future bucket hats using different colors, stitch textures, and sizes while continuing to improve your crochet abilities.
Whether you’re making this hat for yourself, as a thoughtful handmade gift, or even to sell at local craft fairs or online, the techniques you’ve learned here provide a strong foundation for many future crochet projects. Most importantly, enjoy the creative process and don’t be afraid to experiment with new color combinations and personal touches.