
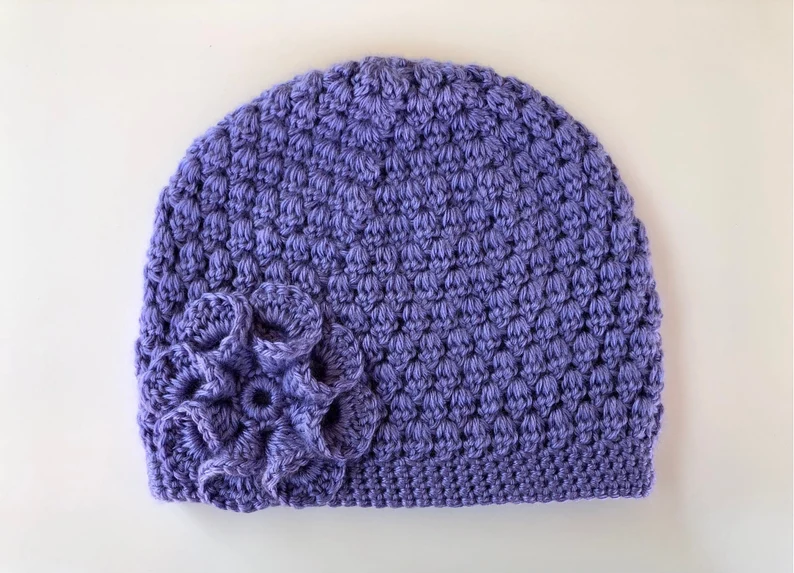
Handmade Crochet Beanie with Flower Pattern is a charming project that combines a practical handmade hat with a beautiful dimensional crochet flower. The lavender color gives the beanie a soft, elegant appearance, while the textured stitches create warmth and visual interest. This design can be made for everyday wear, thoughtful handmade gifts, seasonal accessories, or simply as a relaxing crochet project. Although the finished hat looks detailed, the construction can be approached one stage at a time using familiar U.S. crochet stitches. Once you understand how the crown increases work, the remainder of the hat becomes pleasantly repetitive, making this pattern approachable for adventurous beginners as well as experienced crocheters.
One of the most attractive features of this crochet beanie pattern is its versatility. You can make the hat in lavender to reproduce the gentle look of the inspiration, or choose cream, dusty rose, burgundy, gray, navy, or another favorite shade. The flower can match the hat for a sophisticated monochromatic effect or be worked in a contrasting yarn for additional definition. The pattern below explains how to build the crown, establish the textured body, crochet a firm lower band, and create a layered flower separately before attaching it securely. Because individual crochet tension varies, measurements are provided as an important companion to stitch counts, allowing you to customize the finished size more accurately.
The Lavender Handmade Crochet Beanie with Flower Pattern is worked primarily from the top downward. Starting at the center of the crown makes it easy to control the circumference through evenly distributed increases. After reaching the required crown diameter, the increases stop and the sides begin to form naturally. A textured stitch pattern gives the main section its handmade character, while a tighter band around the bottom provides structure. Finally, a separately crocheted flower is sewn onto one side of the hat. Before beginning, remember that handmade crochet naturally varies according to yarn thickness, hook size, stitch tension, and fiber content, so checking your gauge and trying the hat on during construction can produce a much better fit.
Materials, Crochet Abbreviations, Gauge, and Beanie Sizing
For this handmade crochet beanie, choose a soft worsted-weight or medium-weight yarn that feels comfortable against the skin. Approximately 180–250 yards (165–230 m) should be sufficient for many adult sizes, including the flower, although the exact amount depends on size and tension. A smooth yarn with good stitch definition is especially helpful because it allows the textured pattern and decorative flower to remain visible.
A 5.0 mm (H-8) crochet hook is a practical starting point for medium-weight yarn. You will also need scissors, a yarn needle, and several stitch markers. A flexible measuring tape is highly recommended because circumference and crown diameter are more reliable than simply following a fixed stitch count. If your stitches are unusually loose or tight, change the hook size as necessary.
This tutorial uses U.S. crochet terminology. The main abbreviations are ch = chain, sl st = slip stitch, sc = single crochet, hdc = half double crochet, dc = double crochet, st = stitch, sts = stitches, and inc = increase. An increase means working two stitches into the same stitch unless another instruction is specifically given.
For an average adult hat, aim for a finished circumference of approximately 20–22 inches (51–56 cm), depending on the amount of stretch in your yarn and stitch pattern. A finished height of around 8–9 inches (20–23 cm) works well for a traditional fitted beanie. Remember that crochet hats usually benefit from a little negative ease so they stay comfortably on the head.
Before starting the complete crochet hat pattern, make a small gauge swatch using the yarn and hook you plan to use. A useful starting gauge is approximately 14–16 stitches across 4 inches (10 cm), although the textured stitch may alter this measurement. More important than matching an exact universal gauge is maintaining consistent tension and measuring the developing hat frequently.
To estimate the crown diameter, divide the desired finished head circumference by approximately 3.14, then account for the stretch of the crochet fabric. For example, a 21-inch (53 cm) circumference corresponds mathematically to about 6.7 inches (17 cm), but you may stop the increase section slightly earlier because the finished crochet fabric will stretch. This simple sizing principle makes the Lavender Handmade Crochet Beanie with Flower Pattern easier to adapt.
Step-by-Step Crochet Instructions for the Beanie
Begin the crown with a magic ring. If you prefer not to use a magic ring, ch 4 and join with a sl st to the first ch to create a small circle. Round 1: Ch 1 and work 8 hdc into the ring. Join with a sl st to the first hdc. Pull the starting tail firmly to close the center. You should now have 8 sts.
Round 2: Ch 1, work 2 hdc in every st around, and join with a sl st. You should have 16 sts. Round 3: Ch 1, 1 hdc in the next st, 2 hdc in the next st; repeat from * to * around and join. You should have 24 sts. These regular increases create the flat circular foundation of the crown.
Round 4: Ch 1, 1 hdc in each of the next 2 sts, 2 hdc in the next st; repeat around and join for 32 sts. Round 5: Ch 1, 1 hdc in each of the next 3 sts, 2 hdc in the next st; repeat around and join for 40 sts. Continue following the same principle, adding one additional regular stitch between increases in each new round.
For example, Round 6 uses 4 regular hdc before each increase, Round 7 uses 5, and Round 8 uses 6. Continue until the crown approaches the diameter required for your size. Keep the circle flat while working. If it becomes noticeably wavy, you may be increasing too quickly; if it begins forming a bowl before reaching the desired diameter, additional increases may be required.
Once the crown reaches the correct diameter, stop increasing. For the body, ch 1 and work one hdc in every stitch around. Join with a sl st. Repeat this basic round once if necessary. Then establish texture by alternating regular hdc stitches with front-post half double crochet or another raised stitch. To work a front-post hdc, yarn over, insert the hook from front to back and back to front around the post of the designated stitch, yarn over, pull up a loop, yarn over again, and pull through all three loops.
Continue the textured body until the hat measures approximately 7–8 inches (18–20 cm) from the crown, depending on your desired final depth. For the lower band, switch to sc and work one sc in each stitch around for approximately 4–6 rounds. Keep these stitches comfortably firm without making the opening too tight. Fasten off and weave the yarn tail securely into the inside of the crochet beanie.
How to Crochet the Layered Lavender Flower
The decorative flower is what gives the Lavender Handmade Crochet Beanie with Flower Pattern its distinctive personality. Use the same lavender yarn for a coordinated appearance, or choose a contrasting color. Begin with a magic ring. Round 1: Ch 1, work 10 sc into the ring, pull the ring closed, and join with a sl st to the first sc.
For the first layer of petals, work ch 3, 2 dc in the same st, ch 3, sl st in the same st. Sl st into the next stitch and repeat the petal sequence around. Depending on your preferred fullness, you can make five petals by using every second foundation stitch or create more closely spaced petals around the center. Keep the stitches relaxed so the petals can curve naturally.
To create the layered appearance, turn the flower slightly and work behind the first set of petals. Insert your hook around the back of the foundation stitches and create small chain loops, such as ch 4 or ch 5, anchoring each loop with a sl st behind the flower. These loops become the foundation for a larger second layer of petals.
Into each back loop, work sc, hdc, 3 dc, hdc, sc. This creates a rounded petal with additional height in the center. Repeat in every chain loop around. The second layer should sit behind the smaller petals, creating the dimensional appearance visible in a layered crochet flower.
For an even fuller flower, add another set of back loops using ch 5 or ch 6. Work sc, hdc, dc, 2 tr, dc, hdc, sc into each loop. Here tr means treble crochet: yarn over twice, insert the hook, pull up a loop, then complete the stitch by drawing the yarn through two loops at a time. This optional third layer creates larger outer petals.
Leave a yarn tail approximately 12 inches (30 cm) long when fastening off. Position the finished flower toward one side of the lower portion of the beanie. Thread the tail onto a yarn needle and stitch around the flower center and several outer points. Avoid sewing every petal completely flat because some natural movement helps preserve the dimensional look. Weave the remaining tail securely into the inside of the hat.
Finishing, Customizing, and Getting a Professional Result
After completing the Lavender Handmade Crochet Beanie with Flower Pattern, inspect the overall shape before trimming every yarn tail. Place the hat on an appropriately sized form or try it on carefully. Look for consistent stitch tension, a centered crown, a comfortable opening, and an even lower edge. Small adjustments are much easier before all finishing ends have been permanently secured.
If the beanie feels slightly short, additional body or band rounds can usually be added. If it feels too long, consider folding the bottom upward to create a cuff. A folded band changes the appearance considerably and can make the hat warmer. When intentionally making a cuffed version, add approximately 2–3 inches (5–7.5 cm) of extra length.
Color customization is another simple way to transform this crochet flower beanie. Lavender produces a gentle, classic finish, but cream creates a neutral style, dusty pink adds softness, burgundy gives the project an autumnal feel, and dark gray creates a modern look. You can also make the flower in two coordinated shades by changing yarn between petal layers.
For a child-size version, stop increasing the crown sooner and shorten the body. For a larger adult version, continue the increase sequence until the crown reaches the required diameter. Instead of relying entirely on age labels, use the intended wearer’s head measurement whenever possible. This approach gives much more dependable results because head sizes can vary significantly.
Blocking can help improve the final appearance. If your yarn is suitable for gentle wet blocking, lightly dampen the finished hat and shape it without stretching excessively. Allow it to dry completely on a flat surface or suitable rounded form. Follow the yarn manufacturer’s care instructions, since different fibers respond differently to moisture and heat. Avoid aggressive heat treatment unless you know the fiber can safely tolerate it.
Finally, weave every end through several nearby stitches on the wrong side of the fabric, changing direction once or twice for additional security. Trim only after confirming that the ends are secure. The finished result should be comfortable, flexible, and neatly shaped, with the dimensional flower becoming the main decorative feature without overwhelming the textured surface of the beanie.
Frequently Asked Questions About the Lavender Handmade Crochet Beanie with Flower Pattern
Is this Lavender Handmade Crochet Beanie with Flower Pattern suitable for beginners?
Yes. An adventurous beginner who already understands basic crochet stitches such as chains, single crochet, half double crochet, double crochet, and slip stitches should be able to complete it. The post stitches and layered flower may require a little practice, but they are manageable when worked slowly.
What yarn weight works best for this crochet beanie?
Medium or worsted-weight yarn is an excellent choice because it creates a warm fabric while keeping the stitches easy to see. A soft acrylic, wool blend, or another comfortable hat-friendly fiber can work well. Always consider how the yarn feels against the skin.
Can I make the hat without the flower?
Absolutely. The flower is decorative rather than structural. You can leave it off for a simpler textured crochet beanie, make a smaller flower, attach several miniature flowers, or replace it with another crocheted embellishment.
How do I make the crochet beanie larger?
Continue the crown increase sequence for additional rounds before beginning the straight body. Remember that each new increase round adds one more regular stitch between increases. Measure the crown instead of relying only on the stitch count.
How can I make the beanie smaller?
Stop the crown increases earlier and begin working even rounds once the appropriate diameter is reached. You can also shorten the body before adding the lower band. This method makes it easy to adapt the same general pattern for different sizes.
Why is my crochet crown becoming wavy?
A wavy crown often indicates that there are too many increases for your particular yarn, hook, or tension. Try working an even round without increases or reducing the number of increases in the next round. The crown should remain reasonably flat during the initial construction.
Why is my crown curling into a bowl too early?
This usually happens when there are too few increases or when your tension is especially tight. Check your stitch count and crown diameter. If necessary, add another increase round before continuing the body.
Can I use a different hook size?
Yes. Hook size should complement both the yarn and your personal tension. A smaller hook creates a denser fabric, while a larger hook generally creates a softer and more flexible fabric. Make a gauge swatch before committing to the entire project.
How do I keep the flower from becoming floppy?
Use slightly firm tension when making the flower and attach it securely at the center. You can also place a few discreet stitches near the base of the outer petals. Avoid sewing the entire petal surface down if you want to preserve the three-dimensional appearance.
Can I use several colors in the flower?
Yes. Each petal layer can be crocheted in a different coordinating color. For example, a lavender hat could feature dark purple outer petals, pale lavender middle petals, and a cream center. Color changes are an easy way to personalize the crochet flower pattern.
How long should an adult crochet beanie be?
A traditional fitted adult beanie often measures approximately 8–9 inches (20–23 cm) from crown to lower edge. However, the ideal depth depends on head size, stitch stretch, and whether you want a fitted, cuffed, or slightly slouchy style.
Should I join every round or work continuously?
Either technique can work, but joined rounds are useful for this project because they make it easier to maintain textured stitch placement. If you prefer continuous rounds, place a stitch marker in the first stitch and move it upward after every completed round.
How do I wash a handmade crochet beanie?
Care depends on the yarn fiber. Check the yarn label before washing. Gentle hand washing in cool or lukewarm water is often a safe approach for many handmade items, but the yarn manufacturer’s instructions should always take priority. Reshape the flower and hat while drying.
Can this pattern be turned into a slouchy beanie?
Yes. Once the crown has reached the required circumference, simply continue the body for additional rounds before adding the lower band. Adding roughly 2–4 inches (5–10 cm) can produce a noticeably more relaxed silhouette, depending on the yarn and stitch structure.
What should I do if my stitch count is correct but the hat is still too tight?
Your gauge is probably tighter than the gauge assumed by the pattern. Try a larger crochet hook or add another crown increase round. Measurements are more important than blindly following stitch counts because every crocheter naturally works with slightly different tension.
How should the crochet flower be positioned?
A classic placement is slightly above the lower band and toward one side of the head. Before sewing, use removable stitch markers to hold the flower in several possible positions. Try on the hat and choose the placement that looks balanced.
Can leftover yarn be used for the flower?
Yes, provided the yarn has a similar weight and suitable texture. The flower requires much less yarn than the beanie, making it a practical way to use small amounts left from previous projects.
How can I achieve cleaner-looking stitches?
Maintain consistent yarn tension, avoid pulling joining slip stitches too tightly, and count your stitches regularly. Stitch markers can also help prevent accidental increases or skipped stitches. Taking a few moments to check each round often saves considerable correction later.
The Lavender Handmade Crochet Beanie with Flower Pattern combines straightforward hat construction with texture and a beautiful dimensional embellishment. Throughout this tutorial, you learned how to create a top-down crown using controlled increases, determine the appropriate crown diameter, crochet the body without further increases, establish a textured surface, finish the lower band, and make a separate layered flower using basic U.S. crochet stitches. You also learned how measurements, gauge, yarn choice, tension, and simple adjustments can help adapt the pattern to different head sizes.
Once you understand the basic construction, this handmade crochet beanie offers many opportunities for creativity. Change the color, experiment with contrasting flower petals, adjust the length, make the flower larger or smaller, or adapt the measurements for another size. The most important part is to measure as you work and enjoy creating a handmade accessory with your own personal details. If you make this beanie, leave your sincere opinion about the pattern and share your suggestions for future crochet projects. Your ideas and experiences can inspire even more creative variations.