
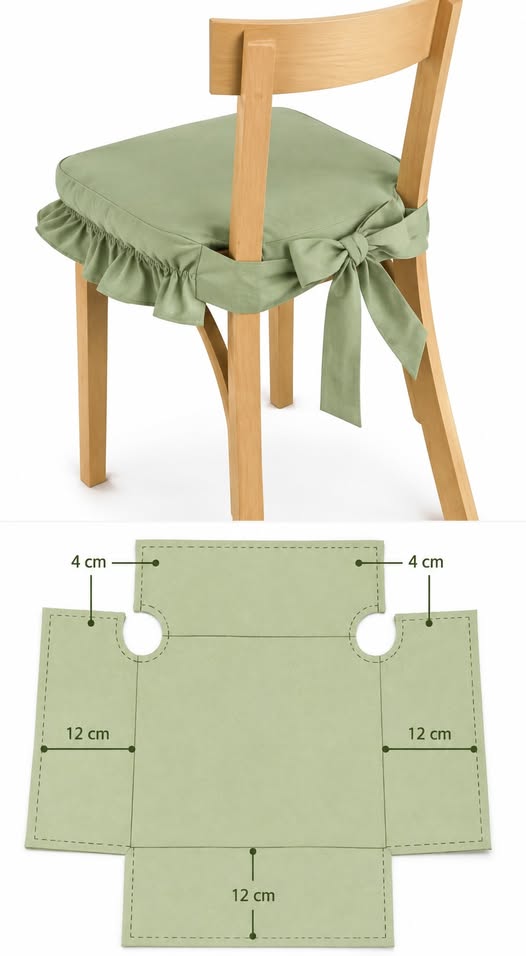
The Ruffled Chair Cushion Cover Pattern is a beautiful sewing project that combines comfort, practicality, and a charming decorative finish in one handmade piece. Inspired by the design shown in the reference image, this cushion cover is shaped to sit neatly on a wooden dining chair while allowing the back posts to pass through carefully positioned openings. The soft ruffle around the outer edge gives the cushion a romantic, cottage-style appearance, while fabric ties at the back or sides help hold everything securely in place. This project is especially appealing because it can transform a simple chair without requiring permanent upholstery or complicated furniture modifications. By choosing a durable cotton, linen blend, canvas, or home décor fabric, you can create a washable cover that coordinates with a kitchen, dining room, breakfast nook, craft room, or bedroom. The construction is approachable for anyone comfortable with basic machine sewing, and careful measuring is more important than advanced sewing techniques.
One of the most useful features of this Ruffled Chair Cushion Cover Pattern is its adaptable shape. Chairs vary considerably, so rather than treating the measurements in the reference as universal dimensions, it is best to use the illustrated proportions as a starting point and customize the pattern to the actual chair. The image suggests side and front extensions of approximately 12 cm (4.7 inches) and allowances near the upper areas of approximately 4 cm (1.6 inches), together with rounded openings designed to accommodate the chair’s back supports. These details demonstrate the basic construction principle: the central section corresponds to the seat, while the surrounding extensions provide enough fabric to wrap, ruffle, tie, and finish the cover attractively. Making a paper template before cutting the final fabric is strongly recommended. A template lets you test the placement of every opening and corner without wasting your chosen material, and it makes producing several matching chair covers much easier.
The term Ruffled Chair Cushion Cover Pattern describes more than a decorative seat cover. In sewing, a pattern provides the dimensions and shapes used to cut the fabric; a chair cushion cover is the removable textile layer surrounding or sitting over a padded seat; and ruffled refers to the gathered fabric detail that creates the softly waved edge visible around the chair. Together, these elements produce a functional home-sewing project with a polished handmade character. The finished look depends heavily on accurate measurements, even gathering, clean seams, and properly positioned ties. Beginners can simplify the design by using one solid fabric, while experienced sewists may combine prints, contrasting ruffles, piping, or coordinated ties. The following tutorial explains the construction from measuring the chair through fitting and finishing, while keeping the design flexible enough to accommodate different chair dimensions.
Materials, Measurements, and Preparing the Chair Cushion Pattern
Begin by measuring the chair seat at its widest and deepest points. Measure from side to side and from the front edge toward the back. Do not assume that the seat is perfectly square; many wooden dining chairs become narrower toward the back. Record all measurements carefully in both inches and centimeters if that makes the pattern easier to reproduce. For a removable chair cushion cover, accurate measurements are essential because a cover that is too small will pull at the seams, while an excessively large cover may shift during normal use.
Next, examine the back of the chair. The design in the photograph has two wooden back supports passing close to or through the rear area of the cover. Measure the width of each support and its exact position relative to the side edges. Transfer those locations to a paper template. The reference design uses rounded cutouts around these supports, which helps the fabric fit neatly rather than bunching around the wood.
The diagram provides useful proportional references. The visible side and lower extensions are marked at approximately 12 cm (4.7 inches), while small upper sections are indicated at approximately 4 cm (1.6 inches). Because your chair may be different, treat these as design references rather than mandatory finished dimensions. Adjust the extensions so there is enough material for the intended ruffle, seam allowance, and attachment method.
For materials, choose a stable woven fabric suitable for frequent handling. Medium-weight cotton, cotton-linen blends, canvas, twill, and many home décor fabrics are excellent choices. You will also need matching thread, fabric scissors or a rotary cutter, pins or clips, measuring tape, a ruler, paper for the template, a fabric-marking tool, an iron, and a sewing machine. If you want a soft padded seat, prepare an appropriately sized cushion insert or upholstery foam as well.
Before cutting, wash and press washable fabric according to its care requirements. Prewashing is particularly helpful with natural fibers because it reduces the chance that the completed cover will shrink noticeably during its first cleaning. Pressing is equally important. Flat, wrinkle-free fabric makes measuring and cutting more precise and helps the finished Ruffled Chair Cushion Cover Pattern look professionally assembled.
Finally, create a full-size paper or inexpensive test-fabric pattern. Place it on the chair and mark the locations of the back posts, corners, front edge, and ties. Check that the extensions fall evenly around the seat. Add your preferred seam allowance—approximately 1/2 inch (1.3 cm) is convenient for many home-sewing projects. Mark the cutting line and stitching line separately whenever possible so there is less confusion during assembly.
Cutting the Fabric and Sewing the Main Cushion Cover
Place the completed template on the fabric, keeping the grain straight. Pin or weight it securely and trace around the shape with a removable fabric marker. If your fabric has a directional print, flowers, stripes, or another obvious motif, check the orientation before cutting. The central seat portion should display the design in the intended direction when the cushion is placed on the chair.
Cut the main cover pieces carefully. Depending on how you plan to insert the cushion, you may use a top piece and a separate underside piece or construct an envelope-style opening underneath. If the cushion needs to be removable for washing, avoid permanently closing all layers around the padding. A concealed zipper, overlapping envelope opening, or hook-and-loop closure can make maintenance much easier.
Pay special attention to the rounded chair-post openings. Rounded shapes should be clipped carefully after stitching so the seam allowance can spread when turned right side out. Never cut through the stitching itself. If your chair posts are wider than those suggested by the reference image, enlarge the openings on the paper template first rather than trying to force the finished cover around them.
Sew the main sections with a consistent seam allowance. When approaching inside corners, slow the machine and keep the needle down before pivoting. This simple technique creates cleaner corners. Curves should also be sewn slowly. Shorter stitch lengths around tight curves can provide additional control, although the exact machine setting will depend on your fabric.
After sewing, trim excessive bulk from corners and grade thick seam allowances if necessary. Clip curved seam allowances at regular intervals, leaving a small distance between each clip and the stitching. Turn the piece carefully and use a blunt turning tool to shape the corners. Press the seams from the wrong side first and then lightly from the right side using an appropriate iron temperature.
Test the unfinished cover on the chair before attaching decorative elements. This fitting stage is extremely valuable. Confirm that the center aligns with the seat, the post openings sit naturally around the wooden supports, and the edges reach the desired positions. Correcting the chair cushion pattern now is much easier than removing a completed ruffle later.
Creating the Ruffled Edge and Fabric Bow Ties
The ruffle is the defining decorative element of this Ruffled Chair Cushion Cover Pattern. To create it, cut long fabric strips on the straight grain. A finished ruffle approximately 2 to 3 inches (5 to 7.5 cm) deep works well for many dining chairs, although you can make it narrower or fuller according to your preference. Remember to include seam and hem allowances when calculating the cutting width.
The total strip length determines how full the ruffle appears. As a practical starting point, prepare a strip approximately 1.5 to 2 times the length of the edge it will decorate. A 1.5:1 gathering ratio creates gentle waves, while a ratio closer to 2:1 produces a noticeably fuller ruffle. Join multiple strips with neat seams if one continuous piece is not long enough.
Finish the exposed lower edge before gathering. A narrow double-fold hem gives woven cotton a clean appearance. Fold the raw edge toward the wrong side, press it, fold again to conceal the raw edge, and stitch close to the inner fold. Pressing before sewing helps prevent twisting and makes the hem more consistent.
To gather the upper edge, sew two parallel rows of long machine stitches inside the seam allowance and leave long thread tails. Do not backstitch at the ends. Gently pull the bobbin threads while sliding the fabric along them until the strip fits the required edge. Distribute the fullness evenly rather than allowing large gathers to accumulate in isolated areas.
Pin or clip the gathered strip to the cushion edge with right sides together. Match important points first—the center front, side centers, and corners—and then distribute the remaining gathers. Sew slowly through the gathered layers. After stitching, inspect the seam from both sides to make sure no folds have accidentally been caught where they should remain free.
For the attractive bow shown in the reference design, make fabric chair ties from long rectangular strips. Fold each strip lengthwise with right sides together, sew along the long edge and one short end, turn it right side out, and press. Attach pairs of ties at suitable positions around the rear or sides of the cushion. They should be long enough to form secure bows without hanging so low that they become inconvenient around the chair legs.
Final Assembly, Fitting, and Professional Finishing Tips
Once the ruffle and ties are prepared, complete the remaining cover seams according to your chosen opening method. If using a zipper, install it where it will be relatively unobtrusive and easy to access. For an envelope back or underside, make sure the overlap is generous enough to prevent the cushion insert from becoming exposed when someone sits down.
Insert the cushion or foam and gently work it into every corner. A medium-firm insert generally gives the seat a tidy appearance while maintaining comfort. If cutting upholstery foam yourself, use the chair-seat template as your guide, but make the foam slightly smaller than the cover’s internal dimensions if needed to accommodate seam bulk.
Place the completed cushion on the chair and guide the rounded openings around the rear supports. Smooth the central panel across the seat and allow the ruffled edge to fall naturally. Tie the fabric straps into bows, adjusting their tension until the cover remains stable without pulling or distorting the corners.
If the ruffle appears uneven, do not immediately alter the seam. First distribute the gathers by hand and lightly steam or press them according to the fabric’s care instructions. Handmade ruffles often settle after the final pressing. Consistent gathering and careful pressing can dramatically improve the overall appearance of a relatively simple sewing project.
For multiple dining chairs, make the first cover your master sample. Fit it completely and note every adjustment before cutting additional pieces. Once the fit is correct, transfer the corrected dimensions to durable pattern paper. This saves considerable time and helps ensure that a set of DIY chair cushion covers has a consistent size, ruffle depth, tie position, and overall appearance.
Regular care will help preserve the finished project. Follow the washing recommendations for the fabric you selected and remove the cushion insert when appropriate. Retie the bows after laundering and press the ruffle lightly if necessary. A carefully constructed Ruffled Chair Cushion Cover Pattern can be both decorative and practical, making it possible to refresh chairs seasonally without permanently changing the furniture.
Frequently Asked Questions About the Ruffled Chair Cushion Cover Pattern
What is a Ruffled Chair Cushion Cover Pattern?
A Ruffled Chair Cushion Cover Pattern is a sewing template and construction method for creating a removable chair-seat cover featuring a gathered fabric edge. The pattern usually includes a central seat area, allowances or extensions around the sides, openings or shaping around chair supports, and optional ties for securing the cushion.
Can a beginner make this chair cushion cover?
Yes. A confident beginner can complete the project with patience. Straight stitching, hemming, gathering, and basic curved sewing are the main skills involved. Creating a test pattern before cutting the final fabric makes the process much more forgiving.
What fabric works best for a ruffled chair cushion cover?
Medium-weight woven fabrics are usually practical. Cotton, cotton-linen blends, twill, canvas, and suitable home décor fabrics can provide enough structure while still gathering nicely. Extremely heavy upholstery fabric may be difficult to gather into a soft ruffle.
How much extra fabric should I use for the ruffle?
A good starting ratio is approximately 1.5 to 2 times the finished edge length. For example, if an edge measures 40 inches (101.6 cm), a ruffle strip between roughly 60 and 80 inches (152.4 to 203.2 cm) will create moderate to full gathering.
Do I have to use the 12 cm measurements shown in the reference pattern?
No. The approximately 12 cm (4.7 inch) markings provide a helpful reference for the pictured design, but actual dimensions should be adapted to your chair. Measure your furniture before cutting because chair seats and back-support positions vary considerably.
What do the 4 cm markings mean for this project?
The approximately 4 cm (1.6 inch) areas shown near the top of the reference template illustrate relatively narrow sections around the rear shaping. Their exact size should be customized to the width, placement, and construction of your particular chair.
How do I measure the openings for the chair back posts?
Place paper over or around the seat and mark the center position and width of each post. Create a slightly generous curved opening, test it directly on the chair, and adjust it before transferring the shape to fabric. Remember that seam allowances affect the final opening size.
How can I keep the cushion from sliding?
Properly positioned fabric ties are one of the easiest solutions. Secure ties around stable parts of the chair frame without making them excessively tight. A correctly sized cushion and well-fitted cover will also move less than an oversized one.
Can I make the cover removable and washable?
Yes, and that is often one of the most practical approaches. Add a zipper or an overlapping envelope opening so the cushion insert can be removed. Always choose fabric and construction materials with their intended cleaning method in mind.
Can I make the ruffle less full?
Absolutely. Reduce the gathering ratio. Using around 1.25 to 1.5 times the edge measurement produces a softer, more restrained effect, while approximately twice the measurement creates a fuller decorative ruffle.
How wide should the fabric ties be?
There is no single required width. Finished ties around 1.5 to 2.5 inches (3.8 to 6.4 cm) wide can create an attractive bow similar to the inspiration image. Their length should be determined by the size of the chair frame and the bow you want to create.
Can this pattern be adapted for round or unusual chair seats?
Yes. The construction principle remains similar, but the central template must follow the actual seat shape. Making a paper or inexpensive fabric test version becomes especially important for curved, trapezoidal, or irregular chairs.
Conclusion
The Ruffled Chair Cushion Cover Pattern is a rewarding way to combine practical sewing with a soft decorative style. Throughout this tutorial, we covered how to measure the chair accurately, create a customized paper template, interpret the approximately 12 cm (4.7 inch) and 4 cm (1.6 inch) details visible in the reference design, shape openings around the chair supports, select suitable fabric, cut and assemble the main cover, and prepare a comfortable cushion insert.We also explored the details that give this project its distinctive appearance: an evenly gathered ruffled chair cushion, carefully finished edges, and long fabric chair ties that can be formed into decorative bows. Taking time to press each stage, test the fit before final assembly, and distribute the gathers evenly will make a noticeable difference in the finished result.
Most importantly, remember that a successful DIY chair cushion cover should be customized to the furniture rather than copied from one fixed set of dimensions. Use the reference measurements as guidance, measure your own chair carefully, and make a test template whenever possible. Once you perfect the first cover, the same master pattern can make it much easier to sew a coordinated set for several chairs.I hope this Ruffled Chair Cushion Cover Pattern inspires you to create a comfortable and charming update for your chairs. If you make your own version, leave your sincere opinion about the project and share your suggestions, favorite fabric choices, or modifications. Your ideas may inspire even more creative ways to personalize this beautiful sewing pattern.