Creating a cow block for a quilt – pattern is one of the most enjoyable and creative tasks for quilters who love to add charm and character to their projects.
Whether you’re a beginner looking for a fun project or an experienced quilter seeking a whimsical design, cow quilt blocks provide an ideal mix of ease, cuteness, and visual appeal.
The beauty of a cow block for a quilt – pattern lies in its versatility. You can keep it simple with minimal details, or bring it to life with playful fabric prints and intricate piecing.
These blocks can be used in baby quilts, farmhouse-themed decor, or even as standalone wall hangings. Plus, cow-themed quilts are especially popular in rural communities and among animal lovers, making them an excellent handmade gift idea.
In this article, we’ll break down the best techniques to create your own cow block for a quilt – pattern, suggest fabric choices, and offer step-by-step insights into piecing, assembling, and finishing your quilt. Whether you sew by hand or machine, this guide will help you get started on a project that’s both meaningful and delightful.
1. Understanding the Cow Block Design
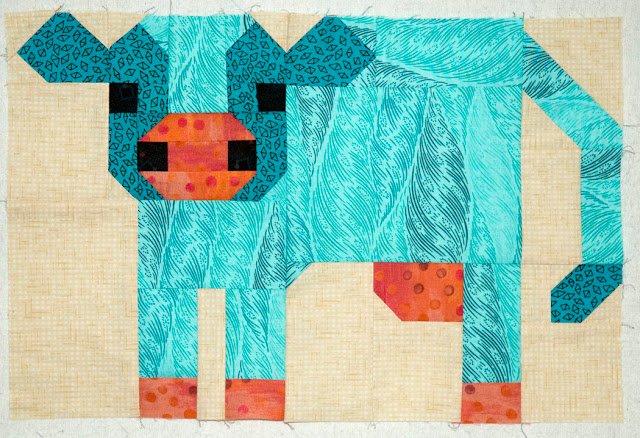
When it comes to designing a cow block for a quilt – pattern, the first step is understanding the elements that define the block. Typically, these blocks feature a simplified or stylized cow face or body, created using fabric squares, rectangles, and triangles.
You don’t need to be an expert artist to create a charming cow. Most cow quilt blocks use geometric shapes to form the head, ears, eyes, snout, and horns. Choosing high-contrast fabrics for these features makes the cow stand out against the background.
Facial expressions also add personality. Some designs include embroidered eyes, stitched nostrils, or a tongue peeking out for an adorable look. Fabric choice plays a big role too—spotted black and white, soft browns, or even pinks for playful projects work beautifully.
You’ll want to pay close attention to symmetry. Keeping features evenly spaced ensures a polished and professional look. If you’re using a sewing machine, consider marking pieces with chalk before stitching to ensure accurate placement.
Using templates or printable cow block for a quilt – pattern PDFs can make the process easier. Many free or paid templates offer cutting guides and step-by-step instructions for different cow styles—from cartoonish to realistic.
Lastly, don’t forget the seam allowances. Precision is key when piecing small features, so be sure to use consistent ¼ inch seams throughout the block for best results.
2. Choosing the Right Fabrics and Colors
The next important step in your cow block for a quilt – pattern journey is fabric selection. The fabric not only determines how your block looks but also how it feels and lasts over time.
Start by choosing a color palette. Traditional cows are black and white, but feel free to play around. Brown, cream, pink, and gray tones can add a more rustic or playful twist. If your quilt is meant for a child, consider using novelty fabrics with polka dots, florals, or even cow prints.
Cotton is the most common fabric for quilt blocks due to its durability and ease of handling. Choose high-quality quilting cotton to ensure longevity and accurate stitching. Pre-washed fabric is ideal to avoid shrinkage later.
When choosing background fabrics, aim for contrast. A cow block will pop best when surrounded by a lighter or darker solid color. Avoid busy prints for the background so that the main design remains the focal point.
Fabric scraps are perfect for this project. Since the cow block is often small, you can reuse leftover fabric pieces from previous projects. This not only reduces waste but also adds a handmade charm.
Think about texture too. Adding flannel or felt for small elements like ears or the snout gives dimension to the block. Just be careful to stabilize textured fabrics if combining them with cotton.
Test your fabric layout before sewing. Arrange your pieces on a flat surface to visualize the final look. This helps avoid mistakes and ensures you’re happy with the design before you commit to stitching.
3. Assembling Your Cow Block Step-by-Step
Once you’ve planned your cow block for a quilt – pattern, it’s time to put everything together. Assembly can be broken down into several small, manageable steps that build up to the complete block.
Start by cutting your fabric pieces according to your chosen template or pattern. Label each piece if necessary to keep track of placement. Make sure to use a rotary cutter and cutting mat for clean, precise edges.
Begin piecing smaller units like the eyes, ears, or nostrils first. These often consist of small squares or triangles. Stitch slowly and press each seam as you go to keep your block flat and neat.
Next, move on to assembling larger sections such as the cow’s face and body. Sew in rows or columns depending on your design. Use pins or fabric clips to align edges and prevent shifting.
Assemble all your units together into the final block. Keep checking measurements throughout to ensure the finished block matches the size needed for your quilt.
Once your block is assembled, give it a final press using a hot iron and a pressing cloth. Avoid using steam if your fabric is delicate or if you’re using adhesive-backed elements.
Double-check your seams and make any adjustments before adding the cow block to your full quilt layout. Proper alignment at this stage ensures the quilt top comes together cleanly and looks cohesive.
4. Creative Ways to Use Cow Quilt Blocks
Now that you’ve completed your cow block for a quilt – pattern, the next step is deciding how to use it in a broader project. There are endless creative options depending on your goal.
One popular use is baby quilts. A cow block makes a charming addition to farm-themed baby quilts, often paired with pig, sheep, or chicken blocks. It creates a storybook-like feel that’s perfect for nurseries.
Wall hangings are another fun option. Frame your cow block in a fabric border and hang it in a farmhouse kitchen or kid’s room for a rustic decorative touch.
Incorporate cow blocks into table runners or placemats for a themed dinner setting. Using seasonal fabrics like red checks for summer or soft browns for autumn creates a cozy vibe.
If you enjoy making larger quilts, use multiple cow blocks with varied expressions and fabric patterns to create an entire “herd” effect. This adds whimsy and makes each section of the quilt unique.
You can even turn a cow block into a throw pillow. Add batting and backing, sew around the edges, and stuff it with fiberfill for a cute farmhouse accent.
Don’t forget gifting. Handmade cow block items make thoughtful presents for birthdays, baby showers, or holidays. The personal touch is always appreciated, especially with such a fun and friendly design.
FAQ – Cow Block for a Quilt – Pattern
1. What size should a cow quilt block be?
Most cow quilt blocks are between 6×6 and 12×12 inches, depending on the complexity and the quilt’s layout. You can scale the pattern up or down to suit your project.
2. Can I find free cow block quilt patterns online?
Yes, many websites and quilting communities offer free templates and downloadable PDFs. Just make sure to choose reputable sources for accurate patterns.
3. Is this project beginner-friendly?
Absolutely. A simple cow block for a quilt – pattern is great for beginners. Stick with straight seams and basic shapes to keep it manageable.
4. What tools do I need to make a cow quilt block?
You’ll need a rotary cutter, ruler, cutting mat, sewing machine (or needle for hand stitching), fabric, thread, and iron. Optional tools include templates and fabric pens.
5. Can I use applique instead of piecing?
Yes! Appliqué is a great alternative and often easier for creating detailed features like eyes or ears. It adds texture and visual interest.
6. How do I make sure my block is symmetrical?
Use careful measurements and always press your seams after each step. Marking guidelines on the back of your fabric can also help with alignment.
Conclusion
Creating a cow block for a quilt – pattern is a rewarding and fun experience, whether you’re crafting a gift or adding a special touch to your own quilt. From choosing fabrics to piecing and assembling the block, every step offers creative expression. By following the tips in this article, you’ll be well on your way to making a beautiful, high-quality cow quilt block that showcases your style and craftsmanship.
If this guide helped you, please consider leaving a sincere opinion in the comments. Your feedback helps others in the quilting community and gives us ideas for improving future content. Have suggestions or requests for similar patterns? We’d love to hear them too!