If you’re a fan of handmade toys and classic characters, the Crochet Ninja Turtles – Pattern offers a fun, creative way to bring the iconic Teenage Mutant Ninja Turtles to life with yarn.
Whether you’re an experienced crocheter or a beginner ready to take on a new challenge, this pattern is a perfect combination of nostalgia and crafty fun.
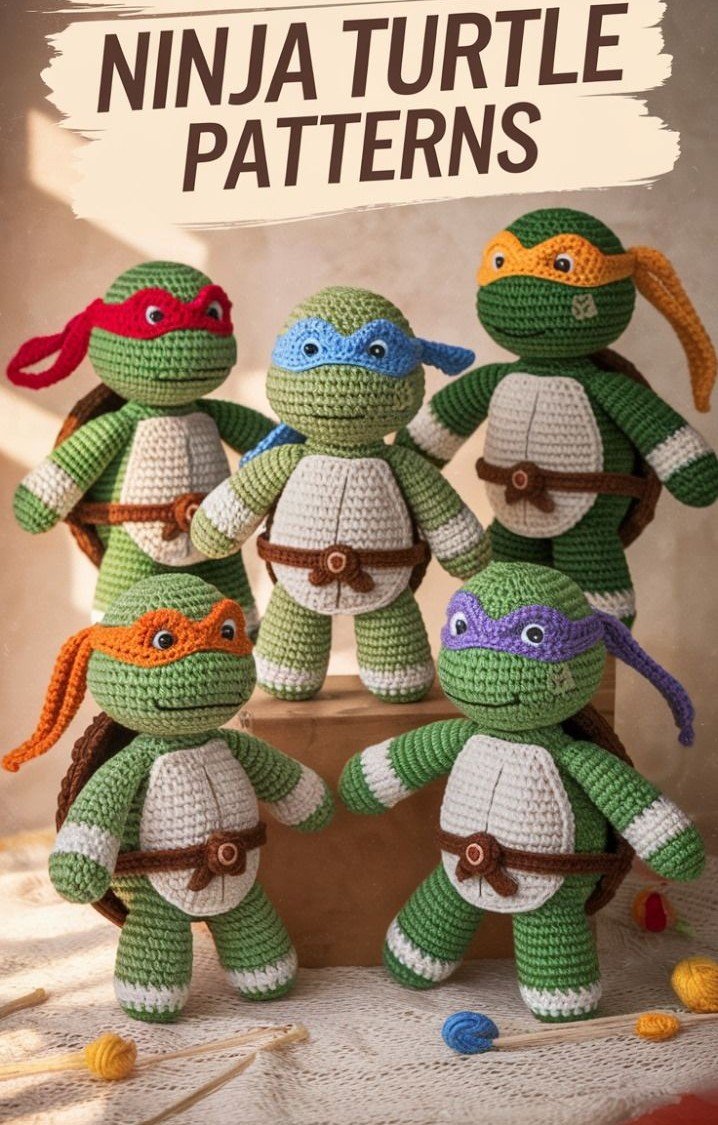
These turtle characters—Leonardo, Donatello, Michelangelo, and Raphael—are beloved by generations, and now, you can crochet your own version to keep, gift, or even sell.
The Crochet Ninja Turtles – Pattern is a unique project that lets you work on amigurumi techniques while crafting a set of playful, character-rich figures. Their colorful masks, little shells, and expressive eyes bring joy to kids and adults alike. These crochet turtles are also ideal for handmade gifts, bedroom decor, or themed party accessories. With just a few materials and some basic stitches, you can recreate each turtle’s signature style, personality, and charm.
This article will guide you through everything you need to know to create your own Crochet Ninja Turtles – Pattern project. We’ll cover the best materials, how to approach each character, assembly tips, and creative ways to use or display your finished turtles. Plus, you’ll find a detailed FAQ and a summary at the end to help you confidently bring these childhood heroes to life through crochet.
1. Getting Started with the Crochet Ninja Turtles – Pattern
Before diving into the stitches, let’s explore why the Crochet Ninja Turtles – Pattern has become so popular among crafters. The project blends simple crochet techniques with character design, offering a fun and rewarding result. Each turtle may look similar in shape, but their distinctive mask colors and accessories help you differentiate and personalize them.
To begin your project, you’ll need some basic crochet supplies: worsted weight yarn in green (for the body), brown (for the shell), and the four signature mask colors—blue for Leonardo, red for Raphael, orange for Michelangelo, and purple for Donatello. You’ll also want white and black yarn or safety eyes for their faces, along with a small amount of stuffing material like polyester fiberfill.
The typical stitch used in this pattern is the single crochet (sc), especially when working in the round. Most Crochet Ninja Turtles – Pattern designs start with a magic ring for the head and body, followed by increases and decreases to shape the limbs, head, and torso. It’s a great introduction to amigurumi (the Japanese art of crocheting small stuffed toys).
Don’t be intimidated if you’ve never made a toy before. While the project may look complex, each turtle is constructed from simple shapes: cylinders for the limbs, ovals for the shell, and spheres for the head and body. Assembling the pieces with a yarn needle and a bit of patience brings the character to life.
Working on one turtle at a time is the best approach. Start with your favorite and use it as a guide when making the others. Once you complete one, the others will come together more easily because the basic structure remains the same.
Finally, take your time. The beauty of handmade crafts is the love and effort put into each stitch. The Crochet Ninja Turtles – Pattern isn’t just a project—it’s a journey that lets you relive childhood memories while practicing your skills.
2. Materials and Tools Needed
Creating your own Crochet Ninja Turtles – Pattern project doesn’t require expensive supplies, but choosing the right materials can make a big difference in the final look and durability of your turtles. Let’s break down everything you’ll need before you start crocheting.
Yarn: Opt for a soft, worsted weight acrylic or cotton yarn. You’ll need green for the body and limbs, brown for the shell and belt, and individual colors for each turtle’s mask—blue, red, purple, and orange. Acrylic yarn works well for toys because it’s washable and durable.
Crochet Hook: A 3.5 mm or 4.0 mm hook is usually recommended for amigurumi. Smaller hooks help create tighter stitches, which is essential to keep the stuffing from showing through.
Stuffing: Use polyester fiberfill or other soft stuffing material to give shape and volume to your turtles. Be sure to stuff each part firmly but not so much that the stitches stretch out.
Eyes and Details: You can use safety eyes for a polished look, or stitch eyes with black and white yarn or felt. Embroidering the mouth and facial expressions adds personality. Don’t forget small embellishments like a tiny felt weapon or belt detail to match each character.
Sewing Tools: A yarn needle, stitch markers, and scissors are must-haves. Stitch markers are especially helpful when working in the round to keep track of your starting point.
Optional Accessories: If you’re feeling extra creative, you can add custom weapons (crocheted or felt) for each turtle—swords for Leonardo, nunchucks for Michelangelo, a bo staff for Donatello, and sais for Raphael.
Before you begin, organize your tools in a project bag or box. Keeping everything in one place helps avoid lost parts and makes the crafting process more enjoyable.
3. How to Make Each Ninja Turtle
Each character in the Crochet Ninja Turtles – Pattern has its own personality, which you can bring out through color, facial expression, and accessories. Let’s go over how to make each turtle and customize them to be recognizable and fun.
Leonardo: Start with your green yarn to crochet the basic body and head. Use blue yarn to create his mask—this can be done with a small band stitched across the face. Embroider or add a small felt sword to his back to complete his look. Leonardo is the leader, so consider giving him a serious expression.
Michelangelo: Use orange yarn for Mikey’s mask. He’s the fun-loving, pizza-loving member of the team. Add a wide, friendly smile and a small crocheted or felt pizza slice as an accessory. His nunchucks can be made with small crochet chains or thin cords tied to look like handles.
Donatello: Known as the tech-savvy turtle, Donnie wears a purple mask. Add a soft, thoughtful expression to reflect his personality. You can make his bo staff from a thin wooden dowel wrapped in brown yarn or use a simple crochet chain.
Raphael: With his red mask and fierce attitude, Raph is usually shown with a bold expression or frown. Create his sais using felt or stitched designs, and consider making his eyebrows more expressive with black yarn.
Assembly: Each turtle is built from parts: head, body, arms, legs, shell, and mask. Assemble them using a yarn needle and strong thread. Take time to align the limbs evenly and stitch the mask carefully for a clean look.
Final Touches: Once all four turtles are complete, you can display them together or gift them as a set. Consider adding tags with their names or traits to make the set even more engaging.
4. Creative Uses and Display Ideas
Once your Crochet Ninja Turtles – Pattern is complete, there are plenty of fun and practical ways to use or display your handmade heroes. Whether you’re making them for yourself or as a gift, these turtles are bound to bring smiles.
Toys for Kids: These soft, durable crochet turtles are perfect for children’s playtime. They’re small enough to carry around and safe to use, especially if you opt for embroidered features instead of safety eyes.
Themed Decorations: Use them as part of a Teenage Mutant Ninja Turtles-themed bedroom, party setup, or even as unique Christmas ornaments. Hang them using a loop of yarn or place them around a themed cake.
Gift Sets: A full set of four makes a wonderful handmade gift. Pack them in a box with shredded paper, add name tags, and include a handmade card for a thoughtful birthday or holiday surprise.
Collectibles for Fans: Adults who grew up with the Ninja Turtles will appreciate a set of crocheted versions for their office, bookshelf, or craft room. It’s a nostalgic piece of décor that brings personality to any space.
Craft Fairs or Etsy Shops: If you’re looking to sell handmade items, these turtles are highly marketable. Be sure to check character licensing and pattern usage rights before selling, but fan art and character-inspired designs are often allowed in small quantities.
Educational Crafts: This project is also ideal for teaching kids to crochet. Start with the body and let them help with stuffing, assembling, or even stitching simple accessories.
FAQ – Crochet Ninja Turtles – Pattern
1. Is the Crochet Ninja Turtles – Pattern suitable for beginners?
Yes! While the project uses basic amigurumi techniques, beginners can follow along by taking their time and practicing each part. Clear instructions and videos are helpful resources.
2. How long does it take to make one turtle?
Depending on your skill level, one turtle can take 4–6 hours to complete. As you become more familiar with the pattern, the process speeds up.
3. What size are the finished turtles?
Most patterns produce turtles that are 6 to 8 inches tall, but you can scale up or down by adjusting the yarn weight and hook size.
4. Can I sell the turtles I make?
In most cases, yes—especially if the pattern is free or permits commercial use. Always check the pattern’s licensing terms and avoid using official logos or copyrighted branding.
5. What is the best yarn to use?
Worsted weight acrylic or cotton yarn is ideal for durability and structure. Cotton gives a tighter, neater finish, while acrylic is softer and easier to find.
6. How do I clean the finished turtles?
Spot clean with a damp cloth or hand wash gently with mild soap. Avoid machine washing to preserve the shape and stitching.
Conclusion
The Crochet Ninja Turtles – Pattern is a fun, nostalgic, and rewarding project that combines the world of handmade crafts with beloved pop culture icons. Whether you’re making them for kids, collectors, or yourself, each turtle you create brings a smile and a sense of accomplishment.
In this guide, we explored how to get started, the materials you’ll need, tips for making each turtle, and creative display ideas. These lovable heroes in a half shell are a perfect blend of creativity, character, and crochet.
If you’ve tried this pattern or have your own tips, we’d love to hear from you! Share your honest feedback, suggestions, or turtle photos in the comments. Cowabunga, and happy crocheting!