3D Crochet Butterfly – Tutorial: If you have been searching for a delightful, creative, and rewarding crafting project, this step-by-step guide is exactly what you need to elevate your fiber art skills. Bring a touch of nature indoors with a stunning, textured project that leaps off the fabric, capturing the whimsical beauty of a real insect in vibrant yarn. Whether you are a seasoned crafter looking to expand your repertoire or a dedicated beginner eager to master new techniques, learning how to create a 3D crochet butterfly will add a magical, multi-dimensional element to your handmade collection.
Crochet has evolved far beyond flat granny squares and basic blankets, opening up a world of structural, sculptural art that breathes life into everyday yarn. The beauty of a 3D crochet butterfly lies in its incredible versatility, as these little creatures can be used to embellish sunhats, decorate nursery walls, or even be transformed into gorgeous brooches and hair accessories. This comprehensive tutorial is designed to walk you through the entire process, ensuring your stitches are crisp, your tension is perfect, and your final piece holds its shape beautifully.
By focusing on a dedicated 3D crochet butterfly – tutorial, you are not just following a pattern; you are mastering the art of layer building, strategic increases, and structural stitching. Throughout this guide, we will explore the best materials to use, the fundamental stitches required, and the secret techniques that give the wings their signature lifelike lift. Grab your favorite yarn, choose a hook that matches your gauge, and let’s dive into this wonderful crafting journey together.
1. Choosing the Right Materials for Your 3D Crochet Butterfly
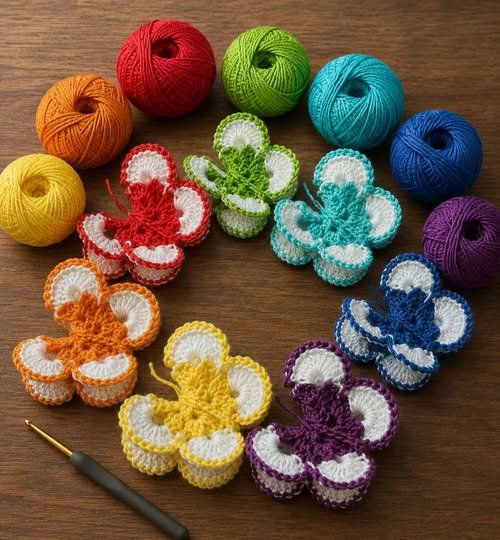
Selecting the perfect yarn is the critical first step in ensuring your 3D crochet butterfly looks vibrant, holds its unique shape, and stands the test of time. For a crisp, highly defined look, mercerized cotton yarn is highly recommended by experts because it offers a beautiful sheen and excellent structural integrity. If you prefer a softer, fluffier texture, a high-quality acrylic yarn or a blend can also work wonderfully, especially for decorative applications on clothing.
The weight of your yarn will directly dictate the final size of your project, allowing you to customize your butterfly for different uses. A sport weight or fingering weight yarn is ideal for delicate, intricate lace-like butterflies that look stunning on jewelry or hairpins. On the other hand, choosing a worsted weight yarn will yield a larger, sturdier butterfly that is perfect for blanket appliques, bunting, or standalone home decor.
Matching your yarn with the correct crochet hook size is equally vital for achieving the desired multi-dimensional effect. For 3D projects, it is generally wise to use a hook that is slightly smaller than what the yarn label suggests to ensure tight, firm stitches. This intentional tension adjustment prevents the stuffing or structural layers from collapsing, keeping the wings perfectly upright and perky.
Do not forget about the small but essential notions that make the crafting process much smoother and more enjoyable. You will need a sharp pair of craft scissors, a sturdy tapestry needle for weaving in loose ends, and a few stitch markers to keep track of your rounds. Having these tools ready by your side will keep your workflow organized and prevent any frustrating mistakes.
Color selection is where your personal creativity can truly shine, allowing you to mimic real-world species or invent your own fantasy creatures. Consider using variegated yarn to create effortless color transitions across the wings without needing to constantly join new threads. Alternatively, selecting high-contrast solid colors for the inner and outer borders will make the intricate stitches pop beautifully under any light.
Finally, if you want your finished piece to have an extra level of rigidity, consider looking into fabric stiffening spray or a simple water-and-glue solution. While a well-crafted pattern naturally holds its form, a light misting of stiffener can ensure the wings never droop, even after years of display. Taking the time to gather these premium supplies sets a solid foundation for a flawless crafting experience.
2. Master the Essential Stitches and Anatomy of the Pattern
Before diving into the core loop of our 3D crochet butterfly – tutorial, it is essential to familiarize yourself with the foundational stitches required. You will need a solid grasp of the chain stitch (ch), single crochet (sc), and the incredibly versatile double crochet (dc). Advanced definition in the wing tips is achieved using the treble crochet (tr), which adds the necessary height and elegant flare to the upper wings.
Understanding how to work in a magic ring (also known as a magic circle) is the secret to starting your project with a perfectly seamless center. This technique allows you to pull the initial loop completely tight, ensuring there is no unsightly hole in the middle of your butterfly’s body. If you struggle with the magic ring, a traditional alternative is chaining four and joining with a slip stitch (sl st) to form a small working ring.
The anatomy of a 3D crochet butterfly is typically worked from the inside out, starting with a flat, circular flower-like shape that is later folded. This ingenious design method uses strategic clusters of stitches separated by chain spaces to create natural hinge points for the wings. By manipulating where the stitches sit, you create a built-in architectural fold that naturally forces the wings forward into a gorgeous three-dimensional perspective.
Tension control plays a massive role in how successfully your stitches transition from flat elements into structural, lifelike shapes. If your stitches are too loose, the wings will lack the stamina to stay upright and may flop backward limply. Focus on maintaining an even, firm pull on your working yarn, ensuring each loop sits snugly around the shaft of your hook rather than the tip.
Another critical technique featured in this crochet tutorial is the picot stitch, which is used to create the delicate, pointed tips on the outer edges of the wings. This simple combination of three chains joined back into the base adds a professional, polished finish to your fiber art. It breaks up the rounded edges of standard stitches, perfectly mimicking the sharp, elegant geometry found in real nature.
Lastly, you will learn how to create a defined butterfly body and antennae using a contrast color to tie the whole project together. The body is usually formed by a long chain wrapped around the folded wings and secured with a neat knot or a series of tight slip stitches. Embracing these structural nuances transforms a simple piece of fabric into a stunning, lifelike sculpture you can be proud of.
3. Step-by-Step Guide to Crafting the Multi-Dimensional Wings
To begin the actual construction phase of your 3D crochet butterfly, create your magic ring and secure it with a single chain stitch. Inside this loop, you will work a series of eight clusters, each consisting of two double crochets followed by two chains. Once all eight clusters are complete, pull the tail of your magic ring firmly to close the center hole, and join with a slip stitch to the top of your first chain.
For the second round, slip stitch your way into the first two-chain space, which serves as the foundation for your expanding wing structure. In each chain space around the circle, you will work a shell pattern consisting of two double crochets, two chains, and two more double crochets. This round expands the circle significantly, creating the deep valleys and high peaks that will eventually form the separate wing segments.
The third round is where the true magic happens, as you transition to larger stitches to give the upper wings their majestic, sweeping appearance. In the first shell space, work a grand total of eight or nine double crochets to create a lush, rounded petal. To add dynamic contrast, you can alternate between double crochets for the lower wings and treble crochets for the prominent upper wings.
Once you finish filling all the shell spaces with these heavy stitch clusters, your project will resemble a dense, beautiful eight-petaled flower. Cut your working yarn, leaving a moderate tail for weaving, and carefully finish off the edge with an invisible join for a flawless look. Take a moment to weave in your starting tails using a tapestry needle so they are completely hidden within the dense stitches.
Now comes the breathtaking transformation: take the flat flower shape and fold it exactly in half, ensuring the petals line up perfectly in pairs. Instantly, the flat fabric shifts, and a gorgeous, layered 3D crochet butterfly appears right before your eyes, boasting two distinct sets of front and back wings. The natural tension of the stacked stitches forces the wings to flare outward, giving the piece its signature depth.
To lock this beautiful shape into place permanently, take a contrasting strand of yarn or a pipe cleaner to form the central body. Wrap this strand tightly around the center crease between the folded wings, tying a secure double knot at the very top. Leave two short, even ends sticking out from the knot, trimming them neatly to serve as the adorable, perky antennae of your finished butterfly.
4. Creative Ways to Use, Embellish, and Display Your Artwork
Now that you have successfully completed your first piece using this 3D crochet butterfly – tutorial, it is time to explore the endless possibilities for display. These dimensional creatures make outstanding additions to handmade home decor, especially when attached to a rustic piece of driftwood or arranged inside a shadow box frame. Stacking multiple butterflies in a gradient of sizes creates a stunning feature wall that instantly draws the eye and sparks conversation.
If you enjoy wearable art, these butterflies can easily be converted into eye-catching fashion accessories with just a tiny dab of hot glue or a few careful stitches. Sew a metal hair clip or a safety pin to the flat underside of the butterfly body to create custom hairpieces, brooches, or hat decorations. Because they are lightweight, they sit comfortably on delicate fabrics without causing any unwanted sagging or pulling.
For those who love gifting, a 3D crochet butterfly serves as an unforgettable embellishment on gift wrap, replacing traditional plastic bows with a reusable keepsake. You can attach them to greeting cards, loop them around the neck of a wine bottle, or hang them from handmade bookmarks. Receivers will appreciate the extra time and love poured into crafting a unique, textile ornament just for them.
You can also take your projects a step further by experimenting with mixed-media embellishments to add a bit of sparkle and glamor. Consider sewing tiny seed beads along the spine of the butterfly body, or weaving a metallic thread alongside your main yarn during the final border round. Adding small rhinestones to the wing tips reflects light beautifully, giving your handmade insects an enchanting, fairytale quality.
Another incredible application is creating a whimsical nursery mobile by suspending several colorful butterflies from a wooden embroidery hoop using clear nylon fishing line. As the light breezes move through the room, the three-dimensional wings will gently spin and float, creating a soothing visual display for a newborn baby. The tactile nature of the crochet fabric adds warmth and comfort to the overall nursery aesthetic.
Finally, do not hesitate to scale this pattern up or down by experimenting with drastically different yarn weights and materials. Imagine using a giant t-shirt yarn and a massive hook to create a statement throw pillow shape, or ultra-fine thread to craft a pair of delicate dangles for earrings. The creative journey does not end with one tutorial; it is simply the gateway to exploring your unique artistic voice.
FAQ – Frequently Asked Questions
What is the best yarn weight to use for a 3D crochet butterfly?
The best yarn weight depends entirely on your intended final project. For small, intricate, and highly detailed butterflies used in jewelry or hair accessories, a fingering or sport weight cotton yarn is ideal. For general appliques, home decor, or blankets, a standard worsted weight yarn (Category 4) offers the perfect balance of ease of use and structural stability.
How do I make sure the butterfly wings stay upright and don’t flop?
To keep the wings perfectly upright, ensure you are using a crochet hook size that is one or two sizes smaller than recommended on the yarn label. This creates tight, dense stitches that naturally support their own weight. Additionally, you can apply a commercial fabric stiffener spray or a mixture of washable school glue and water to the finished piece to lock the shape into place.
Is this 3D crochet butterfly tutorial suitable for absolute beginners?
Yes, this project is highly accessible for adventurous beginners who already know the basic stitches like the chain, single crochet, and double crochet. The pattern uses clever folding techniques rather than overly complex stitching to achieve its multi-dimensional look. Following a detailed step-by-step tutorial makes the process incredibly straightforward and rewarding.
Can I wash items that have these 3D butterflies attached to them?
If your butterfly is made from cotton or acrylic yarn, it is generally safe to wash, but hand washing in cold water is highly recommended to preserve the 3D shape. Avoid wringing out the piece; instead, gently press the water out with a towel, reshape the wings while damp, and lay it flat to air dry completely.
How do I attach the finished butterfly to other crochet projects like blankets?
You can easily attach the butterfly by using a tapestry needle and a strand of matching yarn to sew along the center line of the butterfly’s body onto your main fabric. Leave the wings completely free and unsewn so they can continue to float and stand out away from the flat surface, maintaining the beautiful 3D effect.
Conclusion
In this 3D crochet butterfly – tutorial, we have explored everything from selecting the ideal mercerized cotton yarn and choosing the perfect hook size, to mastering structural stitches and assembling the final layered piece. By turning a simple, flat flower layout into a folded, dynamic sculpture, you have unlocked a beautiful technique that can be applied to countless future fiber art projects.
These whimsical creations open up a world of design possibilities, whether you use them to brighten up a nursery, accessorize your wardrobe, or give a heartfelt, handmade gift to someone special.