Ankh hand fan Crochet – Tutorial: Creating your own hand-woven accessory is one of the most rewarding projects you can undertake, combining historical symbolism with modern, practical artistry. The Ankh hand fan Crochet – Tutorial offers a unique opportunity to craft an elegant, functional piece that stands out both for its visual beauty and its deep cultural resonance. Whether you are looking to stay cool during warm summer days, adding a dramatic flair to a costume, or searching for a distinctive handmade gift, this guide will walk you through every single step of the process.
Crochet enthusiasts are constantly seeking patterns that offer a perfect balance of challenge and utility, and this project delivers exactly that. By blending traditional crochet stitches with the iconic shape of the Egyptian Ankh symbol, you create an item that is simultaneously a piece of art and a usable tool. Hand fans have been used for centuries across various cultures, but giving them a personalized, textured twist using yarn elevates the entire concept into something deeply special and contemporary.
In this comprehensive guide, we will explore everything from selecting the ideal materials to mastering the specific shaping techniques required for this design. You do not need to be a master crafter to succeed, as we have broken down the entire layout into manageable segments. Prepare your hooks, select your favorite yarn colors, and let us dive deep into this wonderful journey of turning simple thread into a stunning, structured masterpiece.
1. Understanding the Significance of the Ankh Design in Fiber Arts
The Ankh symbol, often referred to as the key of life, represents eternal existence, vitality, and spiritual balance in ancient Egyptian culture. When you incorporate this powerful emblem into an Ankh hand fan Crochet – Tutorial, you are doing more than just making a cooling accessory; you are weaving history into your craft. The loop at the top and the crossbars below provide an excellent structural framework that translates beautifully into openwork lace and solid crochet stitches.
Using historical iconography in modern fiber arts allows crafters to connect with ancient storytelling while practicing their favorite hobby. This specific design requires a thoughtful approach to symmetry, ensuring that the central Ankh motif remains distinct, legible, and balanced against the wider fan shape. It serves as a fantastic conversation starter whenever you pull it out of your bag on a warm afternoon.
To achieve the best visual results, it is highly recommended to use contrasting colors or highly defined threads that make the central design pop. Solid colors like deep gold, royal blue, or classic black work wonderfully to highlight the intricate stitch definition of the symbol. As you work through the foundation rows, you will watch this ancient key slowly emerge from a simple chain of loops.
Structuring a fan around a specific geometric symbol requires careful counting of your stitch patterns to avoid warping the final piece. Every single increase and decrease serves a dual purpose: they build the physical dimensions of the fan while mapping out the negative space that defines the Ankh silhouette. This dual focus makes the project incredibly engaging for mind and hands alike.
Furthermore, integrating cultural motifs into functional items helps keep traditional art forms alive and relevant for younger generations of makers. It challenges the crafter to think about how lines, spaces, and textures interact outside of standard flat blankets or garments. The resulting texture is rigid enough to move air effectively while remaining soft to the touch.
As we progress through the actual stitching phases, keeping a close eye on your tension will ensure the symbol does not distort when stretched over the frame. A consistent gauge is your best friend when working on pieces that require precise symmetry and architectural integrity. Let your appreciation for history inspire every movement of your crochet hook.
2. Choosing the Best Materials for Stability and Longevity
Selecting the right supplies is a critical phase of the Ankh hand fan Crochet – Tutorial, as the functionality of your fan depends entirely on the drape and stiffness of the finished fabric. For functional hand fans, a standard soft acrylic yarn is usually too stretchy and lightweight to move air efficiently. Instead, opting for a high-quality mercerized cotton yarn or a sturdy linen blend will give your project the crisp stitch definition and structural integrity it truly needs.
The weight of the thread or yarn also plays an enormous role in how delicate or robust the final fan will turn out. A size 10 crochet thread creates an incredibly intricate, lace-like heirloom piece, while a sport weight or fingering weight yarn works up much faster and offers a bolder, more modern look. Whichever you choose, ensure your hook size matches tightly to keep the stitches firm and secure.
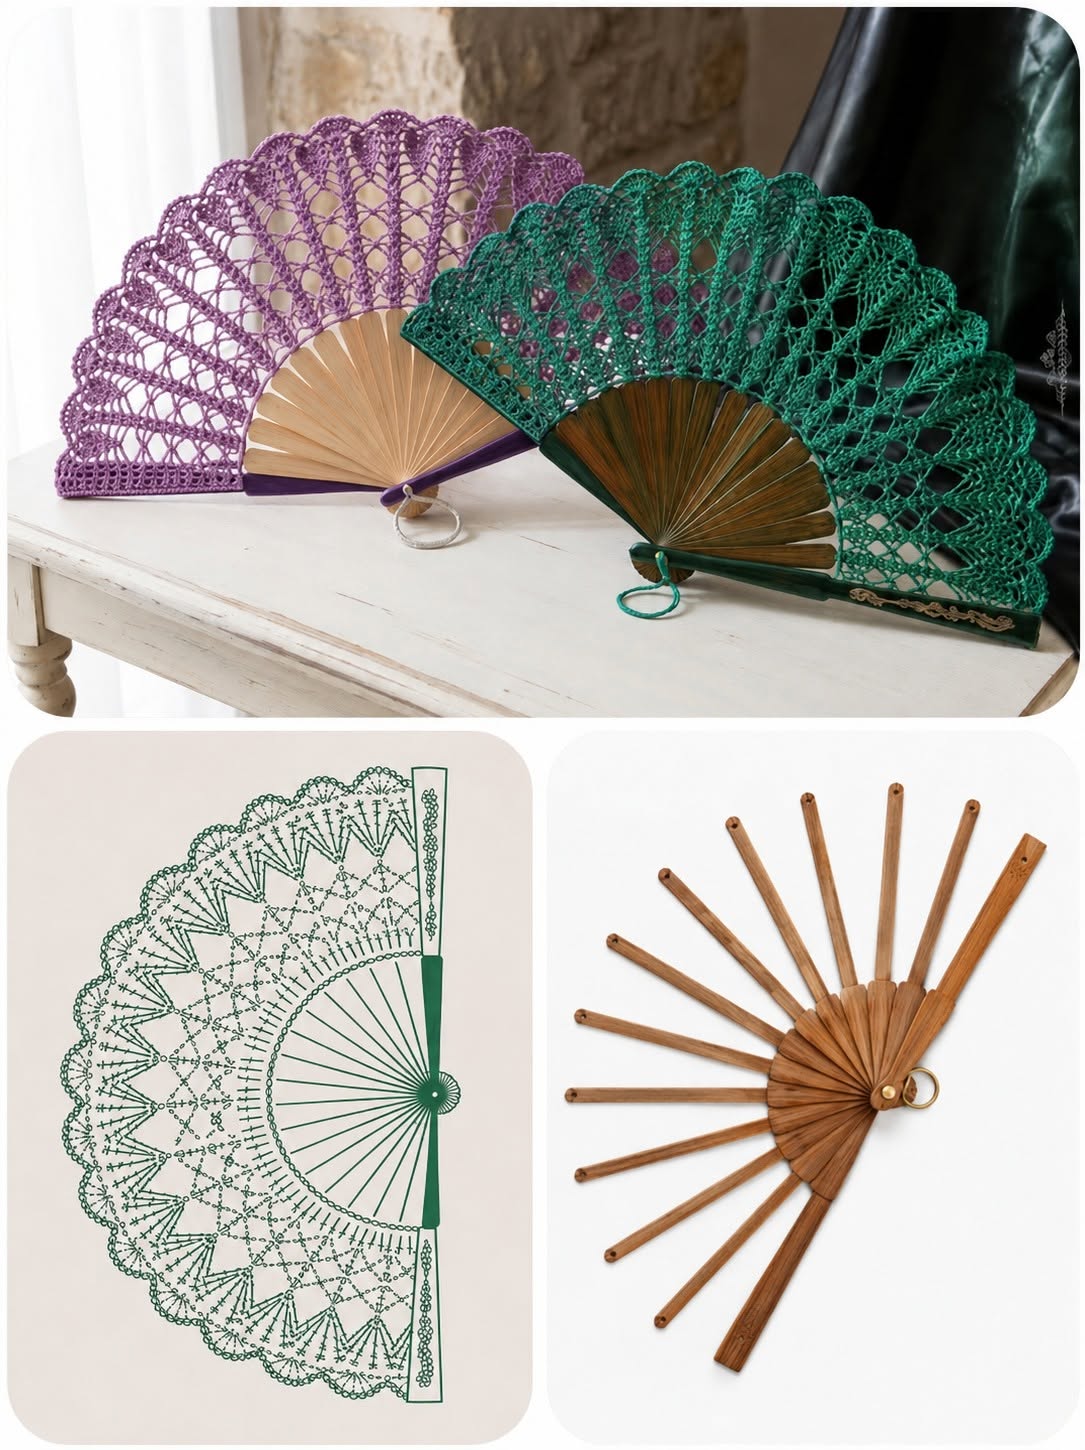
Beyond the yarn itself, you will need to consider the physical frame or ribs that will support your gorgeous crochet work. You can upcycle the plastic or wooden ribs from an old, broken fan, purchase blank bamboo fan sticks online, or even craft a custom support using sturdy wire. The choice of support will dictate how you attach your finished textile piece at the very end of the process.
Do not forget the essential secondary tools that make the crafting experience smooth, such as sharp scissors, a tapestry needle for weaving in ends, and stitch markers. Stitch markers are absolutely indispensable for this project, as they will help you mark the exact center of your Ankh symbol and the points where your fan sections begin to flare outward. Having these tools ready saves time and prevents frustrating counting mistakes.
Blocking supplies are another secret weapon for achieving professional-looking results with this specific handmade accessory. A blocking mat, stainless steel rust-proof pins, and a fabric stiffening spray or traditional starch will help lock the cotton fibers into place, ensuring the fan keeps its shape permanently. This starching process is what transforms a floppy piece of crochet into a fully functional, breeze-generating tool.
Take your time when browsing colors and textures at your local craft store or online shop before beginning. Investing in high-quality materials ensures that your hard work will resist wear and tear, maintaining its beauty through years of use. Once your materials are neatly organized on your workspace, you are completely ready to begin the construction phase.
3. Step-by-Step Stitch Guide and Pattern Construction
To begin the actual construction of your masterpiece, you will start by creating the base handle or attaching your yarn directly to the fan ribs. In this Ankh hand fan Crochet – Tutorial, we recommend starting from the inner center and working outward in radiating rows to form the classic semi-circle fan shape. Start with a secure slip knot and create a foundation chain that matches the width of your chosen fan base pivot point.
The first few rows will establish the base of the Ankh stem using solid single crochet or double crochet stitches to ensure maximum stability near the handle. As you move upward, you will begin incorporating chain spaces to create the open lattice work that outlines the iconic crossbars of the symbol. Precision is key during these initial rows, so count your stitches carefully at the end of every single pass.
Once the stem and horizontal bars are established, you will transition into the gorgeous loop section of the symbol, which requires strategic crochet increases. By placing multiple stitches into a single loop from the previous row, the fabric will naturally begin to fan out into a smooth, elegant curve. This creates the expansive body of the hand fan that will eventually catch and move the air.
For the outer border of the fan, you can choose to keep it simple with clean rows of solid stitching, or add an elegant picot border for a vintage look. The outer edges should be worked with a slightly tighter tension to prevent curling or unwanted ruffling when the fan is fully opened. Ensure that the total stitch count aligns perfectly with the number of support ribs on your frame.
If you encounter any mistakes or notice that your symbol looks asymmetrical, do not be afraid to frog, or rip out, a row to fix it. Because this pattern relies heavily on geometric balance, a single misplaced chain space can shift the entire design off-center in subsequent rows. Patience during the construction phase rewards you with a flawless finished product you can be proud of.
When the final row is complete, fasten off your yarn leaving a long tail, which you will use later for sewing the piece onto the frame. Weave in all remaining loose ends securely using your tapestry needle so they remain hidden from view on both sides. Your raw crochet fabric is now completely finished and ready for the final assembly and finishing steps.
4. Assembling, Stiffening, and Caring for Your Finished Hand Fan
The final phase of the Ankh hand fan Crochet – Tutorial involves joining your beautiful textile art to its structural frame and applying finishing touches. Lay your completed crochet piece flat on your blocking mat and pin it gently into the exact shape of your fan frame to check the alignment. Spray the fabric thoroughly with your chosen fabric stiffener or starch solution while it is pinned down, allowing it to dry completely.
Once the stiffened fabric is dry to the touch, align the central axis of the Ankh motif with the center rib of your fan handle. Using the long yarn tail you saved and your tapestry needle, carefully sew the edges and key points of the crochet work to the wooden or plastic ribs. Ensure the tension is even across all sections so the fan opens and closes smoothly without bunching.
For an extra touch of luxury, you can add decorative embellishments to the base of the handle, such as a handmade yarn tassel or beautiful beads. These small details complement the Egyptian theme beautifully and give the project a high-end, boutique-quality finish. Inspect the entire piece one last time to ensure all attachment points are strong and securely knotted.
Caring for your handmade fan is simple but requires a gentle touch to maintain its shape and stiffness over time. Keep it stored in a cool, dry place when not in use, preferably inside a protective fabric pouch or sleeve to shield it from dust. Avoid exposing the fan to moisture or heavy rain, as water will soften the starch and cause the fabric to lose its rigidity.
If your fan ever loses its crispness after extensive use on hot days, you can easily restore it with a quick maintenance session. Simply lay it flat, shield the handle ribs with a small cloth, and apply a light fresh coat of spray starch before letting it air dry. This easy process snaps the cotton fibers back into their original firm configuration instantly.
Handcrafted items carry a unique charm that mass-produced plastic alternatives simply can never replicate. By completing this project, you have successfully combined ancient symbolism, functional engineering, and modern textile artistry into a single gorgeous object. Enjoy the cool breeze and the compliments you will surely receive every time you display your stunning creation.
Frequently Asked Questions (FAQ)
What type of yarn is best for a crochet hand fan?
The absolute best choice is a non-elastic fiber like mercerized cotton or linen, ideally in a lace or fingering weight. These fibers offer exceptional stitch definition, do not stretch out of shape easily, and absorb fabric stiffeners beautifully compared to synthetic acrylic yarns.
Do I really need to use a fabric stiffener for this project?
Yes, using a fabric stiffener or heavy laundry starch is highly recommended if you intend to use the fan for cooling. Without it, the crochet fabric will remain too soft and flexible to push air effectively when you wave it.
Can a beginner complete this Ankh hand fan tutorial?
This project is best suited for advanced beginners or intermediate crocheters. While it uses foundational stitches like single and double crochets, the pattern requires precise counting, working with thin thread, and maintaining consistent tension to keep the design symmetrical.
How do I attach the finished crochet piece to a wooden frame?
You can securely attach the finished piece by using a tapestry needle and matching yarn to sew the fabric directly through the pre-drilled holes in the fan ribs. Alternatively, clear-drying, strong craft glue can be used carefully along the length of each rib.
How long does it take to complete the entire fan?
Depending on your personal crocheting speed and the thickness of the thread you choose, the stitching takes roughly 4 to 8 hours. You should also account for an additional 12 to 24 hours for the starch or stiffening spray to dry completely.
Conclusion
In this comprehensive Ankh hand fan Crochet – Tutorial, we have journeyed through the rich cultural history of the iconic Ankh symbol and explored how to bring it to life using modern fiber arts.
We discussed the vital importance of choosing rigid, high-quality materials like mercerized cotton, mastered the step-by-step construction of the radiating fan pattern, and learned how to properly assemble, stiffen, and preserve the finished piece for long-term use. This project beautifully demonstrates how traditional crafting techniques can create highly functional, stunningly artistic everyday accessories.