The Bag with Crochet Kitten Square – Tutorial is your ultimate guide to creating a functional piece of art that combines the charm of feline motifs with the practicality of a daily accessory. If you are looking to express your personality through your wardrobe, learning how to assemble a Bag with Crochet Kitten Square is the perfect weekend project. This Tutorial is designed to take you through the process of making adorable crochet kitty patterns and transforming them into a high-quality handmade accessory that is both durable and stylish.
Whether you are a seasoned crafter or just picking up your hook, this Bag with Crochet Kitten Square – Tutorial offers a detailed breakdown of the techniques required to master the kitten granny square. Working on a crochet bag project allows for immense creativity, especially when you play with color palettes and yarn textures. By following this guide, you will gain the confidence to create a personalized crochet gift or a stunning addition to your own collection of boho-style bags.
Focusing on a Bag with Crochet Kitten Square – Tutorial ensures that you are following a structured path toward a professional finish. We will emphasize stitch consistency, seamless joining methods, and sturdy handle construction to ensure your bag stands the test of time. As you progress through this step-by-step crochet guide, you will discover how a simple yarn and hook combination can turn into a sophisticated crochet kitten tote that garners compliments wherever you go.
1. Mastering the Foundation of the Bag with Crochet Kitten Square – Tutorial
Starting your Bag with Crochet Kitten Square – Tutorial requires a solid understanding of the granny square technique. The kitten square is a variation of the classic motif where the center features a cute cat face silhouette. You will need to master the magic ring and basic stitches like the double crochet and half double crochet to create the circular base that eventually transforms into the kitten’s head and ears.
Selection of materials is the next vital step in this Bag with Crochet Kitten Square – Tutorial. For a bag that holds its shape, choosing 100% cotton yarn or a sturdy acrylic blend is highly recommended. Using a 4mm crochet hook usually provides the right tension for a tight stitch, preventing items from falling through the holes of your crochet kitten bag.
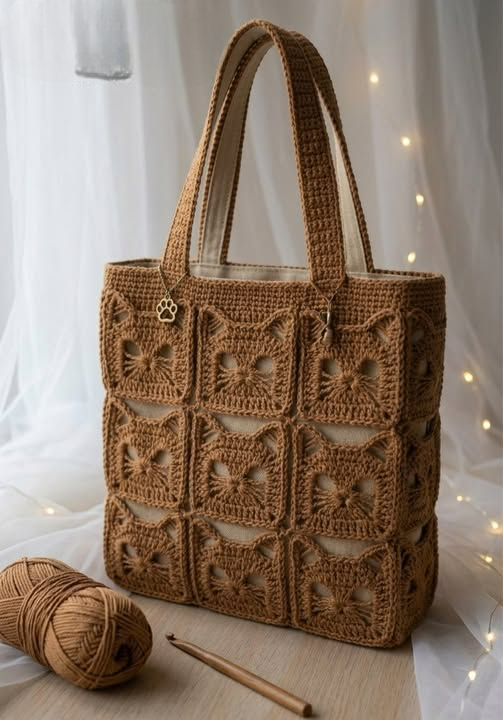
The aesthetic appeal of your handmade bag depends on your color coordination. Many crafters following this Bag with Crochet Kitten Square – Tutorial prefer neutral tones for the kitten, such as white, grey, or ginger, paired with a vibrant contrasting background. This makes the feline motif pop and gives the crochet square a modern, graphic look that fits well with contemporary fashion trends.
Detailing the kitten’s face is where your crochet skills truly shine. Use embroidery techniques or safety eyes to give your kitten a unique expression. In this tutorial, we suggest using satin stitches for the nose and simple straight stitches for the whiskers to keep the design clean and professional, ensuring your crochet kitten pattern looks high-end.
Blocking your squares is a step often skipped, but essential in this Bag with Crochet Kitten Square – Tutorial. To ensure your crochet bag has a square, even shape, you should pin your finished kitten motifs to a blocking board and lightly steam them. This relaxes the fibers and ensures that all your crochet squares are the exact same size before you begin the assembly process.
Understanding the layout is the final part of the foundation. A standard crochet tote bag usually requires about 13 to 15 kitten granny squares depending on the desired size. Planning your bag layout on a flat surface allows you to visualize the final product of this Bag with Crochet Kitten Square – Tutorial before committing to the final joining stitches.
2. Advanced Joining Techniques for a Seamless Crochet Bag
The second phase of our Bag with Crochet Kitten Square – Tutorial focuses on the invisible join and the slip stitch join. How you connect your squares determines the overall “flow” of the crochet accessory. An invisible seam creates a flat, smooth surface, while a raised slip stitch join adds a textured, braided look to the edges of your kitten squares, enhancing the boho-chic vibe.
Durability is key when joining the pieces of your Bag with Crochet Kitten Square. Since bags carry weight, using a whip stitch with a tapestry needle provides a very strong bond between the yarn fibers. This tutorial emphasizes reinforcing the corners of each kitten square, as these are the points that experience the most stress when the bag is filled with your essentials.
In this Bag with Crochet Kitten Square – Tutorial, we also explore the continuous join-as-you-go method. This technique is popular among intermediate crocheters because it reduces the number of ends you have to weave in later. By joining the crochet kitten motifs as you work the final round, you create a more cohesive and structurally sound handmade tote that looks incredibly professional.
Alignment is crucial for the cat face design. When joining, make sure all your kitten squares are facing the same direction, or alternate them for a whimsical, patterned effect. This Bag with Crochet Kitten Square – Tutorial encourages checking the alignment every three squares to ensure the bag’s geometry remains perfect and the feline details are perfectly centered.
Once the main panels are joined, you will work on the side gussets. Adding a side panel made of simple single crochet stitches provides depth to your crochet kitten bag. This step in the tutorial ensures that your bag isn’t just a flat envelope but a spacious functional accessory capable of carrying your phone, wallet, and a small notebook.
Finally, we address the bottom of the bag. For the Bag with Crochet Kitten Square – Tutorial, we recommend a double-layered bottom or a reinforced crochet base. This prevents the bag from sagging when heavy items are placed inside, maintaining the integrity of the kitten square design and ensuring the longevity of your handcrafted crochet project.
3. Crafting Ergonomic Handles and Adding Final Flourishes
No Bag with Crochet Kitten Square – Tutorial is complete without discussing the handles. Crochet handles tend to stretch over time, so we recommend the i-cord technique or thermal stitch handles. These methods create a thick, sturdy strap that is comfortable on the shoulder and resistant to the “stretching effect” common in crochet handbags.
Attachment points are the focus of this section of the Bag with Crochet Kitten Square – Tutorial. You should attach your straps at least two inches down into the body of the bag rather than just at the top edge. Using sturdy yarn and a cross-stitch reinforcement ensures that the weight of the bag is distributed evenly across the crochet kitten squares.
Adding a lining is a “pro-tip” included in this tutorial. While not strictly crochet, sewing a cotton fabric lining inside your Bag with Crochet Kitten Square takes it to a commercial quality level. A lining protects the delicate crochet stitches from sharp objects like keys and provides an opportunity to add internal pockets for better organization.
For the Bag with Crochet Kitten Square – Tutorial, we also suggest incorporating a closure system. Whether you prefer a magnetic snap, a zipper, or a simple crochet button loop, a closure adds security. A wooden button can add a rustic touch that complements the kitten motif, while a hidden zipper keeps the focus entirely on the crochet artistry.
Embellishments can further personalize your crochet kitten square. Consider adding tassels or pompoms to the base of the handles. In this Bag with Crochet Kitten Square – Tutorial, we love the idea of a small crochet fish charm hanging from the strap to play into the cat theme, making the bag even more charming and unique.
The final step is the quality check. Go through your bag and ensure every yarn tail is securely woven in using a weaving-in technique that hides the ends within the kitten stitches. This ensures that your Bag with Crochet Kitten Square doesn’t unravel after its first trip to the market, completing the Tutorial with a masterpiece.
4. Maintenance and Styling Your Crochet Kitten Accessory
Proper care is essential to keep your Bag with Crochet Kitten Square looking new. In this tutorial, we advise hand washing your crochet items in cool water with a gentle detergent. Avoid wringing the bag; instead, roll it in a towel to remove excess moisture and lay it flat to dry to maintain the shape of the kitten squares.
Storage also plays a role in the longevity of your crochet bag. Store your handmade kitten tote stuffed with tissue paper to help it keep its form. Avoiding hanging it by the straps for long periods will prevent unnecessary stretching, preserving the stitch tension you worked so hard to achieve during this Bag with Crochet Kitten Square – Tutorial.
Styling your Bag with Crochet Kitten Square is the fun part! This accessory is versatile enough to pair with a casual jeans-and-tee look or a flowy summer dress. The textured crochet and the cat motif add a layer of visual interest to any outfit, making it a standout statement piece in your wardrobe.
If you are making this for a craft fair, branding is important. This Bag with Crochet Kitten Square – Tutorial suggests adding a small personalized leather tag or a fabric label. This small detail increases the perceived value of your crochet work and helps build your identity as a skilled crochet artisan.
Don’t forget the power of social media. Once you finish your Bag with Crochet Kitten Square, take high-quality photos in natural light. Sharing your progress and the final tutorial results on platforms like Instagram or Pinterest can inspire other crocheters and even lead to custom orders for your kitten-themed designs.
Lastly, remember that the Bag with Crochet Kitten Square – Tutorial is just a jumping-off point. Feel free to experiment with different square sizes, yarn weights, or even different animals. The skills you learned here—motif construction, joining, and lining—are the building blocks for any advanced crochet project you choose to tackle next.
FAQ: Common Questions About the Bag with Crochet Kitten Square – Tutorial
What is the best yarn for a Bag with Crochet Kitten Square?
The best choice is merceryzed cotton or a cotton/acrylic blend. These yarns offer the best stitch definition for the kitten face and are less likely to pill or stretch compared to pure wool.
How do I prevent my crochet bag from stretching?
To prevent stretching, you can line the bag with fabric, use a non-stretch stitch for the straps (like the thermal stitch), or incorporate nylon cord into the handles while crocheting.
Can a beginner finish this Bag with Crochet Kitten Square – Tutorial?
Yes! If you know the basic stitches (CH, SC, DC), you can follow this tutorial. The kitten square is essentially a standard granny square with a few stitch increases for the ears.
How many squares do I need for a medium-sized bag?
A standard size usually requires 13 squares: 6 for the front, 6 for the back, and 1 for the bottom. However, some designs use 15 to 18 squares to include side panels for a wider tote bag.
How do I make the kitten’s eyes and nose?
You can use safety eyes for a 3D look, or you can use embroidery thread to sew on eyes and a nose. Embroidery is safer if the bag is intended for a small child.
Conclusion
In this Bag with Crochet Kitten Square – Tutorial, we have covered everything from the initial yarn selection and square construction to the advanced joining and lining techniques.
You have learned how to create a charming feline motif and assemble it into a durable, fashionable bag that showcases your technical skills. This project is a wonderful way to practice motif-based crochet while creating something truly functional.