
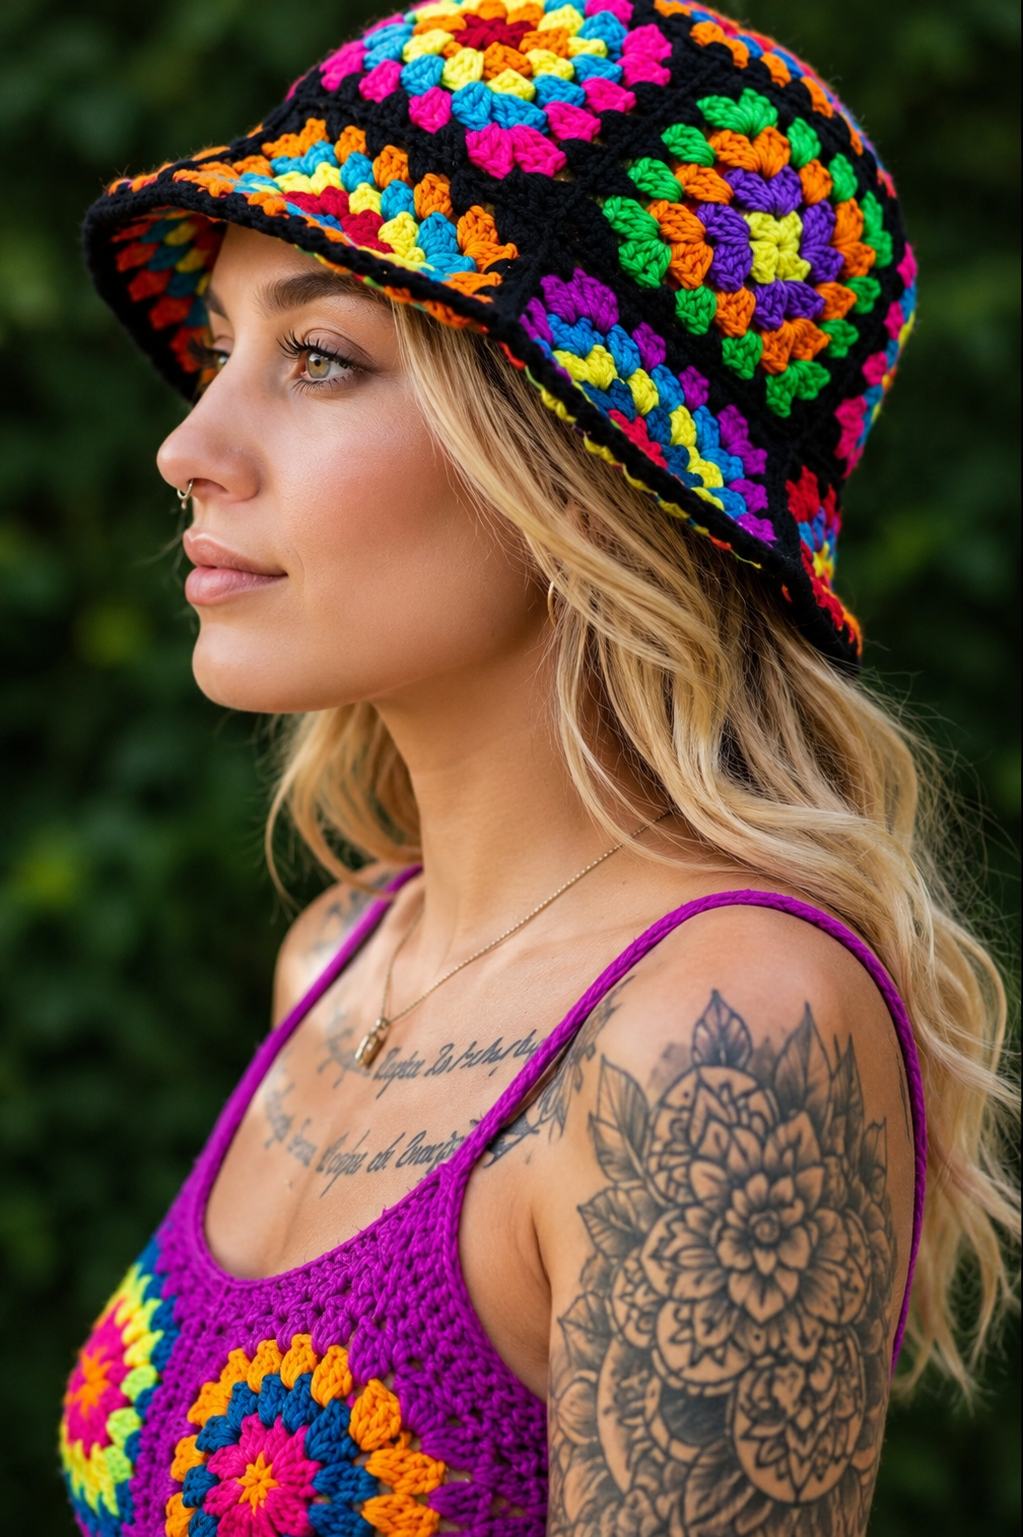
Boho Hat Granny Squares Pattern is a timeless crochet project that combines vintage-inspired granny squares, vibrant colors, and modern bohemian fashion into one stylish handmade accessory. Whether you are an experienced crocheter or just beginning your crochet journey, this beautiful hat is an enjoyable project that allows you to experiment with color combinations while practicing essential crochet techniques. The result is a unique piece that reflects creativity and personality while remaining practical for everyday wear.
The beauty of the Boho Hat Granny Squares Pattern lies in its versatility. Every crocheter can customize the design by selecting different yarn colors, adjusting the size, or creating unique square arrangements. Because each granny square is made individually before being joined together, the project feels manageable and rewarding. Watching the colorful motifs come together into a fashionable bucket-style hat is one of the most satisfying parts of the entire process.
This crochet project is also an excellent way to use leftover yarn from previous creations. Small yarn scraps can become stunning colorful motifs that give the finished hat its signature bohemian appearance. Besides being environmentally friendly, this technique helps reduce yarn waste while creating a one-of-a-kind accessory that looks professionally handmade. Throughout this guide, you will learn every important step needed to complete your own Boho Hat Granny Squares Pattern, from selecting materials to assembling the finished hat and adding beautiful finishing touches.
Choosing Materials and Planning Your Boho Hat Granny Squares Pattern
The first step in creating a successful Boho Hat Granny Squares Pattern is choosing quality materials. Cotton yarn is often preferred because it provides excellent stitch definition, durability, and breathability. Acrylic yarn is another popular option thanks to its affordability, wide color selection, and easy maintenance.
Selecting harmonious color combinations is one of the most enjoyable parts of this project. Bright rainbow shades create a playful festival-inspired hat, while earthy tones such as beige, olive green, mustard, rust, and brown produce a classic boho style. You can also combine neutral backgrounds with vibrant centers for a balanced and elegant appearance.
A crochet hook that matches your yarn weight is essential. Most worsted-weight yarns work well with hooks ranging from 4.5 mm to 5.5 mm. Always crochet a small sample square first to confirm that your stitches create the desired fabric without becoming too stiff or too loose.
Additional supplies include yarn scissors, stitch markers, a yarn needle for weaving in ends, and a measuring tape. Having these tools prepared before beginning makes the project much smoother and more enjoyable.
Before crocheting, determine the desired finished size of your hat. Measure the head circumference and decide how much ease you prefer. A slightly snug fit helps the hat remain comfortable while maintaining its shape during everyday wear.
Planning the arrangement of the granny squares before joining them also helps achieve an attractive final design. Lay the completed motifs on a flat surface and experiment with different color placements until you find a combination that feels balanced and visually pleasing.
How to Crochet the Granny Squares Step by Step
Begin each granny square with a magic ring or chain four and join with a slip stitch to form a loop. This creates a secure center and provides a neat starting point for the motif.
Round one usually consists of chain three, followed by groups of three double crochet stitches separated by chain spaces. Repeat this sequence around the ring to establish the four corners of the square. Finish with a slip stitch into the top of the beginning chain.
For round two, work into each corner space by crocheting three double crochet stitches, chain two, and three more double crochet stitches. Along each side, place groups of three double crochet stitches between the corners. This gradually expands the square while maintaining its shape.
Continue adding rounds using the same construction method. Every corner should include three double crochet stitches, chain two, and three double crochet stitches. Each side receives additional three-double-crochet clusters separated by chain spaces as the square grows larger.
Maintain consistent stitch tension throughout every motif. Uniform tension ensures that all granny squares have similar dimensions, making assembly much easier later. Blocking the completed squares before joining them can also improve accuracy.
Repeat this process until you have crocheted enough granny squares for your chosen hat size. Depending on the design, you may need several squares for the crown, sides, and brim. Organize them according to color before moving on to assembly.
Joining the Granny Squares and Shaping the Hat
Once all granny squares are complete, arrange them on a flat surface exactly as they will appear in the finished hat. This planning stage allows you to balance colors and prevent similar shades from clustering together unless intentionally desired.
Join neighboring squares using slip stitches, whip stitches, or single crochet seams. Each joining method creates a different appearance, so choose the one that best complements your preferred style. Many crocheters enjoy invisible whip stitching for a clean finish.
As the squares are connected, begin shaping them into the curved form of the hat. The crown requires careful joining so the fabric naturally follows the head’s contours without creating bulky seams.
After assembling the crown section, continue joining additional granny squares to build the side walls of the hat. Frequently try the project on or compare it with your measurements to ensure a comfortable fit.
Once the body reaches the desired depth, begin crocheting directly around the lower edge. Several rounds of single crochet help stabilize the structure before forming the brim. This transition creates a smooth connection between the motifs and the finishing rounds.
The brim is created by working multiple rounds of evenly spaced stitches. Gradually increasing stitches allows the brim to gently flare outward, creating the classic bucket hat silhouette associated with many Boho Hat Granny Squares Pattern designs.
Finishing Techniques and Creative Customization Ideas
After completing the brim, carefully weave in every loose yarn end using a yarn needle. Taking time during this step produces a professional-looking finish while improving the durability of the hat.
Blocking is highly recommended once the project is complete. Lightly dampen the hat, shape it over a rounded form or bowl that matches the intended size, and allow it to dry naturally. Blocking smooths the stitches and helps the granny squares align beautifully.
Decorative edging can enhance the final appearance. Reverse single crochet, crab stitch, picot edging, or a simple contrasting round of single crochet all create attractive finishing details that complement the colorful granny squares.
Personalize your Boho Hat Granny Squares Pattern with optional embellishments such as crocheted flowers, small tassels, braided cords, wooden beads, or decorative buttons. These additions allow every finished hat to become truly unique.
Experiment with seasonal color palettes as well. Bright tropical shades work wonderfully for summer festivals, while autumn-inspired combinations featuring burgundy, mustard, forest green, and cream create a cozy handmade accessory for cooler weather.
Most importantly, enjoy the creative process. Handmade crochet projects celebrate individuality, patience, and craftsmanship. Every completed Boho Hat Granny Squares Pattern tells its own story through carefully selected colors, stitches, and personal artistic choices.
FAQ
What skill level is required for the Boho Hat Granny Squares Pattern?
This project is generally suitable for adventurous beginners and intermediate crocheters. If you already know how to make chain stitches, slip stitches, single crochet, and double crochet, you can successfully complete this pattern with patience.
What yarn works best for this crochet hat?
Cotton yarn is ideal for warm-weather wear because it is breathable and holds its shape well. Acrylic yarn is another excellent choice for colorful designs and easy maintenance.
How many granny squares are needed?
The exact number depends on the desired hat size and the dimensions of each square. Larger squares require fewer motifs, while smaller squares create a more detailed appearance.
Can I make the hat larger or smaller?
Yes. You can increase or decrease the number of granny square rounds, adjust the hook size, use thicker or thinner yarn, or add additional rounds to the brim for a customized fit.
Do I need to block the granny squares?
Blocking is not mandatory, but it is highly recommended. It helps each square become uniform in size, making assembly easier and producing a cleaner finished hat.
Can beginners complete this pattern?
Yes. Because granny squares are worked one at a time, beginners can learn gradually while building confidence with each completed motif.
How should I wash the finished crochet hat?
Hand washing with mild detergent and laying the hat flat to dry will help preserve its shape and colors. Always follow the care recommendations for your chosen yarn.
Can I use leftover yarn scraps?
Absolutely. This is one of the best projects for using leftover yarn. Mixing many colors creates the vibrant bohemian look that makes this pattern so popular.
Conclusion
The Boho Hat Granny Squares Pattern is much more than a simple crochet accessory—it is a creative project that combines classic granny squares, beautiful color combinations, and practical construction techniques into a fashionable handmade hat. Throughout this guide, you learned how to choose the right materials, crochet each granny square step by step, join the motifs into a comfortable hat shape, and finish the project with professional details that enhance both durability and appearance.
By mastering these techniques, you can confidently create personalized hats for yourself, family members, or thoughtful handmade gifts. Every version can be customized through unique color palettes, decorative edging, and creative embellishments, making each finished piece completely original.