
Patchwork Wallet Pattern is a timeless sewing project that combines creativity, practicality, and the beauty of fabric scraps into one elegant accessory. Whether you are an experienced quilter or someone just beginning to explore patchwork, creating a Patchwork Wallet Pattern is an enjoyable way to improve your sewing skills while producing a beautiful handmade item. This project is also an excellent opportunity to reduce fabric waste by transforming leftover quilting fabrics into something functional and stylish.
One of the reasons this project has become increasingly popular is its simplicity and versatility. You can customize every detail, from the colors and fabric prints to the zipper and finishing touches. Every wallet becomes a unique creation that reflects your personal style. The compact size makes it perfect for carrying cash, cards, coins, sewing notions, cosmetics, or other small essentials while remaining lightweight and easy to store inside a larger bag.
Besides being beautiful, this project is highly beginner-friendly because it teaches several important quilting techniques, including piecing fabric strips, quilting with batting, attaching zippers, and finishing edges neatly. Throughout this guide, you will learn the complete process of creating your own Patchwork Wallet Pattern, following the same concept shown in the project while understanding each step in detail. With patience and creativity, you will soon have a professional-looking handmade wallet that you can proudly use or give as a thoughtful handmade gift.
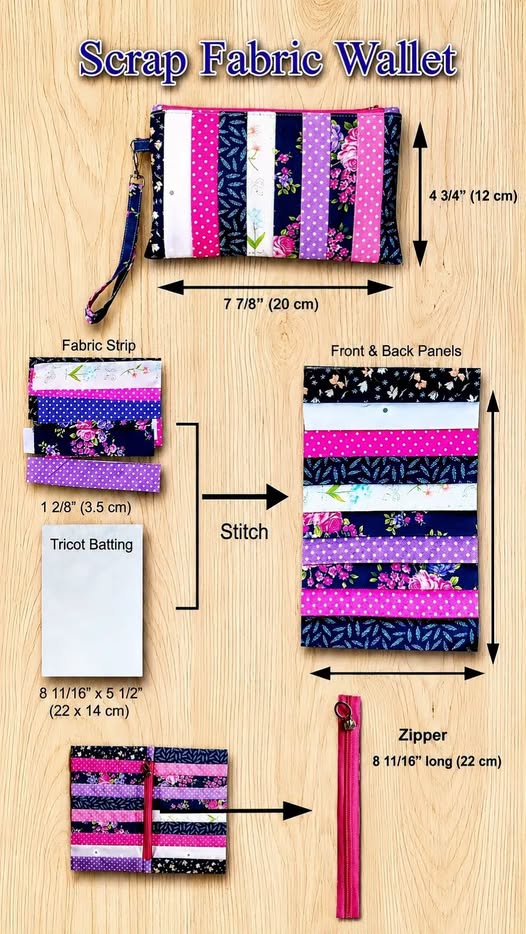
Choosing Materials for Your Patchwork Wallet Pattern
Before starting your Patchwork Wallet Pattern, gather all the necessary supplies. Using quality materials makes sewing easier and improves the final appearance of your wallet. Cotton quilting fabric is the ideal choice because it is stable, durable, and easy to sew. Scrap fabrics work perfectly for this project, allowing you to create colorful combinations while reducing fabric waste.
Prepare several fabric strips measuring approximately 1 3/8 inches (3.5 cm) wide. Mix floral prints, solids, polka dots, geometric designs, or seasonal fabrics to create visual interest. The beauty of patchwork lies in combining different prints into a harmonious composition that looks balanced and vibrant.
You will also need one piece of lightweight batting measuring approximately 8 11/16 x 5 1/2 inches (22 x 14 cm). The batting gives the wallet body, softness, and durability while helping it maintain its shape after repeated use.
A zipper approximately 8 11/16 inches (22 cm) long is recommended for this design. Choose a zipper color that complements one of your fabrics or select a contrasting color to create a modern accent.
Basic sewing supplies include coordinating thread, fabric scissors, quilting ruler, rotary cutter, cutting mat, sewing machine, pins or sewing clips, iron, and ironing board. These tools help ensure accurate measurements and professional construction.
Before sewing, press every fabric strip carefully. Well-pressed fabrics are easier to align, produce straighter seams, and contribute to a polished final project.
Sewing the Patchwork Panels Step by Step
Begin by arranging your fabric strips on a flat surface. Experiment with different color placements until you achieve a balanced composition. Alternating dark, light, floral, and solid fabrics creates a pleasant visual rhythm throughout the wallet.
Place the first two strips right sides together and sew them using a standard 1/4-inch seam allowance. Open the fabrics and press the seam toward the darker fabric or press it open, depending on your preferred quilting technique.
Continue adding one strip at a time until the entire batting area is covered. Press every seam immediately after stitching. Pressing continuously prevents bulky seams and helps the finished panel remain flat and professional.
Once all strips have been sewn together, position the completed patchwork panel on top of the batting. Smooth out any wrinkles before quilting. If desired, secure the layers using temporary spray adhesive or quilting pins.
Quilt the panel by sewing straight lines along each seam or create additional decorative quilting lines between the seams. Simple quilting enhances durability while adding texture and visual appeal to the finished wallet.
Trim the completed panel to approximately 8 11/16 x 5 1/2 inches (22 x 14 cm). Repeat the entire process to create a second identical panel, which will serve as the back of the wallet.
Assembling the Patchwork Wallet Pattern
Lay one quilted panel right side up and position the zipper along the upper edge with the zipper facing the fabric. Place the second quilted panel right side down, creating a fabric-zipper-fabric sandwich before pinning everything securely.
Using a zipper foot on your sewing machine, stitch close to the zipper teeth while maintaining an even seam allowance. Sew slowly to keep the zipper straight and prevent puckering.
Open both panels and press them away from the zipper. Topstitch approximately 1/8 inch from the zipper on both sides. This additional stitching strengthens the seam and gives the wallet a clean, professional appearance.
Fold the wallet so both quilted panels align perfectly with the zipper positioned along the top edge. Before sewing the sides, partially open the zipper. This simple step allows you to turn the wallet right side out after stitching.
Sew around the remaining three sides using a consistent seam allowance. Reinforce the beginning and ending stitches with backstitching to increase durability, especially if the wallet will be used frequently.
Trim the corners carefully without cutting through the stitching. Turn the wallet right side out through the partially opened zipper. Use a turning tool or blunt object to gently push the corners into shape before giving the wallet one final press with the iron.
Personalizing and Caring for Your Finished Wallet
One of the greatest advantages of the Patchwork Wallet Pattern is the endless opportunity for personalization. Every combination of fabrics creates a completely different design, allowing you to make wallets that match every season, holiday, or personal style.
Consider adding decorative quilting motifs, embroidery, appliqué, lace, labels, or personalized monograms before assembling the wallet. These small details make every project even more meaningful and unique.
This wallet also makes a wonderful handmade gift for birthdays, Mother’s Day, Christmas, bridal showers, teachers, or friends who appreciate handcrafted accessories. Handmade gifts carry sentimental value that cannot be found in store-bought products.
To keep your wallet looking beautiful, wash it gently by hand or use the delicate cycle of your washing machine if necessary. Allow it to air dry naturally and press lightly with a warm iron to restore its crisp appearance.
As your sewing confidence grows, you can experiment with larger or smaller sizes, additional interior pockets, wrist straps, snap closures, or decorative bindings. The basic Patchwork Wallet Pattern easily adapts to many creative variations.
Most importantly, enjoy the creative process. Every wallet you make improves your sewing accuracy, quilting confidence, and color coordination skills. Over time, you’ll develop your own signature style while creating practical accessories that showcase your craftsmanship.
FAQ About Patchwork Wallet Pattern
Is this Patchwork Wallet Pattern suitable for beginners?
Yes. This project is ideal for beginners because it teaches basic patchwork construction, quilting, zipper installation, and finishing techniques using simple straight seams.
What type of fabric works best?
High-quality quilting cotton is the most recommended fabric. It is stable, easy to sew, durable, and available in countless beautiful prints.
Can I use fabric scraps?
Absolutely. This project is specifically designed to make excellent use of leftover quilting fabrics, making it economical and environmentally friendly.
Do I need batting?
Yes. Lightweight batting provides structure, softness, and durability while helping the wallet maintain its shape during everyday use.
Can I sew this wallet without a quilting machine?
Yes. A regular sewing machine works perfectly for this project. Straight-line quilting is more than sufficient for both beauty and durability.
What zipper length should I choose?
A zipper measuring approximately 8 11/16 inches (22 cm) works well for the dimensions shown in this project, although slight variations can be adjusted during construction.
Can I make different sizes?
Certainly. Once you understand the basic construction process, you can easily resize the pattern to create coin purses, cosmetic pouches, pencil cases, or larger organizer wallets.
How long does this project usually take?
Most sewists can complete this Patchwork Wallet Pattern in about one to three hours, depending on their sewing experience and the complexity of the quilting design.
Conclusion
The Patchwork Wallet Pattern is a rewarding sewing project that combines creativity, practicality, and classic quilting techniques into one beautiful handmade accessory. Throughout this guide, you learned how to select suitable materials, prepare colorful patchwork strips, quilt the front and back panels, install a zipper, assemble the wallet, and finish it with professional results. You also discovered several ways to personalize the design and properly care for your finished project so it remains beautiful for years to come.
Whether you create this wallet for yourself, as a thoughtful handmade gift, or even as part of a small handmade business, this versatile project offers endless opportunities for creativity. Every fabric combination tells a different story, making each wallet completely unique.