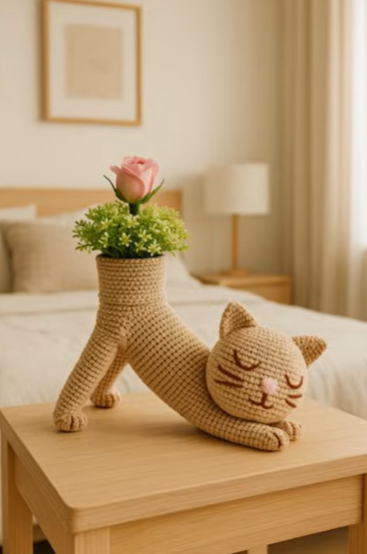
Combining the whimsical charm of feline companions with the practical elegance of home decor is a delightful crafting journey, and this Crochet Amigurumi Cat Vase – Tutorial will guide you through every single step of creating your very own functional yarn masterpiece. Feline-themed decorations bring a joyful, cozy vibe to any room, but when you merge that cute aesthetic with a structural vessel designed to hold faux flowers or workspace supplies, you get something truly magical. Whether you are looking to brighten up your own study desk or searching for the ultimate handmade gift for a cat-loving friend, crafting a crochet amigurumi cat vase is an incredibly rewarding project that beautifully bridges the world of structural crochet with soft, adorable character sculpting.
The secret to a successful decorative container project like this lies in how easily you can transform basic geometric shapes into a sturdy, upright vessel with an unmistakable feline personality. In this detailed tutorial, we break down the process of creating a wide, stable base that tapers into a smooth neck, which is then brought to life with stitched ears, a sleepy embroidered face, and a charming little tail. By following this comprehensive guide, you will learn how to balance your stitching tension and choose the right internal support materials, turning simple skeins of yarn into an impressive, functional piece of fiber art that looks highly professional yet carries the unmistakable warmth of a handmade creation.
As you prepare to embark on this fun textile adventure, remember that consistency and attention to structural details are your best assets for achieving an outstanding final result. Working on a specialized crochet amigurumi cat vase allows you to experiment with various yarn weights and color palettes, meaning you can replicate the specific markings of a favorite calico, a sleek tuxedo, or a minimalist pastel kitty to perfectly match your interior decor. Let us dig right into the specific materials, foundational stitches, assembly methods, and finishing details required to bring this lovely and unique container to life using your favorite crochet hook.
1. Choosing the Best Materials for Stability and Texture
Selecting the right yarn is the absolute foundation of this project, especially when you are working through a specialized Crochet Amigurumi Cat Vase – Tutorial. For a decorative container that needs to stand completely upright without slouching, a 100% cotton yarn in a worsted or DK weight is highly recommended because it offers incredible natural rigidity and crisp stitch definition. Cotton yarn ensures that the walls of your vessel remain firm and smooth, whereas standard acrylic yarns can sometimes stretch too much, causing the container to lose its shape over time when items are placed inside.
Your crochet hook size plays a critical role in establishing the overall density and strength of the fabric for your new crochet amigurumi cat vase. A general rule when working on structural amigurumi is to select a hook that is one or two sizes smaller than what the yarn manufacturer suggests on the label. Using a tight 2.5mm or 3.5mm hook will create a dense, stiff fabric matrix, which is vital because it stops the internal stuffing or stabilizing inserts from shifting out of place or peeking through the stitches.
To ensure your container functions as a real vessel, you will also need to source some clever internal stabilization materials that are not typically found in standard plushie projects. A round piece of sturdy plastic canvas, a repurposed plastic yogurt container lid, or a thick cardboard circle cut to the exact diameter of your base will work beautifully to keep the bottom flat. For the inner walls, inserting a trimmed, clean plastic bottle or an acrylic cup provides a solid waterproof barrier, allowing you to use your finished piece safely around your home.
Safety eyes can be used to give your kitty its characteristic cute expression, with 10mm or 12mm sizes generally being the perfect fit for a medium-sized desktop container. If you prefer a more serene, sleepy look that matches a cozy bohemian home style, you can opt out of plastic eyes entirely and use black embroidery floss to stitch closed, curved eyelashes. Do not forget to grab a small amount of pink yarn or embroidery floss to stitch a tiny, delicate triangular nose right in the middle of the face.
The secondary tools you will need to keep next to your crafting chair for this tutorial include a sharp pair of scissors, a blunt-tipped metal tapestry needle, and a handful of locking stitch markers. Because this vessel is worked in a continuous spiral without joining each round with a slip stitch, placing a marker in the very first stitch of each row is absolutely non-negotiable for keeping your stitch counts correct. A high-quality polyester fiberfill will also be needed to stuff the external features, like the paws, tail, and the outer layer surrounding the internal core.
Finally, consider the color theme you want to implement to bring out the best personality in your handmade creation. Neutral shades like cream, soft grey, charcoal, or warm tan make excellent base choices because they blend seamlessly into modern home styles while showcasing your stitch placement beautifully. Gathering all these essential, high-quality supplies together on your workspace before you make your first slip knot ensures an uninterrupted, highly satisfying crafting experience from start to very last stitch.
2. Mastering the Core Stitches and Structural Techniques
Before diving into the row-by-row instructions of this Crochet Amigurumi Cat Vase – Tutorial, it is incredibly helpful to review the core stitches that form the backbone of structural crochet. The absolute star of the show is the standard single crochet stitch, which produces a tight, durable, and unyielding fabric that holds up incredibly well to daily handling. You will also use the indispensable magic ring technique to kickstart your circular base, ensuring there is no visible hole at the bottom where small items could slip out.
To expand your circular base smoothly into a wide, flat foundation, you will perform regular increases by working two single crochet stitches into a single loop from the previous round. The key to keeping a base perfectly circular rather than turning it into an accidental hexagon is to stagger your increases across consecutive rows. This small adjustment distributes the expansion points evenly, giving your crochet amigurumi cat vase a perfectly level bottom that rests balanced on flat surfaces.
A vital technique used to transition from the flat base to the vertical walls of the container is working an entire round in the back loops only. By inserting your hook solely through the rear loop of each stitch for one round, you create a sharp, distinct ridge that acts as a natural folding hinge for the fabric. This structural ridge forces your crochet work to turn at a clean ninety-degree angle, forming the perfect, upright perimeter for the walls of your kitty container.
As you work your way up the body of your crochet amigurumi cat vase, you will eventually need to use decreases to taper the neck of the container slightly before expanding out for the head detailing. For a perfectly polished look, always utilize the invisible decrease method rather than a standard single crochet decrease. This technique involves lifting only the front loops of the next two stitches onto your hook before completing the stitch, making the reduction completely seamless and smooth on the outside.
Maintaining a firm, unwavering yarn tension is paramount throughout this entire tutorial to ensure the walls of your vessel do not become wavy or uneven. If your hands relax too much, the fabric will turn soft and floppy, causing the container to buckle under its own weight or slouch over when filled with pens or crochet hooks. Try to pull each loop down firmly against the shaft of your crochet hook, letting the tool determine the uniform size of the stitches.
Lastly, mastering the art of invisible fastening off and weaving in your loose ends will give your finished piece a clean, commercial-quality appearance. When you reach the final round of your vessel’s rim, using a needle join instead of a bulky slip stitch creates a flawless, continuous edge that looks neat from every single angle. Weaving your remaining yarn tails back and forth through the internal stitches ensures that your vessel can be handled daily without any danger of unraveling.
3. Step by Step Guide to Crafting the Main Vessel Body
To begin the construction phase of our Crochet Amigurumi Cat Vase – Tutorial, we start at the bottom of the base using our main color yarn and a standard magic ring. You will place six single crochet stitches into the loop, pull it completely tight, and follow a steady increase pattern over the next several rounds until your circle matches the diameter of your internal plastic base support. Make sure to keep your stitches as tight as comfortably possible to prevent any future bowing or distortion.
Once your flat base reaches the desired width, you will work one entire round in the back loops only to create that sharp, structural corner that allows the walls to rise straight up. From this point forward, you will work regular single crochet stitches in continuous spirals without making any increases for several inches, creating the main cylindrical body of the vessel. As the walls grow, slip your rigid plastic canvas circle or yogurt lid inside to ensure it fits snugly against the bottom fabric.
After building up the lower body to about two-thirds of its total height, it is time to perform a few rounds of invisible decreases to define the neck of your crochet amigurumi cat vase. This narrowing creates an elegant hourglass silhouette that mimics a traditional ceramic flower holder while setting up the perfect proportions for the feline facial features above. Keep your tension extra secure during these decrease rows to prevent any unwanted gaps from forming in the neck area.
Once the neck is defined, you will work a few rows of gradual increases to expand the upper portion slightly, creating the distinct forehead and cheek area of the kitty. Before the opening becomes too narrow or difficult to access, position your safety eyes on the front of the face, placing them symmetrically with about six stitches of separation between them. If you prefer embroidered eyes, now is the absolute best time to map them out using a water-soluble fabric marker.
Next, carefully slide your trimmed plastic bottle or internal acrylic cup core directly into the center of the container to check the structural fit. If there are empty gaps between the internal plastic liner and the crocheted outer walls, gently pack small amounts of polyester fiberfill into those spaces to fill out the cat’s plump cheeks and body shape. Ensure the fiberfill is distributed evenly all around the core so the crochet amigurumi cat vase remains perfectly balanced and does not lean.
To complete the main body of the container, continue working straight single crochet rounds until the fabric matches the height of your internal plastic support liner. Finish the final row by executing an invisible needle join to create a smooth, clean rim that folds slightly over the top edge of the inner plastic liner. Fasten off your yarn securely, hide the tail inside the layers of fabric using your tapestry needle, and admire the beautifully structured, hollow cylinder you have created.
4. Sculpting the Feline Features and Final Assembly
A true Crochet Amigurumi Cat Vase – Tutorial would not be complete without crafting the iconic, adorable features that transform a simple cylinder into a lovable character. To make the triangular ears, you will start with a small magic ring, placing four stitches inside and increasing slowly on every round to form a hollow cone shape. Flatten the ears completely with your fingers without adding any stuffing, leaving a long yarn tail at the end of each piece for sewing later on.
For the front paws, you can crochet two small oval spheres, stuffing them lightly with a tiny bit of fiberfill to give them a cute, chubby appearance. You can use a scrap strand of darker yarn to embroider simple vertical lines on the tips of the paws to create defined little kitty toes. The tail is created by working a simple, narrow tube of six single crochets in continuous rounds until it reaches your desired length, allowing it to curve playfully up the side of the container.
Attaching these sculpted pieces requires careful pinning to ensure your completed crochet amigurumi cat vase looks beautifully balanced and full of whimsical charm. Pin the two triangular ears symmetrically onto the upper rim of the container, tilting them slightly outward to mimic an alert, happy expression. Position the two front paws at the very bottom edge of the base, centered directly underneath the eyes so the cat appears to be sitting primly.
Use a secure whip stitch or a ladder stitch to attach each component, sewing through both the edge of the piece and the sturdy cotton stitches of the main body. Pull your sewing thread firm but avoid tugging too hard, which can cause the smooth walls of your container to pucker or warp out of shape. Once a piece is completely attached, tie a hidden knot against the body fabric, push the needle deep into the internal stuffing space, and clip the thread close to the work.
Now comes the most artistic and delightful part of this entire tutorial: embroidering the delicate facial features that bring your kitty character completely to life. Using a strand of pink yarn, embroider a small, inverted triangle centered between the eyes to form the nose, and add two curved lines underneath for a sweet, smiling mouth. You can also add three simple horizontal straight stitches on each side of the cheeks to represent classic, fine cat whiskers.
Take a step back to inspect your fully assembled masterpiece, giving the outer walls a gentle squeeze to distribute the internal fiberfill perfectly around the core liner. Your decorative container is now completely finished, boasting a flat base, perfectly rigid walls, and an incredibly sweet feline face that is ready to bring joy to your home. Place a bunch of beautiful faux lavender, a selection of colorful pens, or your favorite crochet hooks inside to showcase your fantastic handiwork.
FAQ – Frequently Asked Questions
Can I use this amigurumi cat vase to hold real flowers with water?
You can safely use this vase to hold real flowers with water only if you have placed a completely waterproof, seamless glass or plastic container inside the crocheted sleeve. Never let the water come into direct contact with the cotton yarn or internal polyester fiberfill, as this will lead to mold growth and ruin your beautiful handiwork.
My container keeps tipping over when I put things in it; how can I fix this?
If your container feels top-heavy, it means the base needs a bit of extra weight to ground it properly. You can easily fix this by placing a few flat glass pebbles, a metal washer, or some clean crafting weights at the very bottom of the vessel underneath your internal plastic liner before adding your items.
How do I clean my crochet amigurumi cat vase if it accumulates dust?
Because it contains internal stabilizing structural materials like plastic canvas or cardboard, you should avoid tossing the entire container into a washing machine. The best way to clean it is to use a lint roller or a soft brush to remove dust, or gently spot-clean the exterior cotton fabric with a damp cloth and mild soap.
Is this tutorial suitable for someone who has never made amigurumi before?
While it uses basic stitches like single crochet, increases, and decreases, this project is best suited for an advanced beginner due to the structural elements. Managing the internal plastic core inserts, working in the back loops only, and assembling multiple sewn pieces requires a tiny bit of previous crochet patience.
Can I scale this pattern up to make a much larger floor vase?
Yes, you can easily scale this pattern up by using a much thicker yarn, such as super bulky chenille or T-shirt yarn, paired with a larger hook size. Just remember that you will need to find a much larger internal plastic support structure, like a tall plastic bucket or a wastebasket, to match the expanded dimensions.
Conclusion
In this comprehensive Crochet Amigurumi Cat Vase – Tutorial, we have explored the entire creative process of combining structural crochet techniques with adorable character sculpting.
We covered the importance of selecting rigid cotton yarns and tight hooks, mastering back loop transitions for flat bases, integrating internal plastic support cores, and embroidering delicate facial features to bring out a sweet feline personality. By utilizing these foundational amigurumi methods, you can confidently create highly unique, functional, and durable home decor items that showcase your love for crafts and cats alike.