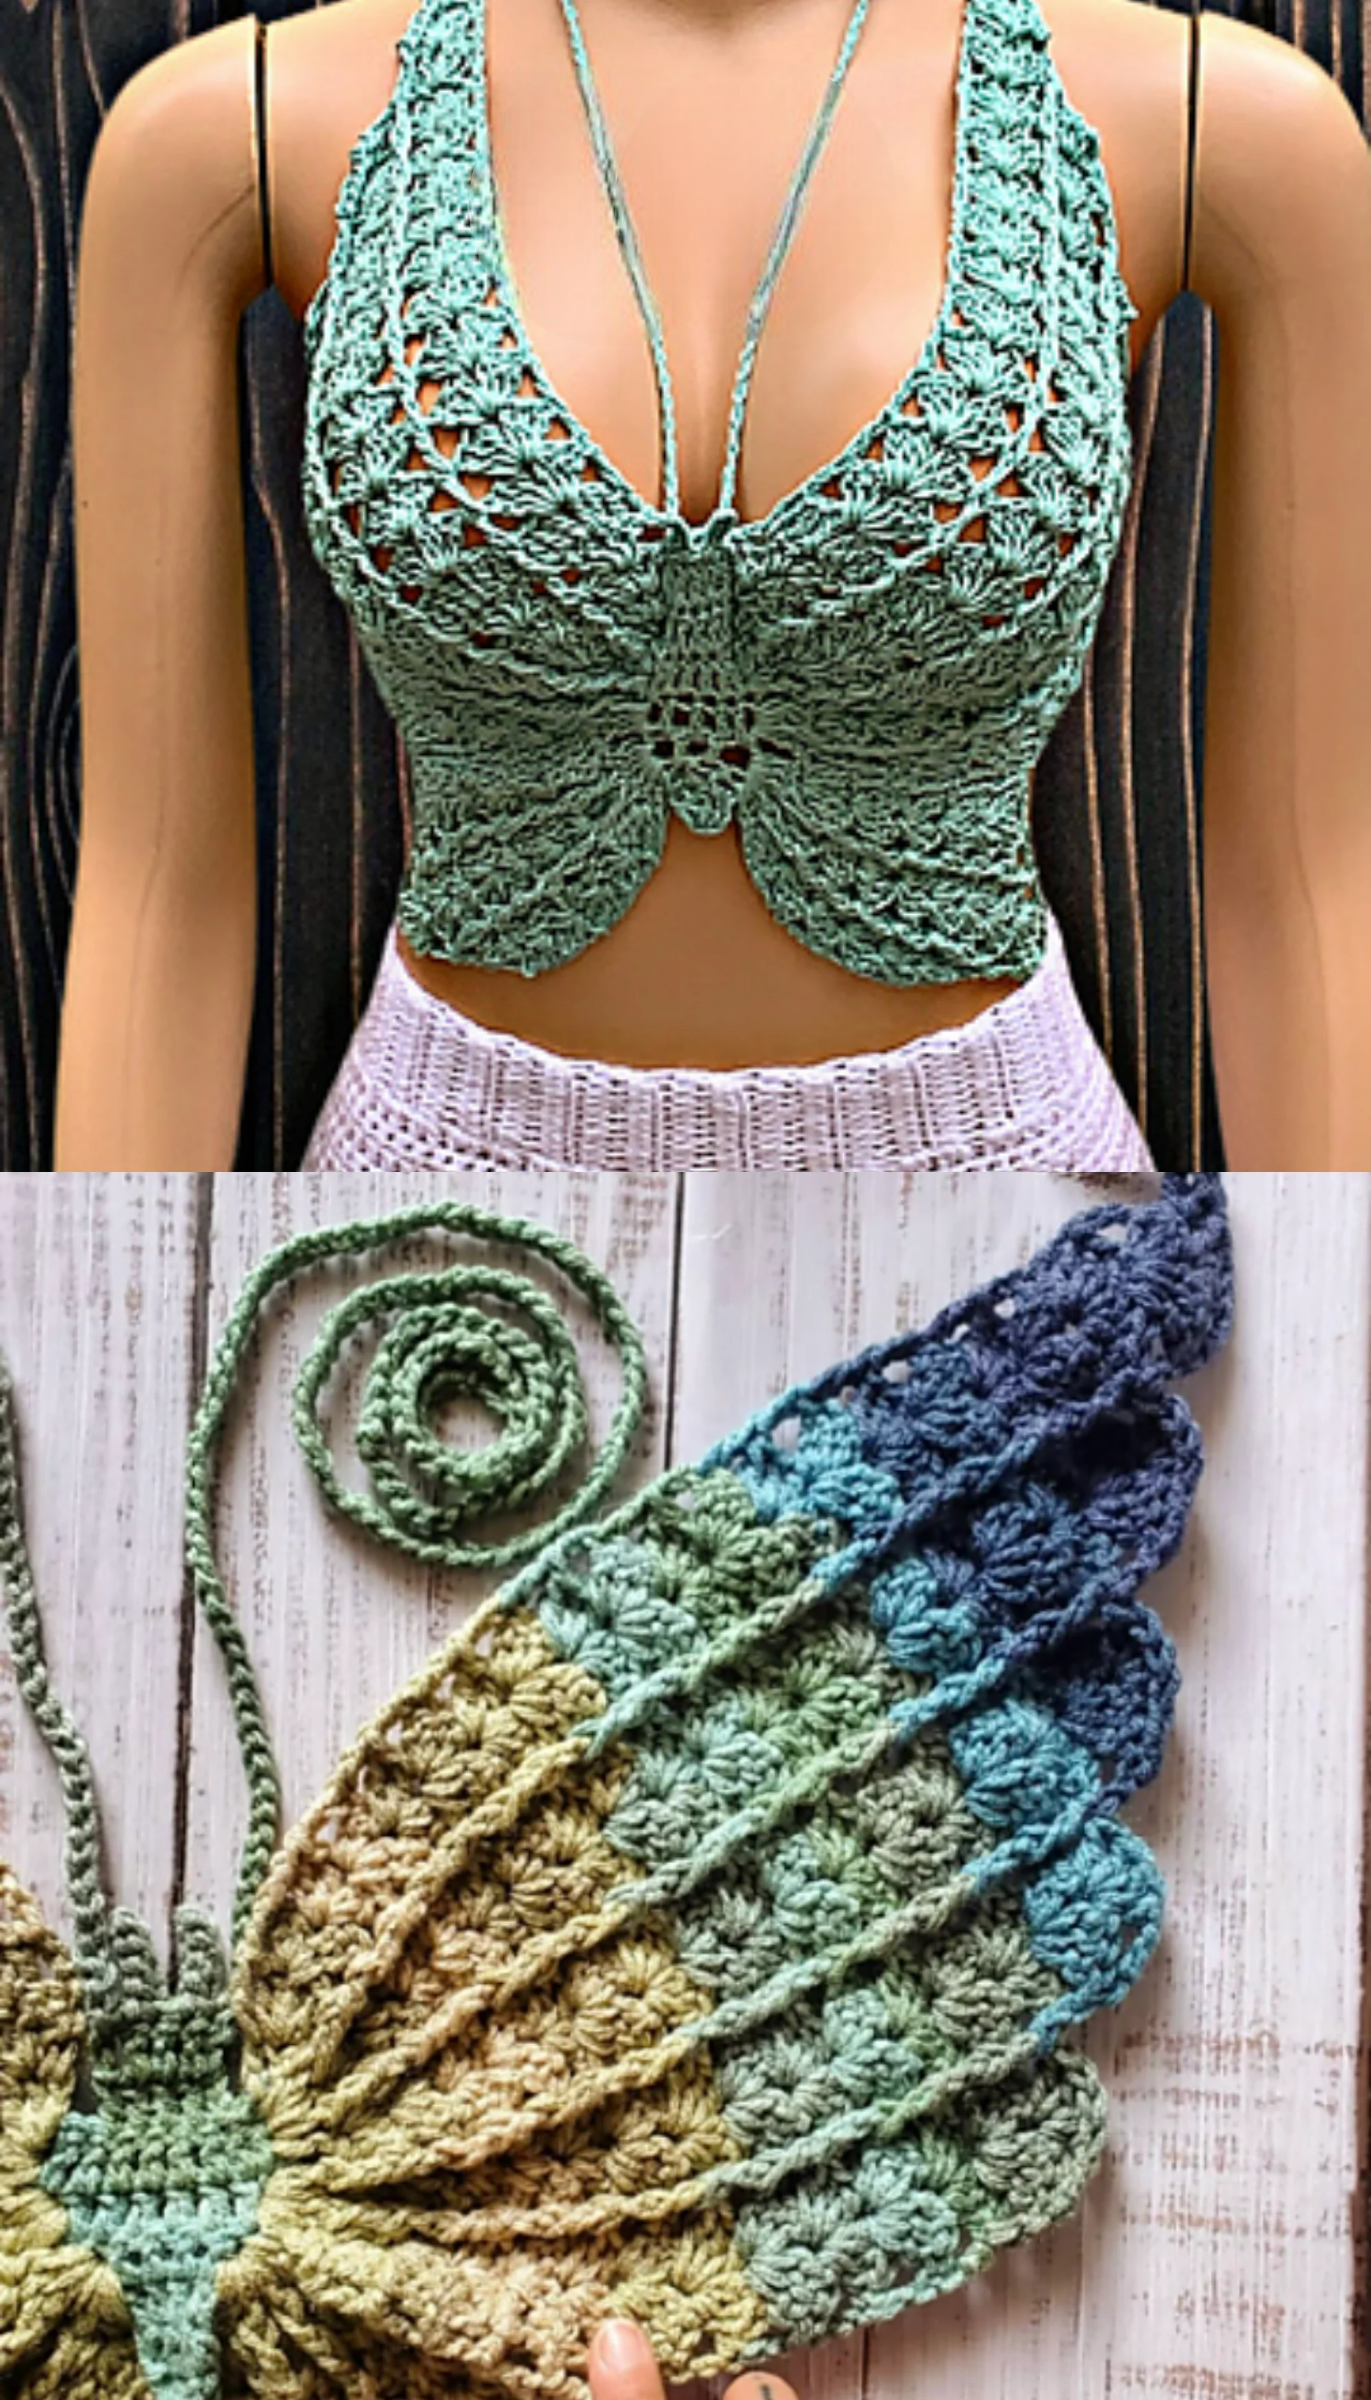
Bringing the whimsical beauty of nature into your summer wardrobe is a delightful creative journey, and this Shelly Butterfly Crochet Top – Tutorial is designed to guide you through every single stitch needed to create your own stunning, wearable piece of fiber art. Butterfly-shaped clothing has taken the fashion world by storm, offering a nostalgic, bohemian flair that is absolutely perfect for festival season, beach days, or warm summer evenings. Whether you want to customize a vibrant crop top for yourself or craft a beautiful handmade gift for a trendsetting friend, mastering this specialized design will instantly elevate your garment-making skills and add an ethereal touch to your wardrobe.
The unique magic of creating a butterfly-shaped garment lies in how beautifully a series of expanding lace rows can mimic the natural symmetry of delicate wings. In this comprehensive garment tutorial, we break down the structural math behind creating a supportive center body that seamlessly branches out into dramatic upper and lower wing panels. By following these steps, you will learn how to manipulate basic stitches to create stunning stitch definition, ensuring your finished Shelly butterfly crochet top fits comfortably, flatters your body shape, and retains its gorgeous, organic silhouette through hours of wear.
As you prepare to dive into this exciting fashion project, remember that selecting the proper materials and taking accurate body measurements are the absolute keys to structural success. Working on a specialized Shelly butterfly crochet top gives you the perfect opportunity to experiment with vibrant color gradients, shimmering cotton threads, or classic bohemian neutrals to perfectly match your personal style. Grab your favorite yarn, find a cozy spot with plenty of light, and let us explore the essential materials, core stitch techniques, row-by-row construction, and custom fitting adjustments required to bring this lovely summer garment to life.
1. Selecting the Perfect Yarn and Tools for Wearable Crochet
Choosing the right yarn is the absolute foundation of garment construction, especially when you are working through a detailed Shelly Butterfly Crochet Top – Tutorial. For a summer top that rests directly against the skin, a 100% cotton yarn or a premium bamboo-cotton blend in a sport or lightweight DK category is highly recommended by experienced makers. Cotton provides excellent breathability, crisp stitch definition, and the necessary weight to make the delicate lace wings drape beautifully without losing their structural shape over time.
Your crochet hook size should be chosen carefully to match your personal tension and the specific weight of your chosen summer yarn. For a lightweight sport yarn, a 3.25mm or 3.5mm hook is generally the sweet spot to ensure your stitches are tight enough to provide adequate coverage while remaining flexible. If your stitches turn out too loose, the wing panels may sag or stretch out unnaturally, whereas stitching too tightly can result in a stiff, uncomfortable fabric that lacks a flattering drape.
To ensure your Shelly butterfly crochet top fits perfectly and stays secure, you will also need a few essential secondary tools within arm’s reach of your crafting chair. A flexible sewing tape measure is completely non-negotiable, as you will need to measure your bust, waist, and underbust to calculate the ideal wing width for your specific body size. You will also need a sharp pair of scissors, a sturdy metal tapestry needle for weaving in tails, and plenty of locking stitch markers to keep track of your symmetry.
Color selection is where your personal creativity can truly shine, allowing you to mimic the jaw-dropping color combinations found on real butterflies in nature. Self-striping cake yarns with long, gradual color changes are an incredible option for this project because they automatically create a gorgeous, symmetrical gradient across the wings without requiring dozens of manual yarn joins. Alternatively, picking a classic solid cream or a deep monochromatic black can result in a highly sophisticated, modern bohemian piece that pairs elegantly with high-waisted denim.
Before diving headfirst into the main rows of the pattern, it is highly recommended to crochet a small gauge swatch to test how your yarn behaves with your hook. Wash and block your small test swatch exactly how you plan to care for the finished garment to see if it shrinks or expands significantly. This quick preparatory step takes only a few minutes but will save you from the heartbreak of completing an entire top only to discover it fits smaller or larger than intended.
Finally, setting up an organized, comfortable workspace with good lighting will make your entire crafting experience much more relaxing and productive. Keep your cut yarn tails contained in a small bowl, and clip your stitch markers onto the corresponding sections of your WIP as you progress through the rows. Having a beautifully curated palette and all your precision tools ready before you make your first slip knot ensures an enjoyable, stress-free fashion journey from start to finish.
2. Mastering the Core Stitches and Symmetrical Increases
Before beginning the actual row instructions of this Shelly Butterfly Crochet Top – Tutorial, it is important to familiarize yourself with the fundamental stitches that build the wing patterns. The primary foundation relies on a combination of chains, single crochets, and double crochets, which work together to build a lightweight, breathable mesh fabric. You will also utilize the classic shell stitch—which is a cluster of multiple double crochets placed in a single loop—to create the wavy, scalloped edges that define the butterfly’s wings.
Achieving perfect symmetry is the absolute secret to making your finished garment look professional, balanced, and structurally sound from every angle. This symmetry is managed by working outward from a central vertical column, reflecting your increases exactly on both the left and right halves of the piece. Using your locking stitch markers to mirror your stitch counts across the central dividing line will prevent one wing from accidentally turning out larger or longer than its counterpart.
To expand the wings outward from the center body, you will master the technique of placing multiple increase clusters at designated corner points along the rows. These deliberate increases force the flat crochet fabric to expand diagonally, beautifully mimicking the natural aerodynamic curvature of an actual butterfly in mid-flight. Paying close attention to where these increases sit ensures your Shelly butterfly crochet top maintains a clean, flat profile that hugs your body smoothly without buckling.
Another crucial technique highlighted in this garment tutorial is working in the back loops only during specific rows to create beautiful structural ridges. This simple adjustment creates raised lines on the surface of the wings, adding incredible visual depth, texture, and a realistic ribbing effect that makes the motif pop. It also gives the garment a bit of horizontal elasticity, which helps the top stretch comfortably over your curves while maintaining a snug, supportive fit.
Managing your yarn tension consistently across both wings is incredibly important when crocheting a wearable garment of this style. If you become tired or distracted while working on the second wing, your stitches might naturally loosen up, resulting in asymmetrical panels that sit unevenly on your chest. Try to work on both matching sections within a similar timeframe, maintaining a steady, relaxed rhythm to ensure your stitch sizes remain perfectly identical throughout.
Lastly, learning how to seamlessly carry your yarn up the sides of your rows during minor color changes will elevate the interior neatness of your work. Instead of cutting the yarn at the end of every row and leaving hundreds of loose ends to weave in, you can gently carry the passive yarn along the edge stitches. This advanced technique keeps the borders of your Shelly butterfly crochet top incredibly clean, durable, and free of bulky knots that could rub uncomfortably against your skin.
3. Step by Step Construction of the Body and Wing Panels
To kickstart the main construction of our Shelly Butterfly Crochet Top – Tutorial, we begin by crocheting a central vertical strip that serves as the butterfly’s main body. Using your chosen main color, you will chain a short foundation row and work basic stitches up and down to create a sturdy, supportive column that will sit directly over your sternum. This central column acts as the anchor point from which both the left and right wing panels will eventually expand outward.
Once the sturdy center column is complete, you will attach your yarn to the upper corner to begin building the intricate lace pattern for the first upper wing. You will work back and forth in rows, combining double crochet stitches and chain spaces to build an elegant, airy mesh that grows larger with every consecutive row. Make sure to move your stitch markers up along the increase points to ensure you never lose track of the pattern’s mathematical expansion.
After completing the expansive rows for the upper wing, you will slip stitch down to the lower half of the center column to start the smaller lower wing panel. The lower wings require fewer rows and a more gradual increase pattern to create a shorter, rounded shape that sits comfortably against the ribs and waist. This distinct size variation between the upper and lower sections is what gives the Shelly butterfly crochet top its recognizable, high-fashion aesthetic.
When the first full side of your butterfly is complete, you will mirror the exact same row counts and stitch placements on the opposite side of the central column. Take frequent breaks during this phase to lay your work completely flat on a table, comparing the left and right sides to verify that your symmetry is absolutely flawless. If you notice any discrepancy in the row lengths, unraveling your stitches back to the error immediately will save you from a distorted fit later on.
Once both sets of wings are completely crocheted, you will work a continuous border of tight single crochets or decorative shell stitches around the entire perimeter of the butterfly. This final framing round locks the loose edge stitches together, preventing the lace mesh from stretching out of shape when the garment is pulled tight against the body. It also provides a clean, reinforced edge where you can securely attach the structural lacing straps in the final assembly steps.
To complete the main body fabric of your new Shelly butterfly crochet top, fasten off your working yarn using an invisible needle join along the outer edge. Thread your yarn tail onto your tapestry needle and weave it securely through the dense stitches of the central column, changing directions three times to lock it permanently. Your main butterfly motif is now fully realized, displaying gorgeous symmetry, beautiful textured ridges, and clean, stable edges that are ready for the custom fitting process.
4. Crafting Cord Straps and Customizing the Fit
The final stage of our Shelly Butterfly Crochet Top – Tutorial involves creating the adjustable closure system that allows this top to comfortably fit multiple body sizes. You will need to crochet four long, sturdy tie straps: two for the top neck loops and two for the lower back closure. For maximum durability, creating a thick chain or a single crochet Romanian cord is highly recommended over a simple, thin chain strand that could snap under tension.
Attach the two upper straps securely to the top tips of the upper wings, reinforcing the attachment point with extra stitches to ensure they can hold up the weight of the garment. The two lower straps should be attached to the outer edges of the lower wings, or you can choose to create a lace-up corset style back. A corset-style closure involves weaving one long cord through the open spaces of the back wings, providing incredible adjustability and a snug, supportive fit.
When attaching the straps to your Shelly butterfly crochet top, sewing them onto the wrong side of the fabric keeps the connection points hidden and clean. Use your tapestry needle and matching yarn to whip stitch the base of the cords down firmly, passing through multiple loops of the border fabric to distribute the pulling force evenly. Once attached, pull firmly on the straps to test their strength, ensuring there is zero slippage or stretching at the base.
To customize the fit for larger bust sizes, you can easily add extra rows of simple mesh stitches to the outer edges of the upper wings before working the final border. This modification provides extra lateral coverage around the sides of the chest without distorting the beautiful central butterfly silhouette or changing the main pattern math. For those who prefer extra security, sewing a soft fabric lining or inserting removable bra cups into the wrong side of the front panels offers fantastic support.
Steam blocking your completed garment is the absolute magic touch that transforms a slightly wrinkled crochet piece into a fluid, boutique-quality summer top. Pin the butterfly down onto foam blocking boards, stretching the wing tips out gently to open up the gorgeous lace mesh holes, and hover a hot steam iron an inch above the fabric. Allow the cotton fibers to cool down and dry completely before unpinning, which locks the flat, beautiful shape into the stitches permanently.
Unpin your newly blocked garment from the boards and try it on, lacing the back cords snugly to adjust the compression and coverage to your exact comfort level. Your summer masterpiece is now fully complete, beautifully merging structured geometry with the organic, free-spirited charm of a butterfly motif. This gorgeous top stands as a proud showcase of your garment-making precision, ready to turn heads and keep you feeling stylish, cool, and comfortable all summer long.
FAQ – Frequently Asked Questions
What is the best way to ensure this crochet top isn’t too see-through?
To increase the opacity and coverage of the top, you can drop down a half size in your crochet hook to make your stitches tighter and closer together. Alternatively, you can easily hand-sew a basic nude or matching fabric lining onto the inside of the front panels, or wear a simple strapless adhesive bra underneath for effortless coverage.
Can a beginner garment maker successfully complete this butterfly top?
Yes, this project is completely achievable for an adventurous beginner who has already mastered basic stitches like double crochet and working in rows. The main challenge is maintaining proper symmetry between the left and right wings, but using plenty of stitch markers and counting your rows carefully will make it an easy process.
How do I adjust this pattern to fit a larger cup or plus size body?
You can easily scale up the size of your Shelly butterfly crochet top by continuing the increase rows on the upper wings until the fabric matches your custom bust measurements. Because the lace pattern expands predictably, adding a few extra rows to each wing will automatically increase the overall coverage while keeping the shape proportional.
How should I wash and care for my handmade crochet summer top?
To preserve the delicate wing shape and prevent the cotton stitches from stretching, always hand wash your top in cold water with a gentle detergent. Avoid twisting or wringing the fabric; instead, press the excess water out gently with a clean towel and lay the garment completely flat to air dry.
Is it better to use cotton yarn or acrylic yarn for this wearable project?
100% cotton or cotton-blend yarn is significantly better than acrylic for making summer garments like this top. Cotton is highly breathable, absorbs moisture, and holds its shape beautifully when steam blocked, whereas acrylic yarn can trap body heat, stretch out permanently when pulled tight, and feel scratchy against bare skin.
Conclusion
In this comprehensive Shelly Butterfly Crochet Top – Tutorial, we have covered every essential step required to transform fine summer yarn into a gorgeous, perfectly symmetrical, and wearable piece of fashion.
We explored selecting high-quality breathable cotton fibers, mastering symmetrical increases from a central column, structuring durable edge borders, and creating adjustable lace-up closures for a personalized fit. By applying these fundamental garment-shaping techniques, you can confidently create custom-fitted tops that beautifully celebrate the whimsical textures of nature while showcasing your advanced crochet precision.