Bring a touch of handmade warmth to your home decor with a Crochet Flower Coaster – Tutorial that is perfect for beginners and seasoned crafters alike. Protecting your wooden tables from unsightly water rings doesn’t have to mean relying on boring, store-bought cork pads. Instead, you can channel your creativity into making beautiful, vibrant fiber art that serves a highly practical purpose in your daily life. This complete step-by-step guide will walk you through the entire process of creating your very own floral drink mats from scratch.
When you dive into a Crochet Flower Coaster – Tutorial, you are not just learning how to manipulate yarn; you are discovering a therapeutic hobby that allows you to decompress while making something truly beautiful. These little textured blossoms make incredible gifts for housewarming parties, Mother’s Day, or holiday gift baskets, and they are brilliant for using up small scraps of yarn left over from larger projects. Because they are quick to make, you will find yourself crocheting a whole colorful bouquet of them in just one single afternoon.
In this comprehensive Crochet Flower Coaster – Tutorial, we will explore everything from selecting the absolute best materials to mastering the essential stitches required for success. We want to ensure your finished project lies perfectly flat, absorbs moisture efficiently, and looks stunning next to your favorite morning coffee mug. Grab your favorite crochet hook, pick out some cheerful yarn colors that match your living room or kitchen aesthetic, and let’s get ready to transform simple stitches into a gorgeous blooming masterpiece.
1. Choosing the Right Materials for Your Crochet Flower Coaster
Selecting the proper yarn is the absolute foundation of creating a functional, long-lasting drink mat. For this specific Crochet Flower Coaster – Tutorial, we highly recommend choosing a 100% cotton yarn rather than an acrylic blend. Cotton is naturally highly absorbent, heat-resistant, and incredibly durable, meaning it will easily soak up the condensation from an ice-cold glass of water without ruining your furniture. Acrylic yarn, on the other hand, tends to repel water and can actually melt if you place a piping hot mug of tea directly on top of it.
The weight of your yarn will also play a massive role in determines the final size and thickness of your floral creation. A worsted weight yarn (medium number 4) is generally the ultimate choice for beginners because it is easy to hold, works up incredibly fast, and creates a sturdy fabric. If you prefer a more delicate, intricate vintage look, you could opt for a finer sport weight or DK weight yarn, though you may need to add an extra round of stitches to achieve the ideal coaster diameter.
Matching your crochet hook size to your chosen yarn is the next vital step in our Crochet Flower Coaster – Tutorial checklist. For a standard worsted weight cotton yarn, an H/8 (5.0mm) or G/6 (4.0mm) crochet hook usually yields the best results. If you happen to be a naturally loose crocheter, dropping down to a slightly smaller hook size will help keep your tension nice and tight, ensuring that the decorative holes in your flower design aren’t so large that moisture leaks right through onto your tabletop.
Color selection is where you can truly let your personal style and creative flair shine through. You can choose to use a single solid color for a modern, minimalist aesthetic, or you can pick three distinct shades to make the flower pop. A classic combination involves using a bright yellow or golden yarn for the center flower bud, a clean white or cream for the delicate petals, and a soft sage green for the outer border round.
Before you begin chaining your first stitches, make sure you have a few essential notions nearby to make your crafting experience seamless. You will definitely need a sharp pair of craft scissors to snip your yarn tails cleanly when changing colors between rounds. A blunt yarn needle (also widely known as a tapestry needle) is absolutely crucial for weaving in those loose ends securely so your hard work doesn’t unravel in the washing machine.
Lastly, having a few stitch markers on hand can be incredibly helpful, especially when you are working in continuous rounds or keeping track of the first stitch of a new petal. These simple little plastic clips prevent you from losing your place if you get distracted. Once your materials are neatly organized on your workspace, you are officially ready to proceed with the actual stitching portion of our guide.
2. Master the Core Stitches and Techniques Step by Step
To successfully complete this Crochet Flower Coaster – Tutorial, you only need to be familiar with a handful of foundational crochet movements. The project begins by establishing a center ring, which can be done using a standard chain 4 loop or the incredibly popular magic ring technique. The magic ring is highly preferred by modern crafters because it allows you to pull the yarn tail tightly, completely closing the center hole so your coaster looks incredibly neat and professional.
Once your center ring is established, the first official round typically utilizes the double crochet (dc) stitch to build a solid foundation. To execute a double crochet, you simply yarn over, insert your hook into the center ring, yarn over and pull up a loop, yarn over and pull through two loops, and yarn over one final time to pull through the remaining two loops. Repeating this stitch around the circle creates a flat, sturdy disc that forms the middle section of your blossom.
Creating the beautiful, flowing petals is where the real artistic magic happens in our Crochet Flower Coaster – Tutorial. Petals are formed by combining stitches of varying heights within a single space or chain loop, starting short, getting tall in the middle, and ending short again. A typical petal sequence might involve making a slip stitch, a half double crochet (hdc), two double crochets, another half double crochet, and finishing with a slip stitch all into the exact same stitch space.
Understanding how to execute a proper slip stitch (sl st) is vital for joining your rounds together seamlessly and for moving your yarn to the next starting point without adding bulk. To work a slip stitch, you merely insert your hook into the designated stitch, yarn over, and pull that loop directly through both the stitch itself and the loop that was already resting on your hook. This technique keeps your edges incredibly clean and uniform.
Changing yarn colors between rounds is a fantastic way to elevate the visual appeal of your handmade flower. To make a clean color transition, stop right before the final pull-through of the last stitch in your round, drop the old color, place the new color over your hook, and pull it through to complete the stitch. This brilliant method avoids creating awkward, visible knots and makes your color transitions look completely effortless and professional.
Maintaining even stitch tension throughout the entire project is the secret key to ensuring your coaster lies completely flat on flat surfaces. If you crochet your stitches too tightly, the edges of your flower will start to curl upward like a small bowl. If you stitch way too loosely, the fabric will become wavy and distorted, so try to maintain a relaxed, consistent rhythm with your hands as you guide the yarn.
3. Assembling the Flower and Refining the Edges
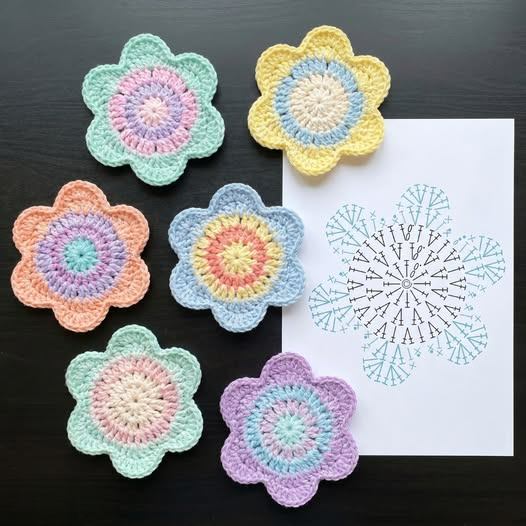
Now that you understand the basic mechanics, let’s look at how the rounds come together to form the finished product. The initial round acts as the pollen center, usually consisting of twelve double crochets worked directly into your magic circle, joined with a slip stitch. Round two builds upon this by creating anchor spaces for your petals, which is often done by alternating single crochets and short chain-3 spaces all the way around the perimeter.
In the third round of our Crochet Flower Coaster – Tutorial, you will work your petal stitch combinations directly into those chain-3 spaces you created in the previous step. As you fill each loop with multiple stitches, you will see the classic, distinct scalloped shapes of the flower petals instantly come to life before your eyes. It is incredibly satisfying to watch a simple piece of string transform into a beautiful organic shape in just a matter of minutes.
If you want to give your drink mat an extra touch of sophistication, you can add an optional fourth round to create a contrast border. Working a row of single crochet (sc) stitches using a contrasting color all around the outermost edges of the petals adds incredible definition and makes the shape pop visually. This extra round also adds structural integrity, preventing the delicate tips of your petals from curling over time.
Once you finish your very last stitch, it is time to fasten off your yarn by cutting the strand, leaving a tail of about six inches. Pull this tail entirely through the remaining loop on your hook and tug it firmly to lock the stitch in place. Now, take your yarn needle and carefully weave all your loose tails back and forth through the dense stitches on the back side of the piece, ensuring they are completely hidden from sight.
A common issue many crafters face when completing a Crochet Flower Coaster – Tutorial is a finished item that looks slightly wrinkled or wonky right off the hook. Do not worry if your coaster isn’t perfectly flat immediately; this is completely normal and is easily fixed through a simple process called wet blocking. Pin your coaster flat onto a foam mat, mist it thoroughly with a spray bottle of water, and allow it to dry completely overnight to set the shape permanently.
Once dry, your beautifully blocked coaster is fully ready to protect your tabletops from condensation and heat. You can easily tie a stack of four or six completed coasters together with a rustic strand of jute twine or a pretty satin ribbon to create a gorgeous, store-worthy gift set. They are highly functional, washable, and add a wonderful element of handmade cozy charm to any room they are placed in.
4. Tips for Customizing and Scaling Your Floral Coasters
One of the absolute best aspects of learning this Crochet Flower Coaster – Tutorial pattern is how incredibly easy it is to customize to fit your exact personal needs. If you want to create a larger mat to place under a hot teapot or a large serving dish, you can simply upgrade to a chunky cotton yarn and a much larger hook size. The exact same stitch counts will instantly scale up into a beautiful, heat-absorbing trivet for your kitchen dining table.
Conversely, if you want to make miniature versions to use as decorative patches for clothing or dainty wine glass markers, you can use thin embroidery floss or size 10 crochet thread. Working the pattern with a tiny steel crochet hook produces micro-flowers that can be glued onto hair clips, sewn onto denim jackets, or turned into stunning bohemian earrings. The creative possibilities are truly endless once you master the core pattern.
You can also experiment with altering the shape of the petals to mimic different types of real-world flowers. For instance, if you want to make a sunflower, you can use bright yellow yarn and replace the double crochets in the petals with taller treble crochet (tr) stitches, adding a small picot stitch at the very peak of each petal to give them a sharp, pointed appearance. For a daisy look, create longer chain loops and fill them with simple single crochets.
Adding texture to the center of your flower is another phenomenal way to enhance the visual depth of your work. Instead of working standard double crochets for the center round, you can utilize the textured popcorn stitch or puff stitch. These dimensional stitches create a raised, bumpy surface in the middle of your flower that looks strikingly similar to real flower seeds and adds an amazing tactile element to your coaster.
If you are a content creator running a craft blog, these variations provide endless ideas for fresh content. You can easily film short video clips demonstrating each structural variation or photograph different color palettes to inspire your Pinterest and Instagram followers. Sharing your unique twists on a classic Crochet Flower Coaster – Tutorial is a proven way to engage your audience, drive organic traffic, and build a thriving community of craft lovers.
Always remember to encourage your readers to experiment and share their completed projects online using a specific branded hashtag. Seeing how different people mix and match colors and textures is one of the most rewarding parts of teaching the art of crochet. Keep practicing, don’t be afraid to make mistakes, and enjoy every single step of your wonderful, creative fiber arts journey.
Frequently Asked Questions (FAQ)
What is the best yarn type to use for a crochet coaster?
The absolute best choice for making coasters is 100% cotton yarn. Cotton is highly absorbent, meaning it will pull moisture away from your cups, and it handles heat exceptionally well without melting. Avoid using 100% acrylic yarn for coasters, as acrylic is made of plastic fibers that do not absorb water well and can warp or melt when exposed to hot coffee mugs or tea pots.
How do I clean and wash my handmade cotton flower coasters?
Because they are made of durable cotton, you can easily hand wash them in warm water with a mild dish soap or laundry detergent, then lay them flat to air dry. If you prefer using a washing machine, place your coasters inside a mesh laundry bag to protect the delicate petals from snagging, wash on a gentle cycle with similar colors, and reshape them while damp so they dry perfectly flat.
Why is my crochet coaster curling up at the edges instead of laying flat?
Curling is usually caused by one of two common issues: your tension is too tight, or there aren’t enough stitches in your increasing rounds. If your hands are naturally tense, try switching to a crochet hook that is one size larger to loosen up your stitches. Also, double-check your stitch count for the initial rounds to ensure you didn’t accidentally skip an increase stitch, which pulls the fabric inward.
How long does it typically take to make one flower coaster?
For an intermediate crocheter, a single coaster can easily be completed in about 15 to 20 minutes. If you are a complete beginner, it might take you 30 to 45 minutes for your very first attempt as you get used to reading the pattern and holding the yarn. They are widely considered one of the quickest, most satisfying “instant gratification” projects in the crafting community.
Can I sell items made from this Crochet Flower Coaster – Tutorial?
Yes, you can absolutely sell the physical coasters you make using this tutorial at local craft fairs, community markets, or on online platforms like Etsy! Crafting handmade home decor items to sell is a fantastic way to earn an extra income while doing what you love. Just ensure that you use your own original photos to market your finished products online.
Conclusion
In this Crochet Flower Coaster – Tutorial, we have covered every single detail you need to know to create gorgeous, practical, and highly absorbent floral drink mats for your home.
From selecting the ideal absorbent cotton yarn and matching hook size to mastering stitches like the double crochet and crafting beautifully shaped petals, you now possess the skills to create a whole garden of functional fiber art. Remember that blocking your finished work is the ultimate secret step to achieving that perfectly flat, professional look that protects your surfaces flawlessly.