If you’re looking for a charming and practical accessory to crochet, the Crochet bag in cluster stitch – pattern is an excellent project to try.
Combining elegance and texture, the cluster stitch gives the bag a rich, dimensional look while remaining soft and functional.
Whether you’re new to crochet or an experienced crafter, this pattern is enjoyable and rewarding to complete.
The Crochet bag in cluster stitch – pattern is perfect for everyday use, gifting, or even selling. Its textured design stands out and adds a handmade flair to your wardrobe. Cluster stitches create a beautifully detailed surface that can be enhanced with color changes, embellishments, or different yarn types. Plus, this type of stitch works up quickly, making it ideal for weekend projects.
In this article, you’ll learn everything you need to know to make your own Crochet bag in cluster stitch – pattern, from choosing materials to working the stitches and assembling your bag. We’ll also share helpful tips and a detailed FAQ to support you along the way. Let’s dive into this creative journey and bring your next crochet project to life.
1. Choosing Materials and Understanding the Cluster Stitch
Before starting your Crochet bag in cluster stitch – pattern, selecting the right materials is key. Cotton yarn is highly recommended for its durability, structure, and clean stitch definition. It’s sturdy enough to hold shape while still being comfortable to carry. You can also use a cotton blend or even recycled yarn for an eco-friendly option.
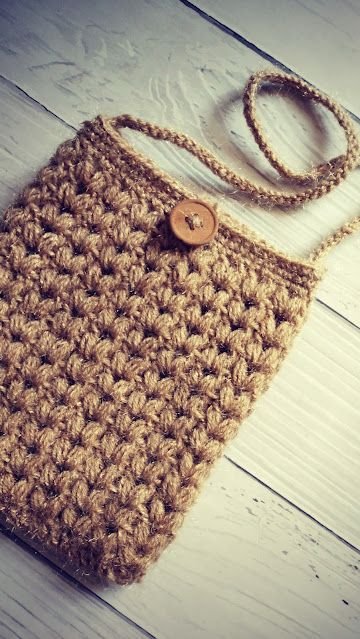
The cluster stitch is a decorative technique that creates a puffed texture by working several stitches together into one. There are variations of the cluster stitch, but most follow a similar formula: several double crochets worked partially and then closed together. This creates a small, raised group of stitches that resemble a flower bud or puff.
To get comfortable with the cluster stitch, it’s a good idea to practice on a small swatch. Count your stitches carefully and make sure your tension is consistent. Using a stitch marker can help you keep track of rounds or rows, especially if the bag is worked in the round from the bottom up.
In addition to yarn, you’ll need a crochet hook that matches your yarn’s weight—typically 4.0 mm (G) to 5.5 mm (I) for worsted weight yarn. A tapestry needle, stitch markers, and scissors will also be useful. If you plan to add lining or closures, you may want some fabric and a magnetic snap or button.
Color choice is another way to personalize your Crochet bag in cluster stitch – pattern. A single-color bag highlights the stitch texture, while multicolored yarn or planned stripes can give it a fun and modern twist. Consider using gradient or variegated yarn for a dynamic effect.
This stitch is not only beautiful but functional. It adds thickness and strength to the fabric, making it ideal for bags that need to hold items like books, phones, or everyday essentials. Once you’re confident with the stitch, you can move on to shaping and creating the body of the bag.
2. Starting the Base and Building the Bag
To begin your Crochet bag in cluster stitch – pattern, you’ll typically start with a flat base. Most crochet bags begin with a foundation chain followed by single crochets worked in the round to form an oval or circle. This creates a sturdy bottom that can support the weight of the contents.
Once the base is the desired size—usually 8 to 10 inches across—you can begin working upward with the cluster stitch. Many patterns will have you switch to the cluster stitch in the round at this point. It’s important to read the pattern instructions carefully, especially when transitioning stitches.
Keep your tension even and pay attention to stitch counts. Cluster stitches can take up more space than regular stitches, so adjusting your count may be necessary to keep the bag symmetrical and flat. Use stitch markers at the start of each round to keep your place.
If you’re new to working in the round, be sure to join each round correctly and chain the appropriate number of stitches to start the next. Improper joins can lead to slanted or uneven rows. Most patterns include specific instructions for how to join and start each round when using cluster stitches.
As you build the height of the bag, consider how deep you want it to be. A typical handbag is around 10 to 12 inches tall. Taller bags may require more yarn, while shorter bags are quicker to complete. Try the bag on as you go or place it next to your favorite bag for comparison.
Optional elements like color changes, decorative rows, or texture variations can be introduced at this stage. You might alternate rows of cluster stitch with rows of single crochet for visual contrast. The key is to stay consistent and maintain the structure as you add height.
3. Shaping the Handles and Finishing Touches
Once the body of your Crochet bag in cluster stitch – pattern is complete, it’s time to shape the handles. Handles can be made by skipping stitches in a row to form a gap, then chaining to bridge the gap. In the following round, you crochet over those chains to build the strap.
Decide whether you want short hand-held handles or a longer shoulder strap. You can create two small handles or a single long crossbody strap. For longer straps, reinforce them with an extra layer or use leather straps for added strength and style.
Secure your handles well by reinforcing the attachment points. For crocheted handles, you might add a few extra rows at the base of each strap to make them stronger. If you’re sewing on purchased handles, use a tapestry needle and matching yarn or embroidery thread.
Now’s also a good time to add lining if desired. A simple fabric lining adds a clean interior and prevents small items from poking through the crochet holes. Cut fabric slightly larger than the bag’s dimensions, fold the edges, and hand-sew the lining into place with a needle and thread.
Adding a closure helps keep your belongings safe. Magnetic snaps, zippers, or drawstrings are all good options. Be sure to test the position before attaching it permanently. Closures are optional, but they can make your Crochet bag in cluster stitch – pattern even more functional.
Final touches might include a tassel, button, or label. These details personalize your creation and give it a finished, professional look. Step back and admire your work—you’ve created a beautiful, handmade bag with your own two hands!
4. Customizing and Caring for Your Crochet Bag
One of the best parts of making your own Crochet bag in cluster stitch – pattern is the ability to customize it completely. Change the size, color scheme, handle style, or add pockets—the choice is yours. Each version becomes a unique expression of your creativity.
For example, a beach bag could be made larger and lined with waterproof fabric, while a casual everyday purse might be smaller with a fabric lining and zip closure. You can even use your leftover yarn to create matching accessories like a wallet or keychain.
Experimenting with different yarn textures also brings new life to your project. Cotton creates structure, but switching to acrylic or bamboo blends can offer softness and sheen. Just be aware that softer yarns may not hold the bag’s shape as well.
Caring for your crochet bag is important to maintain its look and durability. Spot clean with a damp cloth and mild soap when possible. For a deeper clean, hand wash gently in cold water and reshape while drying flat. Avoid wringing or machine washing unless your yarn label allows it.
If your bag includes a fabric lining, remove any detachable parts before washing. Be cautious with decorative elements like wooden handles or metal rings—they may need special care to avoid rust or damage.
With proper care, your crochet bag will last for years and continue to be a stylish, sustainable accessory. Don’t forget to tag your projects on social media and share your version of the Crochet bag in cluster stitch – pattern with fellow crafters!
Frequently Asked Questions (FAQ)
Q1: What is a cluster stitch in crochet?
A cluster stitch is a textured stitch made by partially completing several double crochets in the same space, then joining them at the top to form a cluster.
Q2: Is the cluster stitch beginner-friendly?
Yes, with a little practice. It’s great for beginners ready to expand beyond basic stitches and adds lovely texture to any project.
Q3: How much yarn do I need for a crochet bag in cluster stitch?
Typically, 200–400 grams of worsted weight cotton yarn, depending on the size of the bag and strap length.
Q4: Can I line my crochet bag?
Absolutely. A fabric lining adds structure and durability, and it helps prevent smaller items from slipping through the stitches.
Q5: What’s the best way to add a closure to my crochet bag?
Magnetic snaps are easy to install and functional. You can also use buttons, zippers, or drawstrings, depending on your bag’s style.
Q6: How do I clean a crochet bag?
Hand wash gently in cold water with mild soap. Lay flat to dry, reshaping as needed. Avoid harsh detergents and wringing the fabric.
Conclusion
The Crochet bag in cluster stitch – pattern is not only a fun and creative project but also a practical addition to your daily life. From choosing materials to adding finishing touches, this pattern allows for personalization at every step. The cluster stitch offers texture and charm, while the structure of the bag keeps it functional and stylish.
We hope this guide has inspired you to create your own crochet bag. Whether you’re making it for yourself, as a gift, or to sell, this project is a rewarding way to express your creativity. If you’ve tried this pattern or have ideas for customization, we’d love to hear from you! Please leave a sincere comment below with your thoughts and suggestions—your feedback helps other makers grow
and learn too. Happy crocheting!