Crochet Butterfly Bracelets – Tutorial is the perfect way to dive into the world of delicate, handmade jewelry while mastering a design that is both timeless and trendy. Whether you are a seasoned artisan or a curious beginner picking up a hook for the first time, creating these whimsical accessories offers a unique blend of relaxation and creative fulfillment. In this guide, we will explore everything you need to know to craft stunning wristwear that captures the ethereal beauty of nature’s most graceful insects.
The beauty of a Crochet Butterfly Bracelets – Tutorial lies in its versatility, as these pieces can be customized with various yarn weights, vibrant colors, and decorative beads to suit any personal style. Handmade jewelry has seen a massive resurgence in recent years, with people valuing the “slow fashion” movement and the personal touch that mass-produced items simply cannot replicate. By the end of this article, you will have a deep understanding of the techniques required to make these charming pieces for yourself or as thoughtful, personalized gifts for friends and family.
To ensure your success, we will focus on the essential crochet stitches, material selection, and the assembly process that makes your butterflies look professional and polished. Using high-quality cotton thread or embroidery floss is often the secret to achieving that intricate, lace-like appearance that defines high-end crochet jewelry. As we move through the steps, remember that patience is key; working on a smaller scale requires a bit of focus, but the rewarding result of a finished crochet butterfly is well worth the effort.
1. Essential Materials for Your Crochet Butterfly Bracelets – Tutorial
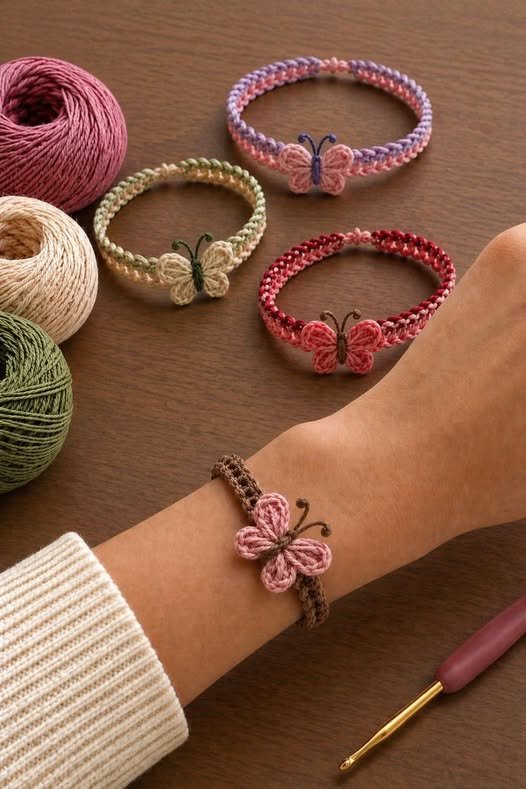
Before starting your crochet project, you must gather the right tools to ensure your stitches are crisp and your bracelet is durable. The most important choice is your yarn or thread, as a mercerized cotton is highly recommended for jewelry because it doesn’t pill and has a beautiful sheen. For a delicate butterfly, a size 10 crochet thread or even embroidery silk works best to capture the fine details of the wings.
Your crochet hook size must correspond strictly to the thickness of your thread to avoid loose, messy loops. For jewelry-grade work, a steel crochet hook (usually ranging from 1.25mm to 1.75mm) is the standard choice for maintaining high stitch tension. Using a hook that is slightly smaller than what the yarn label suggests will result in a firmer butterfly that holds its shape without needing stiffening agents.
Don’t forget the functional hardware that turns a crochet motif into a wearable butterfly bracelet. You will need jewelry findings such as lobster claws, jump rings, and perhaps a small length of extension chain to make the size adjustable. Having a pair of jewelry pliers on hand will make attaching these metal components much easier and ensure your bracelet stays securely on your wrist.
Adding a touch of sparkle can elevate your Crochet Butterfly Bracelets – Tutorial from simple to sophisticated. Consider incorporating seed beads or tiny pearls into the “body” or the tips of the wings for a 3D effect. If you choose to add beads, you will need a beading needle or a very fine hook to slide the beads onto your thread before you begin the actual crocheting process.
Proper finishing tools are just as vital as the hook itself for a professional look. A sharp pair of embroidery scissors is necessary for clean cuts, and a tapestry needle with a fine eye will help you weave in those pesky ends invisibly. Keeping your workspace organized with a small tray for your beads and findings will prevent frustration and allow you to focus on the rhythmic flow of your crochet stitches.
Lastly, think about the structural integrity of your finished piece. While tightly worked double crochet and treble crochet stitches usually hold up well, some crafters prefer using a fabric stiffener or a water-glue mixture to block their butterflies. This ensures the wings stay flat and vibrant even after multiple wears, keeping your handmade jewelry looking brand new for a long time.
2. Mastering the Basic Stitches and Butterfly Anatomy
To follow this Crochet Butterfly Bracelets – Tutorial effectively, you need to be comfortable with a few foundational crochet techniques. The butterfly is typically constructed using a “magic ring” or a small circle of chains as the center. From this center, you will build the wings using a combination of chains (ch), single crochets (sc), and taller stitches like the double crochet (dc) to create the curved shape of the wings.
The anatomy of a crochet butterfly usually consists of two large upper wings and two smaller lower wings. To achieve this, we use the height of the stitches to our advantage; treble crochets (tr) are perfect for the expansive upper wings, while half-double crochets (hdc) provide the subtle taper for the lower sections. Understanding how these stitch heights interact is the core of successful amigurumi-style jewelry making.
One of the most popular methods for this Crochet Butterfly Bracelets – Tutorial involves working in the round to create a flowery shape that is later folded in half. By folding a circular motif, you instantly create a symmetrical set of wings with a natural crease in the middle. This “fold-and-stitch” method is incredibly beginner-friendly and produces a sturdy, layered effect that looks much more complex than it actually is.
The “body” of the butterfly is often created by wrapping a contrasting color of thread around the center or by working a row of slip stitches (sl st) down the middle. This not only secures the wings in their folded position but also provides a base to attach the antenna. For the antenna, a simple sequence of chain stitches finished with a small knot or a bead at the end adds a delightful, realistic touch.
Consistent tension control is arguably the most important skill to practice during this tutorial. If your tension is too loose, the butterfly will be floppy and lose its iconic silhouette; if it’s too tight, the wings may curl inward excessively. Aim for a firm, even feel where the stitches are close together with no visible gaps, ensuring the butterfly motif remains crisp and defined.
Once you have mastered the basic shape, you can experiment with color changes to create “Monarch” styles or variegated patterns. Using multi-colored yarn is an easy way to get a complex look without having to join new threads constantly. Learning to transition between colors seamlessly will take your Crochet Butterfly Bracelets – Tutorial to a professional level, making your work stand out in any collection.
3. Assembling the Bracelet and Customizing the Strap
The transition from a single motif to a functional Crochet Butterfly Bracelets – Tutorial requires a sturdy strap. You have several options here: a simple foundation chain worked with double strands for strength, or a more decorative I-cord or Romanian point lace cord. The choice of strap depends on the weight of your butterfly and the aesthetic you want to achieve—dainty or bohemian.
For a minimalist look, you can attach the butterfly directly to a delicate metal chain using jump rings. Simply find a secure loop on the back of each wing and hook the jump rings through the crochet fabric. This hybrid style combines the softness of fiber art with the sleekness of traditional jewelry, making the crochet butterfly the undisputed star of the piece.
If you prefer an all-yarn approach, consider crocheting the strap as part of the butterfly itself. You can start with a long chain tail, work the butterfly in the center, and finish with another long chain. This “one-piece” construction is excellent for durability since there are no joins that can break or come undone over time, creating a seamless handmade accessory.
Adjustability is a key factor in making your Crochet Butterfly Bracelets – Tutorial accessible to everyone. Instead of a fixed closure, try using a sliding knot (common in friendship bracelets) or a button-and-loop system. A small, vintage button can serve as a beautiful decorative element on the underside of the wrist while keeping the butterfly bracelet securely in place.
For those who want a bolder statement, you can create a “multi-butterfly” bracelet. By linking three or four smaller crochet butterflies together in a row, you create a stunning garland effect around the wrist. In this case, ensure each butterfly is blocked and stiffened slightly so they don’t overlap awkwardly or lose their shape while you are moving your hand.
Finally, consider the comfort of the wearer by ensuring there are no scratchy ends or bulky knots. Use your tapestry needle to weave yarn tails deep into the stitches of the butterfly’s body. A well-finished crochet bracelet should feel soft against the skin, making it a joy to wear all day long. This attention to detail is what defines a high-quality Crochet Butterfly Bracelets – Tutorial.
4. SEO Tips and Marketing Your Handmade Jewelry
If you plan to sell your creations, understanding the digital side of this Crochet Butterfly Bracelets – Tutorial is just as important as the craft itself. Using long-tail keywords like “handmade crochet butterfly jewelry” or “DIY boho butterfly bracelet” in your online listings can help customers find your work. High-quality photography with natural lighting is essential to showcase the intricate stitch work and vibrant colors.
Search Engine Optimization (SEO) for crafters involves more than just words; it’s about providing value. Creating a blog post or a video featuring your Crochet Butterfly Bracelets – Tutorial can drive traffic to your shop. Make sure to include alt-text on your images that describes the item, such as “blue and gold crochet butterfly bracelet with beads,” to help search engines index your content properly.
Social media platforms like Pinterest and Instagram are visual search engines that are perfect for crochet patterns. Share “behind-the-scenes” clips of you working on your butterfly motif or a time-lapse of the assembly process. Engaging with the crochet community through hashtags like #CrochetTutorial or #ModernCrochet will help build a loyal following and increase your brand’s authority.
When writing descriptions for your products, focus on the “why” as much as the “how.” Explain that your Crochet Butterfly Bracelets – Tutorial uses eco-friendly cotton thread or that each piece is inspired by specific nature walks. Storytelling creates an emotional connection with the buyer, making them more likely to invest in your handmade brand over a generic alternative.
Don’t forget to optimize your website’s loading speed and mobile responsiveness. Most users looking for a Crochet Butterfly Bracelets – Tutorial will likely be viewing it on a phone or tablet while they work. A clean, easy-to-navigate layout ensures that your readers stay on the page longer, which signals to Google that your content is high-quality and relevant.
Lastly, encourage user interaction by asking for reviews or photos of their finished projects. User-generated content is a powerful SEO tool because it provides fresh, relevant text and social proof. By building a community around your crochet tutorials, you create a sustainable ecosystem where your art can thrive both creatively and commercially in the competitive world of online crafts.
FAQ – Frequently Asked Questions
1. What is the best yarn for a Crochet Butterfly Bracelets – Tutorial?
The best choice is mercerized cotton thread (size 10 or 20) or embroidery floss. These materials are thin enough for jewelry and have a smooth finish that highlights the butterfly’s wings without looking fuzzy.
2. Is this tutorial suitable for absolute beginners?
Yes! While working with small hooks can be fiddly, the basic crochet stitches used—like the single, double, and treble crochet—are fundamental. If you can make a magic circle, you can complete this butterfly bracelet.
3. How do I make the bracelet waterproof?
While cotton is washable, constant exposure to water can ruin the jewelry findings. It is best to remove your crochet jewelry before swimming or showering. You can apply a commercial fabric protector spray to help repel light moisture and dirt.
4. How long does it take to make one bracelet?
A single crochet butterfly usually takes about 15 to 30 minutes, depending on your speed. Assembling the full bracelet with hardware might take another 15 minutes, making it a perfect one-hour project.
5. Can I use this pattern to make other things?
Absolutely! The butterfly motif from this Crochet Butterfly Bracelets – Tutorial can be used for earrings, hair clips, appliqués for clothing, or even festive bunting. The possibilities for crochet motifs are endless.
Conclusion
Creating your own jewelry through this Crochet Butterfly Bracelets – Tutorial is a rewarding journey that combines technical skill with artistic flair. We have covered everything from selecting the finest cotton threads and steel hooks to mastering the anatomy of the butterfly wings and attaching professional jewelry findings. By focusing on consistent tension and clean finishing techniques, you can produce high-quality accessories that rival boutique finds.
Remember that every stitch is an opportunity to express your personal style. Whether you choose vibrant, tropical colors or soft, muted pastels, your handmade butterfly bracelet will be a testament to your creativity and patience. We hope this guide has inspired you to pick up your hook and start crafting these delicate treasures today.