Crochet Cat pull tab Keychains – Tutorial is the perfect project for anyone looking to combine sustainability with adorable handmade aesthetics. If you have ever looked at a simple soda can and wondered how to turn that small piece of aluminum into something magical, you are in the right place. Creating these unique crochet accessories allows you to upcycle everyday items into charming feline-inspired gifts that are both functional and incredibly cute to look at.
In this comprehensive Crochet Cat pull tab Keychains – Tutorial, we are going to explore the intersection of eco-friendly crafting and the “amigurumi” style. Using pull tabs as the structural base for your crochet work provides a sturdy foundation that makes these keychains durable enough for daily use on bags, keys, or backpacks. This project is ideal for beginners because it requires minimal yarn and teaches you how to work around non-traditional materials, expanding your creative horizons significantly.
The beauty of following a Crochet Cat pull tab Keychains – Tutorial lies in the customization options available to every crafter. You can play with different yarn weights, vibrant colors, and various facial expressions to give each cat its own personality. Whether you want a grumpy calico or a cheerful tabby, the techniques we will discuss today will help you master the art of upcycled crochet art while producing a professional-looking result that looks like it came straight from a boutique.
1 Gathering Materials for Your Crochet Cat pull tab Keychains – Tutorial
To begin your journey into making Crochet Cat pull tab Keychains, you first need to collect high-quality soda can tabs. Ensure they are cleaned thoroughly and inspected for any sharp edges that might snag your cotton yarn. Safety is a priority when working with recycled metal, so a quick filing of the rough spots is highly recommended.
Choosing the right hook is the next step in this Crochet Cat pull tab Keychains – Tutorial. A smaller hook, such as a 2.5mm or 3.0mm crochet hook, is usually best for getting into the tight spaces of the aluminum holes. This ensures your stitches are tight enough to hide the metal completely while maintaining a neat, uniform appearance throughout the piece.
Don’t forget the keychain rings and lobster clasps that will turn your crochet cat into a portable accessory. You will also need a small amount of fiberfill stuffing if you decide to make a 3D version, though many of these designs work beautifully as flat, layered charms. Having these components ready will make your crafting process much smoother and more enjoyable.
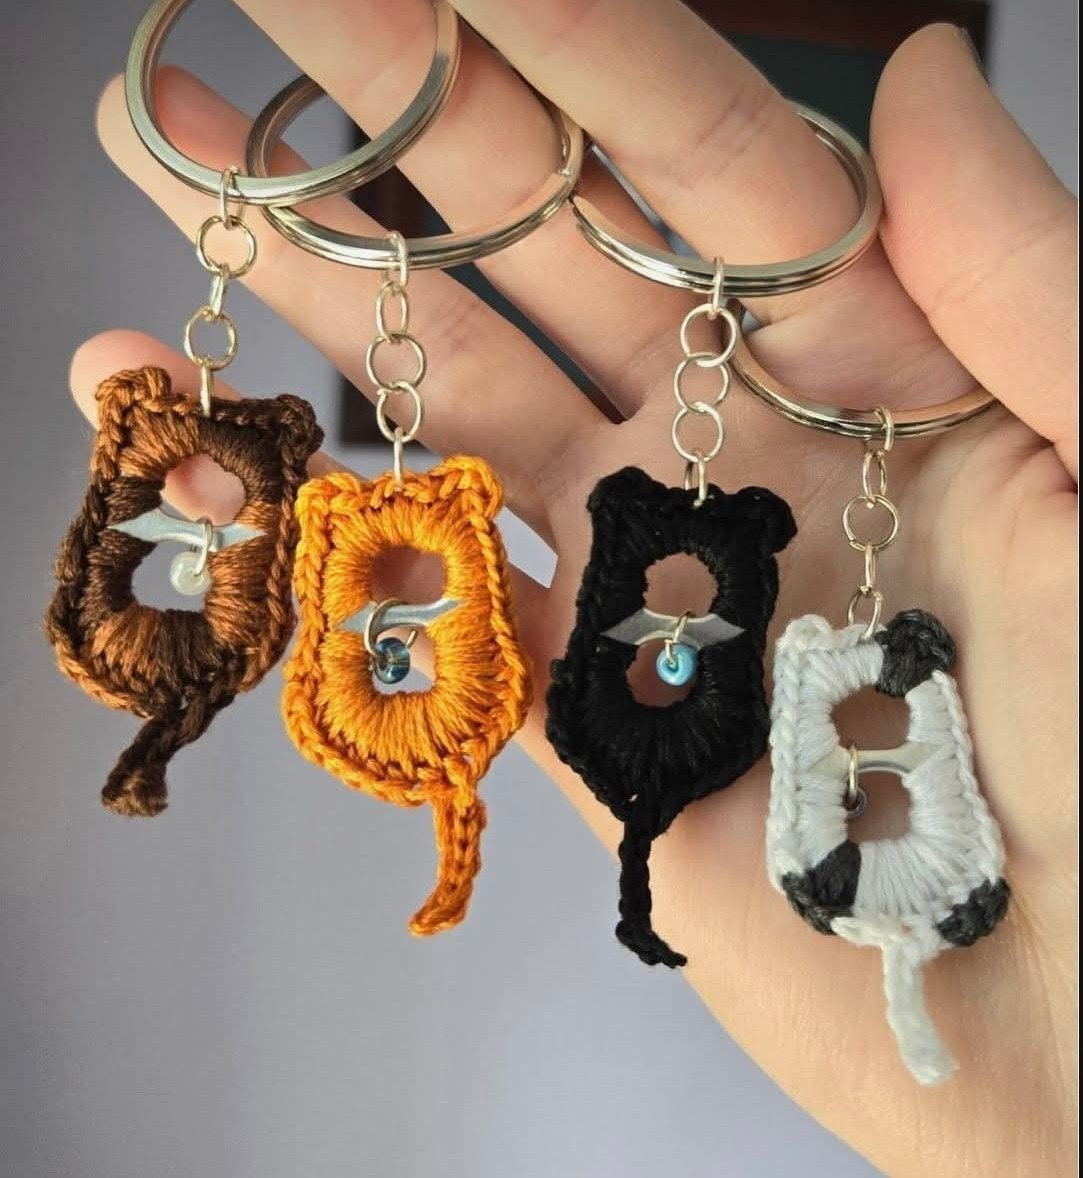
For the feline features, gather some embroidery floss in black or pink to stitch the nose and whiskers. Small safety eyes are a popular choice for adding a professional “toy” look, but embroidered eyes are safer if you plan on gifting these to small children. The contrast between the soft thread and the metallic core is what makes pull tab crochet so visually appealing.
The type of yarn you select for your Crochet Cat pull tab Keychains – Tutorial matters immensely for the final texture. I recommend using mercerized cotton because it has a slight sheen and does not fray easily when rubbed against the edges of the pull tabs. This durability ensures that your handmade keychain stays looking new even after months of being tossed around in a purse.
Lastly, keep a pair of sharp embroidery scissors and a tapestry needle nearby for weaving in ends. Since these items are small, loose threads can become very obvious, so a clean finish is essential. Once your workspace is set and your materials are organized, you are officially ready to start the actual construction phase of your DIY crochet project.
2 Mastering the Foundation Stitches Around Metal Tabs
The core technique in this Crochet Cat pull tab Keychains – Tutorial involves the single crochet (sc) stitch worked directly over the aluminum. You start by joining your yarn to one of the holes in the tab with a slip stitch. It is vital to keep your tension consistent so the yarn covers the metal without buckling the tab or leaving gaps.
As you work your way around the pull tab, you will notice that the shape starts to resemble a small frame. For a cat design, we often use two tabs joined together to create a longer body or a separate head and torso. Learning to join crochet elements seamlessly is a skill that will elevate your work from amateur to expert level.
In this part of the Crochet Cat pull tab Keychains – Tutorial, we focus on the “ears.” By using a combination of half double crochet (hdc) and double crochet (dc) stitches at the top corners of the tab, you can easily create those signature pointed cat ears. This simple geometric shift transforms a basic circle into a recognizable feline silhouette in just a few seconds.
One secret to success with Crochet Cat pull tab Keychains is “hiding the bridge.” The bridge is the middle section of the pull tab that separates the two holes. By placing extra stitches over this area, you ensure that no silver metal peeks through, giving your crocheted cat a solid, high-quality fabric feel that is pleasant to the touch.
If you are a beginner, don’t worry if your first few stitches look a bit crowded. Working with metal requires a bit of patience as you learn how to pivot the hook. This Crochet Cat pull tab Keychains – Tutorial encourages you to take it slow; once you find the rhythm of the wrap-around stitch, the process becomes very meditative and fast.
To finish the foundation, you will close the round with a slip stitch into the first stitch. This creates a clean, continuous border. At this stage, you have the “skeleton” of your cat ready. You can see how the upcycled materials provide a rigid structure that yarn alone could never achieve, making it the perfect base for a heavy-duty keychain accessory.
3 Adding Character and Feline Details to Your Work
Now comes the most creative part of the Crochet Cat pull tab Keychains – Tutorial: adding the face. Using your tapestry needle, you will define the “muzzle” area. A simple “V” shape in pink thread creates a perfect nose, while long straight stitches on either side serve as whiskers that give your cat a lifelike and whimsical personality.
The placement of the eyes is crucial in any amigurumi-style project. Placing them lower on the face gives the cat a “kawaii” or cute appearance, while placing them higher makes it look more realistic. In this Crochet Cat pull tab Keychains – Tutorial, we suggest experimenting with different positions before permanently securing your safety eyes or knots.
Tail construction is another fun element. You can create a simple chain stitch tail that dangles from the bottom of the pull tab, or a sturdier i-cord if you want something more substantial. A curly tail adds a playful touch to your handmade cat keychain, making it stand out as a unique piece of fiber art.
Color changes can also be introduced here. If you want a “tuxedo cat,” you can switch yarn colors halfway through the round. This Crochet Cat pull tab Keychains – Tutorial teaches you that even with a small surface area, you can incorporate sophisticated colorwork techniques to mimic the patterns of real-life feline friends.
Adding a small crochet heart or a tiny bell to the collar area can further customize your creation. These small details are what make personalized crochet gifts so special. The pull tab serves as a great anchor point for attaching these extra charms without putting too much strain on the yarn stitches themselves.
Finally, ensure all your facial features are anchored tightly. Since a keychain undergoes a lot of friction, you want your embroidery to be “snag-proof.” This part of the Crochet Cat pull tab Keychains – Tutorial emphasizes durability; a beautiful cat is great, but a beautiful cat that stays intact for years is even better for your crafting reputation.
4 Final Assembly and Finishing Touches for Durability
The last step in our Crochet Cat pull tab Keychains – Tutorial is the attachment of the hardware. You should use a sturdy jump ring to connect the crochet fabric to the metal keychain. It is best to hook the jump ring through both the yarn and the hole of the pull tab to ensure it never pulls out of the fabric.
Check your work for any “hairy” yarn bits. Using a small lint roller or even a quick pass with a fabric shaver can make your Crochet Cat pull tab Keychains look much more professional. Clean lines and a neat finish are the hallmarks of a master crafter, and these small steps make a world of difference in the final SEO-ready product description.
If you are making these for sale, consider adding a handmade tag. This adds a touch of branding to your Crochet Cat pull tab Keychains – Tutorial results. Even though the core of the project is a recycled soda tab, the final presentation should feel like a luxury, eco-conscious item that people would be proud to carry.
Durability testing is a great habit to get into. Give the ears and tail a gentle tug to make sure everything is secure. This Crochet Cat pull tab Keychains – Tutorial aims to help you create items that aren’t just pretty to look at but are also built to survive the chaotic environment of a pocket or a set of car keys.
Don’t forget to block your work if the yarn seems a bit distorted. While not always necessary for pull tab crochet, a quick steam can help the stitches settle flatly against the metal. This ensures that your cat keychain maintains its shape and doesn’t curl at the edges over time, keeping the silhouette sharp and recognizable.
Now that you have completed the Crochet Cat pull tab Keychains – Tutorial, you have a finished piece of art! You have successfully turned trash into treasure. This process not only saves items from the landfill but also provides you with a scalable project that can be turned into a small business or a heartfelt hobby for cat lovers everywhere.
FAQ: Common Questions About Crochet Cat pull tab Keychains
What is the best yarn for this project?
The best yarn for a Crochet Cat pull tab Keychains – Tutorial is definitely a 100% cotton yarn. It provides the necessary stiffness and doesn’t pill as much as acrylic or wool, which is important for an item that will be handled frequently.
How do I clean the pull tabs?
You should soak the tabs in warm, soapy water and use an old toothbrush to scrub away any sticky residue. Make sure they are completely dry before you start the Crochet Cat pull tab Keychains – Tutorial to prevent any moisture from being trapped under the yarn.
Can beginners do this project?
Absolutely! This Crochet Cat pull tab Keychains – Tutorial is designed for those who know basic stitches like the single crochet. The only challenge is working around the metal, which just takes a little bit of practice to get used to.
Are the metal edges dangerous?
If the tabs are handled properly, they are safe. However, in this Crochet Cat pull tab Keychains – Tutorial, we always recommend checking for sharp burrs where the tab was detached from the can. You can use a nail file or pliers to smooth these down before crocheting.
How long does it take to make one?
Once you are familiar with the Crochet Cat pull tab Keychains – Tutorial steps, you can easily finish one cat in about 20 to 30 minutes. This makes it an excellent “stash-buster” project or a quick craft for markets.
Can I use other types of tabs?
Yes, you can use juice tabs or energy drink tabs, which often come in different colors like black, green, or red. This adds an extra layer of style to your crochet keychain without needing to dye the metal yourself.
Conclusion
In this Crochet Cat pull tab Keychains – Tutorial, we have covered everything from selecting your recycled materials to the final embroidery of the feline face.
We learned that upcycling can be both beautiful and practical, and that a little bit of yarn can transform industrial waste into a charming handmade accessory. This project is a testament to the creativity of the crochet community and the endless possibilities of sustainable crafting.