Crochet coaster patterns are a wonderful way to express your creativity while making practical items for your home.
Whether you are a beginner or an experienced crocheter, learning how to make a crochet coaster can be a rewarding project.
Coasters are not just functional; they can add a personal touch to your decor and can also make for a thoughtful handmade gift.
In this article, we’ll dive deep into the world of crochet coasters, providing you with a step-by-step guide to help you create your own coaster pattern.
Crochet is a versatile craft that allows you to make various types of patterns, from intricate designs to simple ones like the crochet coaster. The beauty of crochet lies in the variety of techniques and yarns that can be used to create different textures, colors, and styles. A crochet coaster pattern is an ideal project for practicing new techniques or experimenting with yarn colors and stitch patterns.
A crochet coaster is a simple item, yet it can showcase your skills and imagination. It serves a practical purpose—protecting your surfaces from drink stains or hot cups—but it can also be a unique piece of art in your home. Learning a few basic stitches and techniques will allow you to make these coasters in no time. Throughout this article, we will cover all the essential steps, from choosing materials to creating your first coaster using a crochet coaster pattern.
1. Materials You’ll Need for Your Crochet Coaster Pattern
Before you start crocheting, it’s essential to gather the right materials for your crochet coaster pattern. The good news is that you don’t need much—crochet is a relatively inexpensive craft to start with. Here’s what you’ll need:
Yarn: When choosing yarn for your crochet coaster pattern, opt for a medium-weight yarn, also known as worsted weight yarn. This type of yarn works well for most coaster patterns because it’s sturdy and offers a good balance of flexibility and durability. Cotton yarn is highly recommended for coasters as it is absorbent and easy to clean.
Crochet Hook: The size of the hook you use will depend on your yarn. For worsted weight yarn, a hook size between 4mm and 5mm is typically ideal. A hook that is too small will result in a tight, stiff coaster, while a hook that’s too large will make your coaster too loose.
Scissors: These are essential for cutting your yarn when you finish each round of your crochet coaster pattern or if you need to change yarn colors.
Yarn Needle: A yarn needle is useful for weaving in the loose ends after completing the coaster. This step is important to ensure your work looks neat and polished.
Stitch Markers: Stitch markers are optional but can be incredibly helpful, especially for beginners. They help keep track of the start and end of your rounds and ensure you stay on the right path.
Having all the necessary materials at hand will make your crochet coaster project smoother and more enjoyable. Once you’ve gathered these items, you’re ready to start working on your crochet coaster pattern.
2. Basic Stitches for Your Crochet Coaster Pattern
To create a basic crochet coaster pattern, you’ll need to master a few essential stitches. These stitches are the foundation of almost all crochet projects, and understanding them will make your coasters come together beautifully.
Chain Stitch (ch): This is the most basic crochet stitch and is used to start most patterns. To make a chain stitch, create a loop with your yarn and pull it through the loop on the hook. Repeat this until you have the desired number of stitches.
Slip Stitch (sl st): A slip stitch is used to join rounds together or to move the yarn to a different part of your project. Insert the hook into a stitch, yarn over, and pull through both the stitch and the loop on the hook.
Single Crochet (sc): This is the most common stitch used in crochet coaster patterns. Insert the hook into a stitch, yarn over, pull up a loop, then yarn over again and pull through both loops on the hook.
Half Double Crochet (hdc): This stitch is taller than a single crochet, giving your coaster a bit more texture. Yarn over, insert the hook into a stitch, yarn over again, and pull up a loop. Yarn over one more time and pull through all three loops on the hook.
By mastering these basic stitches, you’ll be able to follow most crochet coaster patterns with ease. These stitches form the building blocks for a variety of designs, from simple to intricate, so once you understand them, you can experiment with more complex patterns.
3. Step-by-Step Instructions for Creating a Crochet Coaster Pattern
Now that you have all your materials and know the basic stitches, it’s time to start crocheting your coaster. Here’s a step-by-step guide to help you create your own crochet coaster pattern:
Step 1: Start with a Magic Ring
Begin by creating a magic ring (also known as a magic circle). This is a great way to start your crochet coaster pattern because it allows you to work in the round and close the center tightly.
Step 2: Crochet in the Round
Once you have your magic ring, chain 1, and then work a few single crochets into the ring. The number of stitches you make will depend on the size of your coaster, but typically 6-8 stitches are a good starting point for a small coaster. Pull the ring tight to close the center.
Step 3: Increase Stitches for Round 2
In the second round, you’ll need to increase the number of stitches to create a flat, circular shape. For every stitch in the previous round, add two single crochets. This will help the coaster lie flat and keep it from curling up.
Step 4: Continue Adding Rounds
For each subsequent round, you can alternate between increasing stitches and maintaining the same number of stitches to create a flat circle. If you prefer a more textured look, you can switch up the stitches in different rounds, adding half double crochets or slip stitches.
Step 5: Finish the Coaster
Once you’ve reached your desired size, finish the round by slipping the hook through the final stitch. Use a yarn needle to weave in any loose ends, ensuring the coaster looks clean and neat.
By following these steps, you’ll be able to create a variety of coasters with different shapes, textures, and designs. This method is easy to follow and can be modified depending on your personal preferences.
4. Tips and Tricks for Perfecting Your Crochet Coaster Pattern
As you become more comfortable with your crochet coaster pattern, you may want to experiment with new techniques and ideas to perfect your coasters. Here are a few tips and tricks to help you improve your coaster-making skills:
Use Variegated Yarn: Variegated yarn adds a unique and colorful touch to your crochet coaster. The changing colors will give your coaster a more dynamic and visually interesting look.
Try Different Shapes: While most crochet coasters are round, you can experiment with square, hexagonal, or even heart-shaped designs. Simply adjust the number of stitches and increase them at the right intervals to create different shapes.
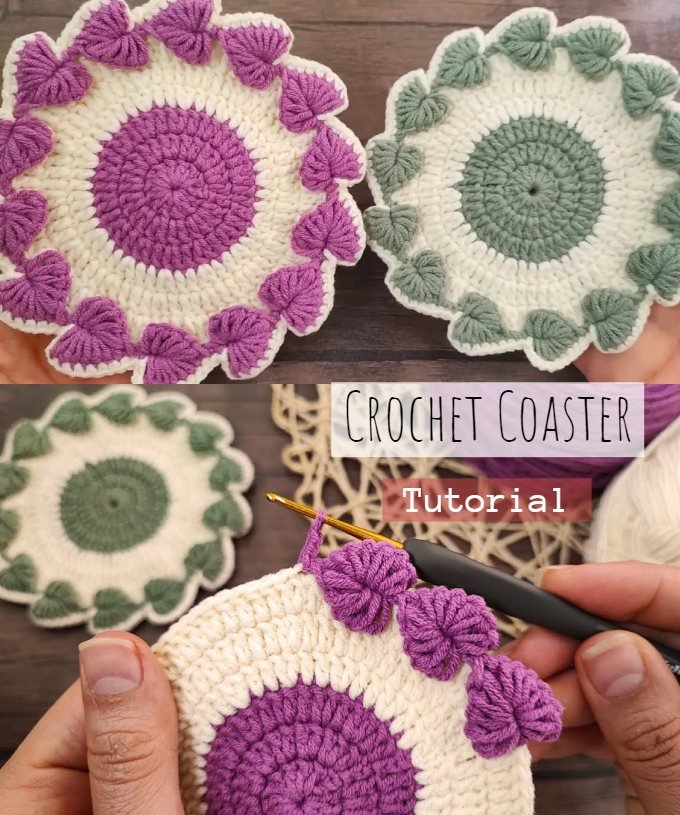
Add Decorative Borders: Once your basic coaster is complete, consider adding a decorative border to enhance the look. You can use picot stitches or scalloped edges for a more intricate design.
Use Different Stitches: Don’t be afraid to mix things up with different crochet stitches. A combination of single crochets, double crochets, and slip stitches can give your coaster a unique texture and appearance.
Block Your Coasters: If your coaster tends to curl up after crocheting, consider blocking it. This involves wetting the coaster and pinning it to a flat surface to allow it to dry in the desired shape.
Make a Set of Coasters: Creating a set of coasters with matching designs or colors makes for a great gift idea. Personalize them by adding initials, patterns, or colors that match the recipient’s style.
These tips and tricks will help you create crochet coasters that are not only functional but also visually stunning.
FAQ:
1. How long does it take to crochet a coaster?
It usually takes about 30 minutes to an hour to crochet a basic coaster, depending on your experience level.
2. Can I use acrylic yarn for coasters?
While acrylic yarn is durable, cotton yarn is the best option for coasters as it is more absorbent and easier to clean.
3. How can I make my coaster flat?
To prevent curling, make sure to follow the correct stitch count and increase stitches evenly in each round.
4. Can I make coasters in different shapes?
Yes! You can experiment with square, hexagonal, or even flower-shaped coasters by adjusting your stitch counts and increases.
5. Are crochet coasters machine washable?
Yes, especially if you use cotton yarn. Just make sure to read the yarn care instructions for washing.
Conclusion:
In this article, we’ve covered everything you need to know about creating your own crochet coaster pattern. From choosing the right materials to mastering basic stitches and following step-by-step instructions, you’re now ready to create beautiful and functional coasters. Remember to experiment with different stitches, yarns, and shapes to make your coasters unique. We’d love to hear your thoughts on this guide—feel free to leave a comment with your experiences and any suggestions for future articles! Happy crocheting!