
Half-Moon Bag Pattern is one of the most elegant and practical sewing projects for anyone who enjoys creating beautiful handmade accessories. Its smooth curved silhouette, comfortable shoulder opening, and spacious interior make it a favorite among beginners and experienced sewists alike. Whether you are making it for yourself, as a thoughtful gift, or even to sell at craft fairs, this timeless bag combines simplicity with sophistication. Throughout this guide, you will learn every essential step required to create your own Half-Moon Bag Pattern while improving your sewing skills and achieving professional-looking results.
Creating a handmade bag is much more than joining pieces of fabric together. Every stage, from selecting the fabric to pressing the finished seams, contributes to the overall appearance, durability, and comfort of the final project. A carefully planned Half-Moon Bag Pattern offers clean lines, balanced proportions, and a modern design that matches casual, elegant, and everyday outfits. The large opening makes it practical for daily use, while the rounded body provides generous storage without feeling bulky.
One of the greatest advantages of this project is its versatility. You can personalize your Half-Moon Bag Pattern using floral cotton, linen, canvas, denim, quilted fabric, or even lightweight upholstery materials. Small adjustments such as adding pockets, decorative stitching, magnetic closures, or contrasting linings allow every finished bag to become unique. In this tutorial, you will discover the complete process, useful sewing tips, common mistakes to avoid, finishing techniques, and professional recommendations that will help you create a beautiful handmade accessory from start to finish.
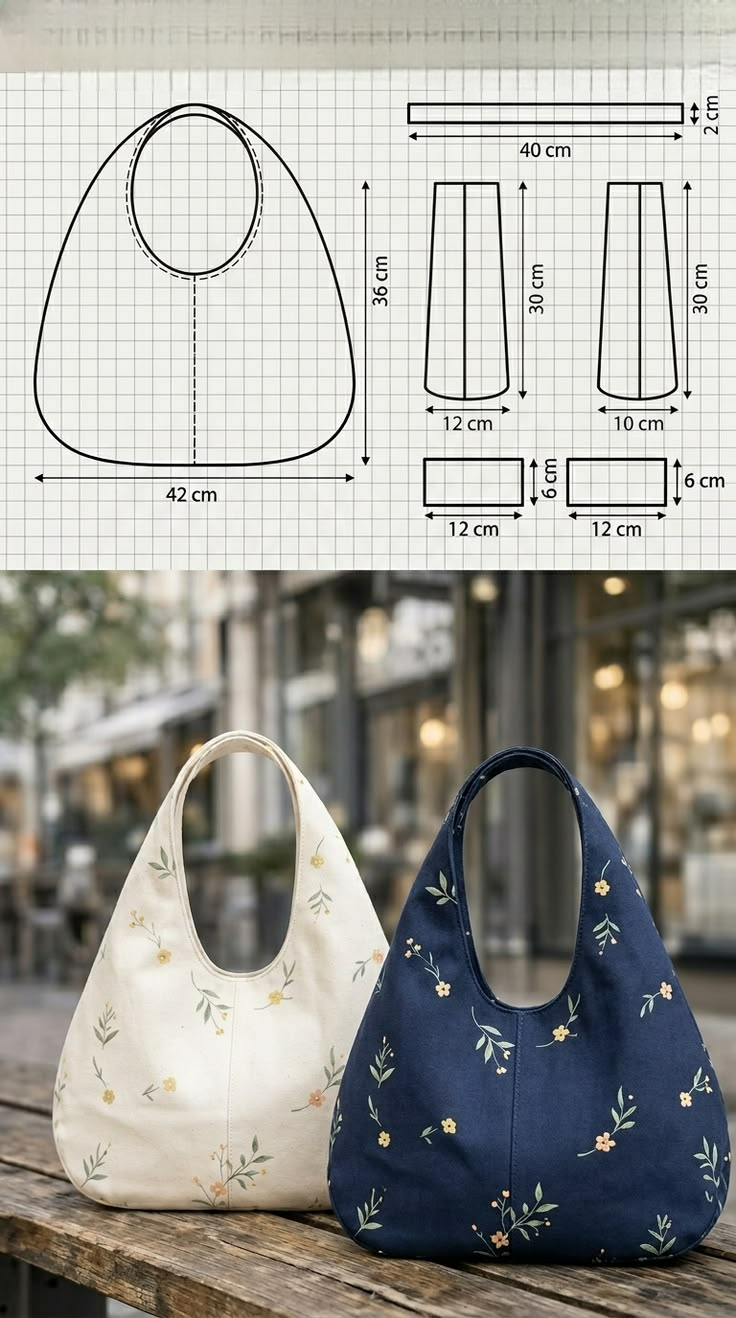
Choosing Materials for Your Half-Moon Bag Pattern
Before cutting your fabric, gathering the right supplies will make the sewing process much smoother. High-quality materials not only improve durability but also give your finished bag a refined appearance. Selecting fabrics that hold their shape well is especially important for this style.
For the exterior, medium-weight cotton canvas, linen blends, denim, or quilted cotton are excellent options. These fabrics provide enough structure while remaining easy to sew on most home sewing machines. Printed florals, minimalist solids, and soft botanical patterns all work beautifully with the elegant curves of the Half-Moon Bag Pattern.
The lining should be lightweight but durable. Cotton quilting fabric is one of the most popular choices because it is easy to sew, available in countless prints, and creates a clean interior finish. Choosing a coordinating lining adds a pleasant surprise every time the bag is opened.
Interfacing plays an important role in shaping the bag. Fusible woven interfacing provides gentle support, while foam stabilizer creates a more structured silhouette. The amount of stability depends on the final look you prefer.
Thread selection is equally important. A quality polyester thread offers excellent strength and flexibility for everyday use. Matching thread creates invisible seams, while contrasting thread can become a decorative design feature.
Finally, prepare your sewing tools before beginning. Sharp fabric scissors, clips or pins, measuring tape, rotary cutter, cutting mat, ironing board, steam iron, and a sewing machine equipped with a universal needle will make every stage more enjoyable and accurate.
Cutting and Preparing the Half-Moon Bag Pattern
Preparation is the foundation of a professional sewing project. Taking extra time during the cutting stage prevents many common sewing problems later in the process.
Begin by printing or tracing the Half-Moon Bag Pattern at full size. Verify every measurement before cutting your fabric. Symmetry is essential because even small differences may affect the final shape of the bag.
Prewash and press your chosen fabrics before cutting. This simple step prevents future shrinkage and removes wrinkles that could distort the pattern pieces. Smooth fabric always results in more accurate cutting.
Lay the fabric on a flat cutting surface and carefully align the grain. Position every pattern piece according to the recommended grainline. Secure each piece using sewing clips or pattern weights before cutting around the edges.
Transfer all important markings from the pattern. Center lines, notches, fold indicators, and placement guides help maintain alignment during assembly. These reference points become especially valuable when joining curved seams.
Cut the exterior fabric, lining, interfacing, and any optional pocket pieces separately. Keep every group organized to avoid confusion as you begin sewing. Labeling each component is particularly useful if you’re making multiple bags at once.
Fuse the interfacing according to the manufacturer’s instructions. Apply steady heat and allow each piece to cool completely before handling it. Properly fused interfacing gives the Half-Moon Bag Pattern its attractive structure while preventing bubbling or shifting during sewing.
Sewing the Half-Moon Bag Pattern Step by Step
Now comes the most rewarding part of the project—transforming individual fabric pieces into a finished handbag. Working methodically ensures accurate construction and clean professional results.
Start by sewing any interior pockets before assembling the main bag. Flat slip pockets or zippered pockets are much easier to install while the lining remains open. Reinforce pocket corners for additional durability.
Join the front and back exterior pieces with right sides together. Sew slowly around the curved edges using the recommended seam allowance. Curved seams benefit from consistent speed and careful fabric control.
Clip the seam allowances along the curves without cutting through the stitching. This technique allows the fabric to relax and creates a smooth rounded shape when turned right side out. Press the seams carefully after clipping.
Repeat the same process for the lining pieces. Leave a turning opening along the bottom seam of the lining. This opening will later allow the entire bag to be turned right side out after assembly.
Prepare the handle or integrated shoulder opening by attaching any facing or binding pieces. Stitch carefully around the curved opening, clip the curves, then understitch whenever possible. This prevents the lining from rolling outward during use.
Place the exterior and lining with right sides together. Stitch around the upper opening, ensuring all edges align perfectly. Turn the bag through the lining opening, close the gap with a neat stitch, push the lining inside, and finish with a crisp topstitch around the opening for a polished appearance.
Finishing Techniques and Creative Customization for Your Half-Moon Bag Pattern
Professional finishing transforms a simple sewing project into a high-quality handmade accessory. Small details make a remarkable difference in both appearance and durability.
Carefully press the completed bag using steam and a pressing cloth. Pressing sets the stitches, smooths the curves, and gives the Half-Moon Bag Pattern its elegant finished silhouette. Never skip this important step.
Decorative topstitching enhances both beauty and strength. A perfectly even topstitch around the handle opening and upper edge creates a refined professional finish while reinforcing high-stress areas.
Consider adding a magnetic snap, zipper closure, or fabric button loop depending on how you plan to use the bag. Secure closures help keep belongings safe while maintaining the clean aesthetic of the design.
Personalization makes every handmade bag unique. Embroidery, appliqué, quilting, decorative labels, lace trim, patchwork panels, or fabric painting allow endless creative possibilities without changing the core Half-Moon Bag Pattern.
If you plan to sell your finished bags, consistency becomes important. Use templates for accurate cutting, maintain identical seam allowances, and inspect every finished bag for loose threads or uneven stitching before presenting it to customers.
With regular practice, you can experiment by adjusting the size, adding boxed corners, increasing depth, incorporating interior dividers, or creating reversible versions. Mastering one Half-Moon Bag Pattern opens the door to countless original variations and future sewing projects.
FAQ About Half-Moon Bag Pattern
Is the Half-Moon Bag Pattern suitable for beginners?
Yes. The project is beginner-friendly because it mainly involves curved seams, basic construction techniques, and straightforward assembly. Patience during the curved stitching is the key to success.
What fabric works best for this bag?
Canvas, linen blends, cotton duck, quilted cotton, lightweight denim, and medium-weight home décor fabrics all provide excellent results while remaining easy to sew.
Should I use interfacing?
Absolutely. Interfacing gives the bag structure, improves durability, and helps maintain the rounded shape over time.
Can I add pockets?
Yes. Interior slip pockets, zippered compartments, and even exterior pockets can easily be incorporated before assembling the main body.
Can I resize the Half-Moon Bag Pattern?
Certainly. You may enlarge or reduce the pattern proportionally to create small handbags, medium everyday bags, or oversized tote-style versions.
What sewing machine needle should I use?
A universal size 90/14 works well for most medium-weight fabrics. For denim or heavy canvas, consider using a denim needle for smoother stitching.
How do I make the bag sturdier?
Use foam stabilizer, heavy fusible interfacing, reinforced stitching, and quality fabrics. Topstitching also contributes additional strength.
Can the bag be washed?
Most cotton and canvas versions can be gently hand washed if prewashed fabrics were used during construction. Always air dry to preserve the shape.
How long does the project usually take?
Beginners typically complete the project in three to five hours, while experienced sewists often finish it in one to two hours depending on customization.
Is this bag suitable for gifts or selling?
Yes. Its timeless design, practical functionality, and elegant appearance make it a popular handmade gift and an attractive product for craft markets and small handmade businesses.
In conclusion, this Half-Moon Bag Pattern tutorial demonstrated every essential stage required to create a beautiful handmade bag, from selecting the right fabrics and stabilizers to cutting accurate pattern pieces, sewing curved seams, assembling the lining, finishing the handle opening, and adding professional details.
You also learned valuable techniques for pressing, topstitching, reinforcing stress points, and customizing the design with decorative features that reflect your personal style. With patience and careful attention to detail, this versatile project can become one of your favorite sewing creations, suitable for everyday use, thoughtful gifts, or even small business production.