Crochet Crocs keychains – Tutorial is the ultimate fun, quirky, and rewarding project you can dive into today. If you have ever owned a pair of these famously comfortable foam clogs, you know exactly how much personality they hold, and translating that iconic style into a miniature, yarn-based accessory is pure crafting magic. Whether you want to deck out your own backpack, create a hilarious conversation starter for your keys, or stock up your craft fair booth with a high-demand item, this guide will walk you through every single step.
The beauty of working on a Crochet Crocs keychains – Tutorial is that it perfectly blends simplicity with high-impact results. You do not need to spend weeks on a complex blanket or hours deciphering an impossible garment pattern; instead, you get a burst of creative satisfaction in under an hour. Plus, these tiny masterpieces are incredible for utilizing those leftover yarn scraps you have been hoarding in your stash, making it an eco-friendly and budget-conscious project.
In this comprehensive guide, we are going to explore everything from selecting the perfect yarn and hook combination to mastering the specific stitches required for that signature clog shape. We will also cover how to customize your miniature shoes with tiny embellishments and securely fasten them to durable keychain hardware. Get your hooks ready, find a cozy spot, and let us jump straight into this delightful crafting adventure.
1. Choosing the Best Materials for Your Crochet Crocs Keychains
When diving into a Crochet Crocs keychains – Tutorial, selecting the right yarn is the foundation of your entire project. For a crisp, defined structure that mimics the shape of a real shoe, a 100% mercerized cotton yarn is highly recommended. Cotton yarn offers fantastic stitch definition, does not fuzz up over time, and gives the miniature clog the sturdiness it needs to survive being tossed around inside a bag or pocket.
Alongside your yarn, matching the correct hook size is absolutely crucial for achieving the perfect tension. For standard sport or lightweight cotton yarn, a 2.5 mm or 3.0 mm crochet hook works beautifully to keep your stitches tight and neat. Tight stitches ensure that the stuffing does not peek through the gaps, giving your crochet keychains a highly professional, store-bought finish that looks incredibly polished.
You will also need a few essential notions to round out your crafting toolkit before you begin stitching. Make sure to have a sharp pair of scissors, a blunt-tipped tapestry needle for weaving in your loose ends, and a handful of stitch markers to track your rounds. Since this project is worked in continuous spirals, a reliable stitch marker will save you from the headache of losing your place.
Do not forget the small details that transform a simple crochet shape into a fully functional accessory. You will need high-quality metal split rings or lobster clasps, along with some sturdy jewelry pliers to attach them securely to the heel strap. For the inside of the clog, a tiny handful of polyester fiberfill stuffing will help the toe box maintain its iconic, rounded volume.
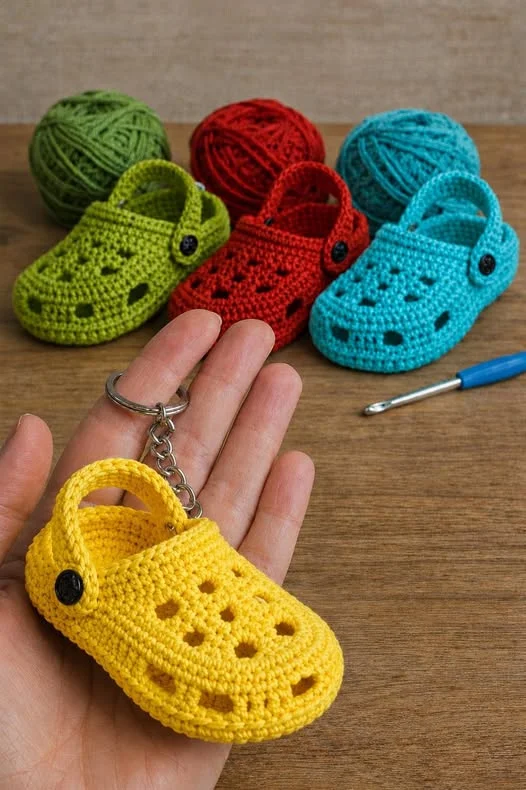
Color selection is where you can truly let your personal style and creativity shine through. Traditional clogs come in a massive array of vibrant hues, so feel free to experiment with bright neons, soft pastels, or classic neutrals. You can even use multi-colored variegated yarn to create a funky, tie-dye effect that makes your Crochet Crocs keychains – Tutorial project completely unique.
Lastly, consider how you want to display or gift your finished items once they are off the hook. Investing in some simple kraft paper backing cards can elevate your presentation, making them look like retail-ready handmade gifts. If you plan to sell these at local markets, having a cohesive color palette and neat packaging will instantly attract eager customers to your display.
2. Step-by-Step Stitch Guide for the Miniature Clog Base
To begin the actual construction of our shoe, we start by working the sole from the bottom up using basic stitches. You will kick off the pattern by creating a short foundation chain, and then you will work in rounds completely around both sides of that chain. This technique creates an oval shape that forms the perfect, flat base for your miniature footwear accessory.
As you transition from the sole to the sides of the clog, you will utilize the back loop only (BLO) technique for one round. Working into the back loops creates a sharp, distinct ridge that forces the crochet fabric to turn upward at a clean 90-degree angle. This simple structural trick clearly separates the bottom of the shoe from the upper body, establishing the realistic silhouette.
The main body of the clog is built using the trusty single crochet (sc) stitch, which provides a dense, durable fabric. To mimic the sloping shape of a real shoe, you will introduce strategic single crochet decreases (sc2tog) across the front half of the round. These decreases quickly taper the toe area, creating that instantly recognizable, bulky toe box that defines the clog style.
No clog would be complete without its signature swivel heel strap across the back of the shoe. To create this, you will attach your yarn to one side of the ankle opening, chain a short length, and slip stitch it to the opposite side. This creates a functional look, and you can secure it permanently with a tiny decorative button or a small stitch on either end.
One of the most important aspects of this Crochet Crocs keychains – Tutorial is creating the illusion of the famous ventilation holes. You can achieve this look by either working small chain spaces into the upper rounds or by using a dark embroidery thread to stitch tiny faux holes onto the top surface. This subtle detail instantly elevates the realism of your miniature project.
Once your stitching is complete, you will fasten off your yarn, leaving a medium-length tail for assembly. Use your tapestry needle to neatly weave the tail through the final round, pulling it tight to close any remaining gaps near the top if necessary. Ensure all knots are hidden inside the shoe body before trimming away any excess thread for a flawless appearance.
3. Assembling and Securing the Keychain Hardware
Transforming your freshly stitched miniature shoe into a durable, everyday accessory requires proper assembly and attachment techniques. Start by selecting heavy-duty keychain findings that can withstand the daily wear and tear of being attached to heavy sets of keys. Avoid flimsy jump rings that can easily bend open, opting instead for thick, double-looped split rings.
To attach the hardware, use jewelry pliers to carefully open a small jump ring and loop it directly through the crochet fabric. The best placement for the ring is either at the very back of the heel strap or through the top center of the heel rim. Ensure you catch at least two or three strands of yarn so the weight does not pull on a single thread and stretch it out.
If you want to add an extra layer of security, you can use a small drop of fabric glue or clear jewelry cement on the knot of your yarn attachment. This prevents the yarn from shifting or fraying over time due to the friction of the metal ring rubbing against the fibers. A secure connection guarantees your amigurumi keychain will remain safely attached for years to come.
For a more decorative and trendy look, consider adding extra charms alongside the main metal split ring. You can attach small tassels, colorful silicone beads, or even miniature faux tassels to the chain link to complement the color of your yarn. This adds movement and texture, making the finished accessory feel even more premium and customized.
Tension plays a huge role in how well your keychain hardware sits against the plush fabric of the miniature shoe. If your stitches are too loose, the metal ring will sag and pull the shoe out of shape when hung. Keeping your stitches firm and compact ensures the miniature clog retains its upright, crisp profile even when dangling from a heavy bag.
Before declaring your project finished, give the entire keychain assembly a gentle tug test to ensure everything is locked tight. Check that the jump rings are closed completely with no visible gaps where the yarn or chain could slip through. Taking these extra quality control steps ensures your handmade crochet accessories are durable, reliable, and built to last.
4. Customizing Your Crochet Clogs with Fun Embellishments
The absolute best part of completing a Crochet Crocs keychains – Tutorial is entering the personalization stage, where you can mimic real shoe charms. You can use thin embroidery floss to stitch tiny shapes like hearts, stars, or initial letters directly onto the toe box of the miniature shoe. This level of customization makes them incredibly thoughtful and personalized gifts for friends.
Another brilliant customization idea is to experiment with contrasting, vibrant colors for different parts of the miniature clog. Try making the heel strap a completely different neon color from the main body, or use a clean white yarn for the sole to create a sporty sneaker vibe. These color block variations keep the design fresh and allow you to create endless unique styles.
If you love a bit of sparkle, you can easily sew tiny sequins or small glass beads onto the surface of the crochet fabric. The beads catch the light beautifully and simulate the look of glitzy, glamorous shoe charms that are incredibly popular right now. Just ensure they are sewn on tightly with strong sewing thread so they do not snag on items.
For crafters who enjoy multi-media projects, you can even use polymer clay to sculpt microscopic charms to glue onto your crochet shoes. Miniature fruits, tiny animals, or abstract shapes can be baked, cooled, and affixed using strong fabric adhesive. This hybrid crafting technique sets your work apart and creates a truly eye-catching, unique conversation piece.
You can also adjust the overall sizing of your clogs by simply altering your yarn weight and corresponding hook size. If you use a thicker worsted weight yarn, you will get a larger, chunkier clog that works wonderfully as a statement bag charm. If you use ultra-thin embroidery thread and a tiny lace hook, you can create a delicate, microscopic version.
Do not be afraid to think outside the box and turn these little shoes into seasonal festive decorations as well. Swap out standard colors for festive reds and greens for Christmas tree ornaments, or use spooky oranges and blacks for Halloween bag tags. The versatility of this simple design makes it an evergreen pattern you can return to all year long.
FAQ
What is the best type of yarn for this project?
The best yarn to use is a 100% mercerized cotton yarn in a sport or lightweight category. Cotton provides excellent structure, crisp stitch definition, and does not pill or fray easily, which keeps your miniature keychain looking clean and professional over extended periods of daily use.
How long does it take to crochet one miniature clog keychain?
For an intermediate crocheter, a single miniature shoe takes approximately 30 to 45 minutes to complete from start to finish. This quick turnaround time makes it an ideal project for last-minute gifting, satisfying weekend crafting sessions, or building up large amounts of inventory for market stalls.
Can beginners complete this crochet tutorial successfully?
Yes, this project is highly accessible to confident beginners who are comfortable with working in the round and executing basic increases and decreases. If you know how to make a chain, a single crochet, and a slip stitch, you have all the foundational skills required to follow along smoothly.
Do I need to stuff the miniature shoe with fiberfill?
A very small amount of polyester fiberfill stuffing is highly recommended to fill out the front toe box area of the clog. This helps the shoe hold its iconic, rounded shape and prevents it from collapsing or flattening out when it is compressed inside pockets or bags.
How do I clean my crochet keychain if it gets dirty?
Since keychains are handled frequently, they can accumulate dirt over time. To clean your miniature shoe, hand wash it gently in cool water using a mild soap, reshape it carefully with your fingers while damp, and lay it flat to air dry completely before reattaching your keys.
Conclusion
In this Crochet Crocs keychains – Tutorial, we have covered everything from picking out the stiffest cotton yarns to mastering the structural stitches needed to form the iconic clog silhouette.
We explored how to securely mount heavy-duty keychain hardware and touched on endless fun ways to embellish your miniature creations to match your unique style. These pocket-sized projects are not only an excellent way to clear out your yarn scraps, but they also bring a joyful, lighthearted touch to your daily accessories.